How to grow ginger anywhere – cool zones, pots, and more!

Tyrant Farms' articles are created by real people with real experience. Our articles are free and supported by readers like you, which is why there are ads on our site. Please consider buying (or gifting) our books about raising ducks and raising geese. Also, when you buy through links on our site, we may earn an affiliate commission. Learn more
Ginger (Botanical Name: Zingiber officinale) is one of the world’s most popular culinary and medicinal herbs. In this growing guide, you’ll find out how to grow ginger no matter where you live: warm climates, cool climates, in pots, indoors…
You’ll also discover many unique qualities and health benefits of “baby ginger,” which can be grown much faster than mature ginger! Use the links below to jump right to the specific section you’re interested in or read the whole article.
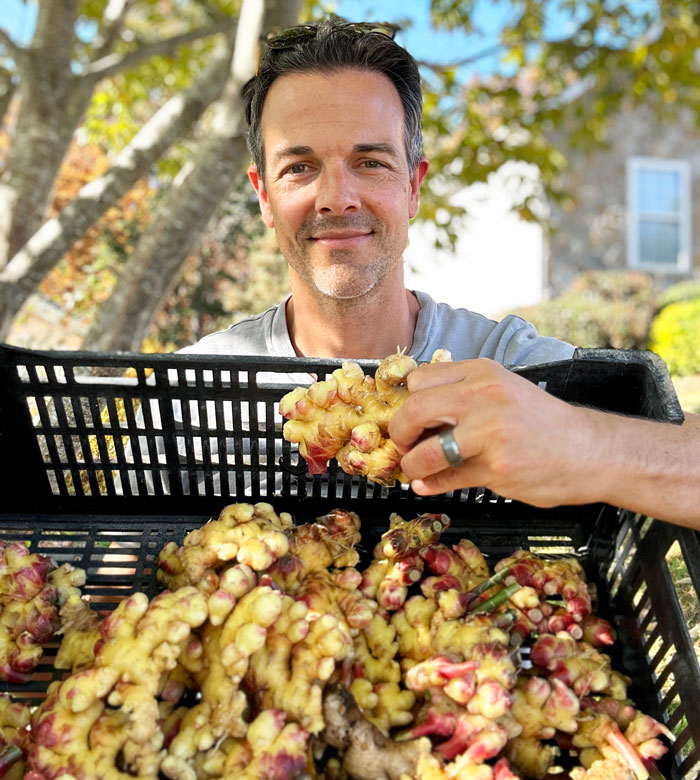
Table of contents:
Basic facts you should know about ginger
Why you should grow and eat “baby ginger”
How to get “seed” ginger
How to grow ginger in your garden: the basics
7 tips for growing ginger in cool zones
7 tips for growing ginger in pots
6 tips for growing ginger indoors
8 ginger harvesting tips
5 ginger storage tips
Ginger FAQs
I. Ginger: Basic facts you should know
Ginger (Zingiber officinale) is native to moist tropical and subtropical forests of Southeast Asia, where it grows primarily as an understory plant. Due to its popularity as a food plant, ginger is now cultivated worldwide far outside of its native range, including in the United States.
It’s a relatively easy plant to grow — even in cooler climates, in pots, or indoors.
All parts of the ginger plant are edible, including the leaves and stems. However, ginger rhizomes are the part primarily used for culinary and medicinal purposes.
Rhizomes vs roots: what’s the difference?
Rhizomes are NOT the same thing as roots. A ginger rhizome is essentially a modified underground stem with nodes and internodes that grow horizontally under the soil surface. True roots grow vertically down into the soil from the rhizome, and green leafy shoots (pseudostems) will develop from the top of the rhizome.
Ginger hardiness zones
Ginger is hardy from USDA Zones 9-12, but there are lots of caveats to this basic fact, which we’ll detail below.
How long does it take to grow ginger?
Most advice about how long it takes to grow ginger is for mature rhizomes, like the ones you get in the grocery store. Mature ginger rhizomes require 10-11 months to grow, which doesn’t give growers in cooler climates enough time to grow them in-ground.
Thus, people interested in growing ginger in cooler climates typically grow it in pots, so the plants can be moved to a sheltered spot and allowed to continue growing as the weather cools.
Only want to grow MATURE ginger?
- Zones 9+ – Grow ginger in ground.
- Zones 8 or lower – Either: a) for in-ground growing, start your plants indoors months ahead of your last frost and transplant outdoors after your last frost date, or b) grow ginger in pots.
Baby ginger: a game-changer for aspiring ginger growers
“Baby” ginger refers to immature ginger rhizomes. Unlike mature ginger, baby ginger can be grown in as little as 6-7 months, meaning far more people in cooler climates can grow it in-ground.
II. Why you should grow and eat “baby ginger”
In addition to it taking fewer months to grow, here are six other benefits of baby ginger compared to mature ginger:
1. You can’t find it in grocery stores.
Rarity plus desirability equals value. That’s why every farmer tries to be the first to market with their tomatoes. Or why De Beers (the diamond company) only releases a small fraction of the diamonds they mine each year while concurrently convincing everyone that these relatively common gemstones are the symbol of love. Cha-ching.
We’ve never seen baby ginger in a grocery store, but we’ve never NOT seen mature ginger in a grocery store. (I just heard a collective scream from all my old English teachers because of that sentence.)
Point being: we think baby ginger is far better and more valuable than mature ginger. And for most people, the only way to get it is to grow it yourself. (No, baby ginger can not be used as a wedding ring.)
2. Less fibrous
Mature ginger rhizomes are tough and woody due to the development of strong fiber strands. Thus, it’s fairly difficult to cut or bite into a mature ginger rhizome.
However, baby ginger is not nearly as fibrous. It’s more crispy and crunchy with a texture more akin to a crunchy apple than a mature ginger rhizome. A knife easily slices right through baby ginger, making it easy to grate, cut into matchsticks, etc.
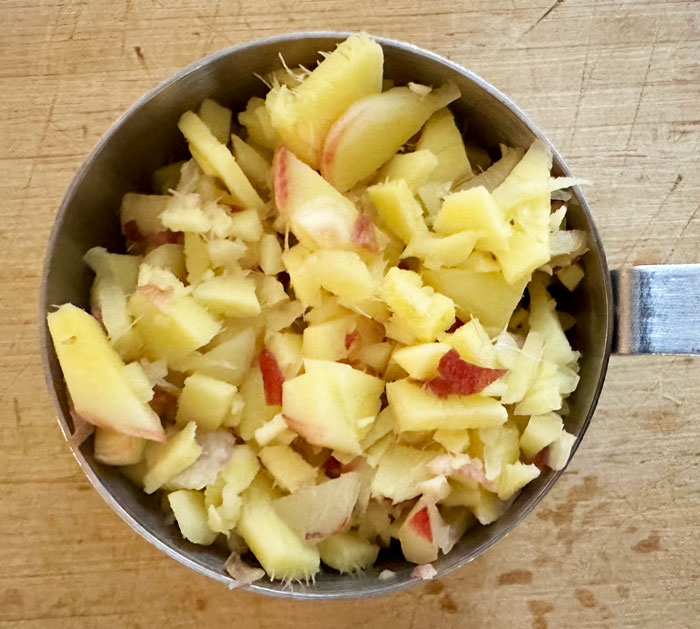
3. Thinner skin
Before using mature ginger rhizomes in the kitchen, you have to peel off the thick outer skin.
However, baby ginger’s skin is so thin, you can typically just leave it on when slicing it and using it in recipes. Or you can easily slide the skin off the rhizomes with your fingernails by scraping it under running water.
4. Not as intensely flavored
Mature ginger has a far stronger flavor than baby ginger. Granted you still won’t want to munch on baby ginger rhizomes whole, but their lower flavor potency is a big benefit for most uses.
5. Better for recipes
Given the benefits listed above, you can see why it’s easier to use baby ginger versus mature ginger in recipes. Summer rolls, ramen, candied ginger, etc — for pretty much any recipe we know of, baby ginger is superior than mature ginger.
6. More nutritious and medicinal
Baby ginger is more nutritious and has higher levels of medicinal compounds compared to mature ginger.
Researchers at Virginia State University found that baby ginger “contains about twice as many polyphenols and has two to three times more antioxidation activity than the mature ginger found in most grocery stores.”
In their research paper’s abstract, the scientists also conclude:
“Our results suggest that harvesting ginger at an appropriate (early) time may be beneficial for optimizing its biological active contents and qualitative properties. The data also suggest that a regular use of ginger can potentially lower incidences of obesity and diabetes.”
III. How to get “seed” ginger
Unlike many other common edible garden plants, ginger is not grown from actual seeds. Rather, new plants are grown from pieces of the previous growing season’s rhizomes, which are sometimes referred to as “seed ginger.” (Other names: ginger seed, seed rhizome, and mother.)
The good news: once you start growing your own ginger, you can continue to grow it for as many years as you want by saving rhizomes from the previous year to plant the following year. Yes, stored in a cool, dry place out of sunlight, even baby ginger can easily last for 6 months or more, until it’s time to plant again.
But where do you get your very first seed ginger to get started?
Tips for getting seed ginger
You can get seed ginger from either: a) a grocery store, or b) a specialty grower/retailer. We’ve done both.
Option 1: Grocery stores
The easiest and most affordable way to get seed ginger is to buy store-bought ginger rhizomes from a nearby grocery store. If you go this route, try to get certified organic ginger.
Why organic? Conventionally grown ginger is often treated with a post-harvest growth inhibitor to prevent it sprouting before use and to extend its shelf life. Certified organic ginger is untreated.
When selecting your rhizomes, look for the largest, fullest pieces and avoid smaller, desiccated ones.
Option 2: Grower/retailer
The benefit of buying seed ginger from a grower/retailer is that you may be able to find more unusual ginger varieties than you’ll find at a grocery store.
For instance, we love ‘Bubba Baba’ ginger, a hybrid whose rhizomes mature to a striking blue color.

IV. The basics: How to grow ginger in your garden
Now that you have your seed ginger, let’s cover the basics of growing ginger in your garden!
When do you plant seed ginger?
When is the best time to plant seed ginger? When there are sustained soil temperatures close to 70°F (21°C) or higher, otherwise they won’t break dormancy. (You can check your local soil temps here.)
We’re in USDA zone 7b and our last frost date is mid-April. In warm years, we’ll put our ginger in the ground in late April; in cool years, we won’t put it in the ground until early May. For us (zone 7b), there’s no reason to put our seed ginger in the ground in early spring because it will just lay there, dormant, and could get injured or killed by a late freeze.
If you want to get a jump on the season to grow either mature or baby ginger, you can start your ginger indoors in smaller nursery pots filled with dampened potting soil, then transplant them outdoors once soil temperatures are ideal.
How do you prepare seed ginger for planting?
Each large ginger “hand” contains multiple “fingers.” Botanically, the fingers are called nodes and each node is comprised of internodes covered with thin papery scales.
Usually, grocery store ginger and seed ginger has already been cut into smaller nodes, and each node can be planted as-is to grow into a new ginger plant. However, if you’re starting with a large hand of homegrown ginger, you can cut or pull off the individual fingers just before planting.
Should you pre-soak ginger before planting?
Some people pre-soak their seed ginger for 12-24 hours before planting. This is not necessary for growth, but may help remove chemical growth retardant sprayed on conventional ginger.
Thus, there’s no need to pre-soak if you’re using certified organic and/or homegrown ginger.
Sowing depth:
When planting your seed ginger, lay each piece flat about 1″ below the soil surface.
Plant spacing:
Plant each ginger node to allow for about a 10″ diameter growing zone around the plant. In a single standard 30″ wide home or market garden bed, you can get two rows of ginger. Offset/stagger them to allow for ideal spacing.
Soil and moisture requirements:
- Soil – Ginger will grow best in rich, well-draining loamy soil that is kept damp but not wet. Ideally, you can amend your soil with high quality compost and/or worm castings before planting or top-dress the beds after planting (for no-till systems). Otherwise, add a quality organic slow-release fertilizer. A soil pH between 5.5–6.5 is ideal for ginger.
- Water – In the summer, ginger will need about 1″ of water per week for optimal growth. Don’t over-water or you can rot the rhizomes and roots. That also means you need to turn off your irrigation when rain is plentiful!
- Mulch – It’s a good idea to mulch the soil surface over and around your ginger with 1-2″ of dead organic matter immediately after planting. Spent duck or chicken bedding, wood chips, or chopped leaves all work great
Mulch adds fertility and protects your soil ecosystem, reduces/eliminates weeds, optimizes soil moisture levels, and reduces soil temperature fluctuations. Yes, the emerging ginger shoots can punch right through the mulch.
How long does it take ginger to sprout?
Ginger can take a long time to break dormancy and sprout. Expect anywhere from 2-4 weeks for new shoots to be visible above the soil surface, depending on whether the soil temperatures are ideal. Be patient!
Plant height:
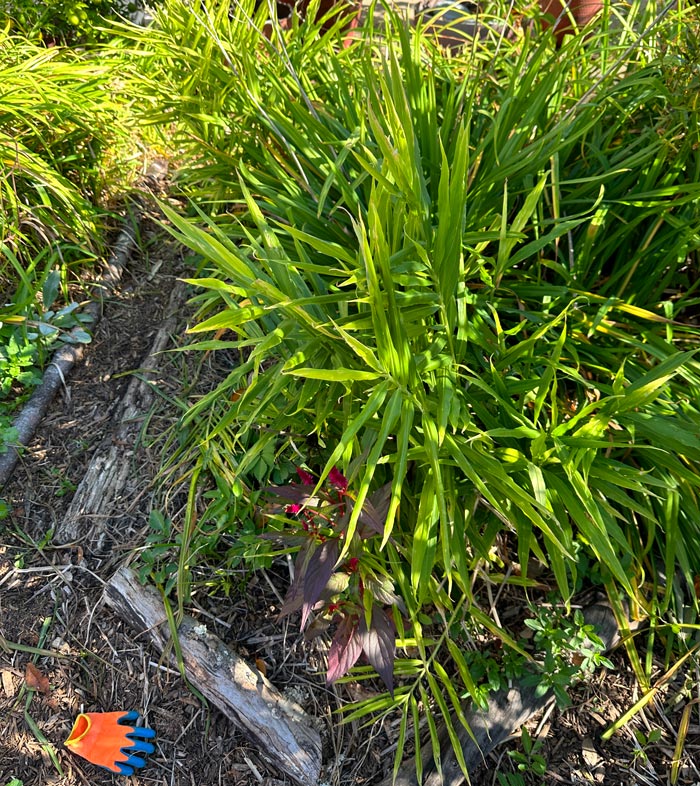
Ginger matures to a height of 2-3′. Each plant takes up little space in a garden, and you can easily tuck ginger plants throughout a home landscape amongst your ornamental plants.
Light requirements:
Ginger grows best with about 4-6 hours of direct sunlight, so long as the direct sunlight comes in the morning and/or late afternoon. It prefers dappled/partial shade during midday, although it can tolerate more direct sun in cooler, northerly climates. Ginger will not grow well in full shade.
If those light conditions are hard to meet, consider interplanting ginger amongst larger plants which can provide protection from the midday sun. For instance, when I was growing ginger and turmeric commercially, I’d interplant ginger with turmeric so that the large, tall turmeric leaves (which do fine in full sun) would provide midday shade for the smaller ginger plants.
Maintenance:
Compared to most other edible plants, ginger is very easy to grow. It doesn’t require trimming, support, training, etc, and even strong winds won’t blow the plants over due to the shape of the leaves and the growth habit.
Other than maintaining adequate soil moisture, the only thing we’d recommend doing for maintenance is adding another layer of compost and/or mulch over top the developing ginger rhizomes about half way through the growing season as they start to pop through the soil surface. This step will result in more and larger rhizomes.
Pest and disease control:
Pests and insects generally don’t bother ginger grown outdoors. It’s even deer-resistant and vole-resistant!
This general rule might not hold quite as true if you’re growing ginger indoors, where there aren’t predatory insects to help hold the pest insects in check. We’ll discuss this topic more in our “growing ginger indoors” section below.
V. Growing ginger in COOL growing zones: 6 tips
Here, we’ll define “cool” as zones 6 or lower. Here are seven ginger growing tips for cool zones:
Tip #1: If you’re growing in-ground, aim to grow baby ginger (which takes 6-7 months) NOT mature rhizomes (which takes 10-11 months).
Tip #2: If you want to grow ginger in-ground, start your ginger indoors then transplant it outdoors to buy yourself at least a 6 month growing season. Shooting for 7-8 months is better though to accommodate sprouting time and potential slower growth rates in cooler climates.
Tip #3: If you’re determined to produce mature ginger rhizomes, grow your ginger in pots, from start to finish. Commercial growers unconcerned about aesthetics can use grow bags, but home growers will probably prefer something more attractive, like ceramic pots.
Tip #4: If you’re a cool climate farmer, you might consider growing your ginger in high tunnels. If you’re a cool climate gardener, you might consider starting and finishing your ginger under low tunnels or cold frames. This will help you start your ginger earlier and keep it in the ground longer, potentially extending your growing season by 4-6 weeks or more.
Tip #5: Don’t worry about providing midday shade for your ginger, unless there’s a heat wave where daytime high temperatures exceed ~92°F (33°C) for multiple days.
Tip #6: If growing ginger in pots, sprinkle an organic slow-release fertilizer on top of the soil surface every 4-6 weeks to ensure the plants get the nutrients they need for optimal growth. For a fast boost, you can use a liquid fertilizer such as kelp emulsion, fish emulsion, or homemade “liquid gold” (ha!).
Tip #7: Keep your soil lightly damp, not wet. The consistency of a wrung-out sponge is ideal. Wet soil will eventually rot ginger. If the soil is consistently dry, the plants won’t develop large rhizomes.
VI. Growing ginger in POTS: 7 tips
Here are seven tips for success if you’re planning to grow ginger in pots:
Tip #1: Select a wide, shallow pot/container that provides ample room for the ginger rhizomes to spread. (Remember, the rhizomes develop horizontally under the soil surface.) The best container for growing ginger is a pot that is at least 12 inches deep x 12″ wide (for a single plant).
Tip #2: To maintain ideal soil moisture, consider using sub-irrigated planters
Tip #3: Never grow ginger (or any other plant) in pots that don’t have holes in the bottom which allow for water drainage.
Tip #4: Only use high quality potting soil, NOT regular gardening soil which will become compacted. Our favorite: Fox Farm’s Happy Frog organic potting soil.
Tip #5: Put a 1″ – 2″ layer of mulch on top of the soil surface.
Tip #6: Ginger is considered a relatively heavy feeder. You’ll need to sprinkle an organic slow-release fertilizer on top of the soil surface every 4-6 weeks to ensure the plants get the nutrients they need for optimal growth when growing in containers/pots.
Tip #7: Ginger thrives in soil temps ranging from 70°F (21°C) – 80°F (27°C). For optimal growth, move your outdoor potted ginger into an indoor sunny spot when daytime temperatures are below 55°F (13°C). Likewise, move pots into a spot where they’ll get midday shade (or into an indoor sunny spot) when temps are over ~92°F (33°C).
VII. Growing ginger INDOORS: 6 tips
Obviously, to grow ginger indoors means you have to grow ginger in pots. Thus, all of our tips for growing ginger in pots (listed above) apply to growing ginger indoors as well.
Here are six additional tips for growing ginger indoors:
Tip #1: Put appropriately sized plant saucers under your pots to catch any water or soil that comes out.
Tip #2: Only attempt to grow ginger indoors directly in front of a sunny, south-facing window. Even then, coatings on modern windows might filter out too much sunlight to provide adequate light for ginger plants.
Tip #3: Don’t have a sunny south-facing window? Have windows that filter out too much sunlight? Use grow lights. Tripod grow light systems are ideal since you can adjust the height and direction of the lights.
Tip #4: If and when possible, put your potted ginger plants outside whenever temperatures allow. Over 55°F (13°C) and under 92°F (33°C) is ideal range. Keep in mind that if your ginger plants have never been in direct natural sunlight before, you’ll need to slowly acclimate them before leaving them outdoors for extended periods of time, aka “harden them off.”
Tip #5: Spider mites, aphids, and scales can proliferate and harm ginger plants that are grown indoors, even though these pests are almost never a problem for outdoor plants. Solution: use organic insecticide sprays to both prevent and treat pest insect infestations. Prevention recommendation: briefly move potted ginger outside (or into bathtub) once per month to apply a neem oil spray to the leaves.
Tip #6: Ginger likes moisture and humidity. Hopefully, your home is not moist and humid, so you’ll want to mist the foliage on your ginger plants every few days to accommodate.
VIII. 8 ginger harvesting tips
Harvest time! Here are eight helpful tips when it’s time to harvest your ginger:
Tip #1: WHEN you harvest will depend on whether you’re growing baby or mature ginger rhizomes:
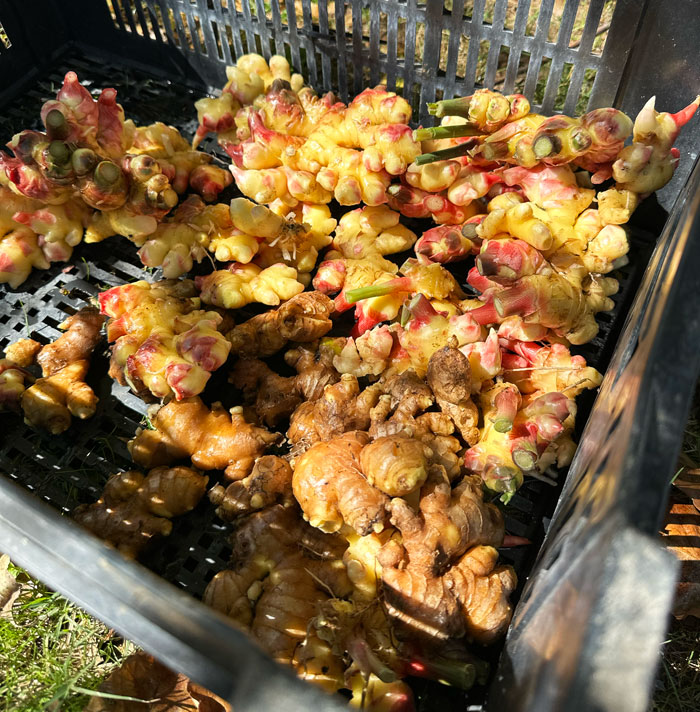
- Baby ginger can be ready to harvest within 6-7 months after sowing. The plants’ leaves will still be green and vibrant when you harvest baby ginger.
- Mature ginger takes 10-11 months before it’s ready to harvest. The plants’ leaves will start to wilt and yellow in preparation for dormancy when you harvest mature ginger.
Tip #2: Don’t leave ginger plants in the ground if temperatures are projected to drop below about 30°F (-1°C). Otherwise, the rhizomes could be damaged, especially if they’re not protected by a layer of soil and mulch.
What if there’s a danger of a frost? 36°F (2°C) is when frost starts forming. That temperature will burn ginger’s foliage if it’s uncovered, but won’t harm the rhizomes, especially if they’re covered by a layer of mulch. If you’re trying to buy more time before harvest, cover your plants through a frost and hope for warmer weather on the other side!
Tip #3: If: a) cold temperatures aren’t forcing you to harvest your ginger, and b) you’re not sure your ginger is ready to harvest, you can check the rhizomes’s development without harvesting them. Carefully move the mulch and soil away from the base of the plant to examine a section of the rhizomes. If the rhizomes are plump and firm, they are ready to be harvested.
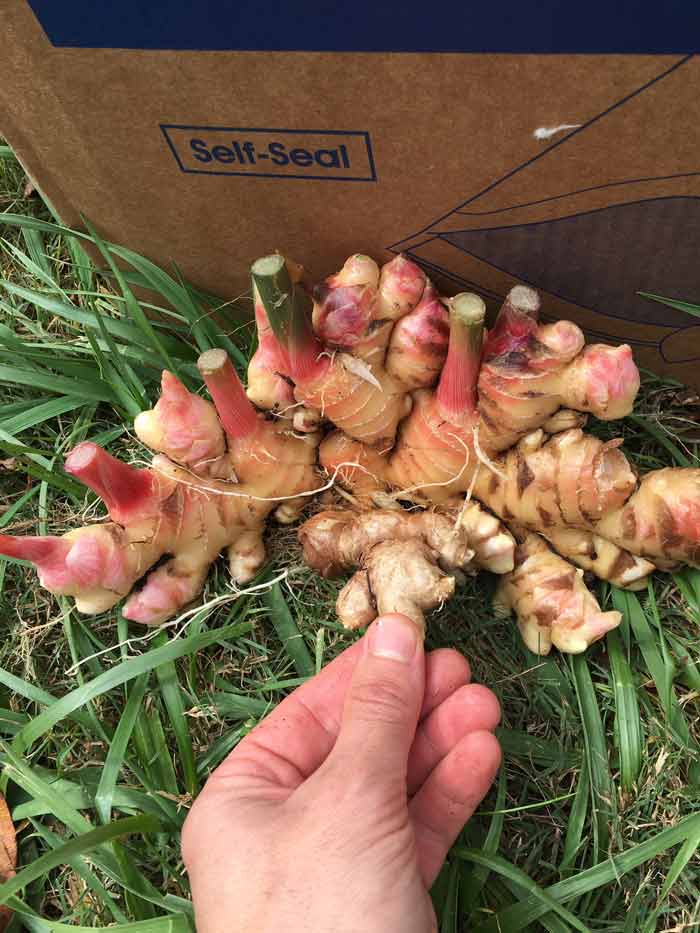
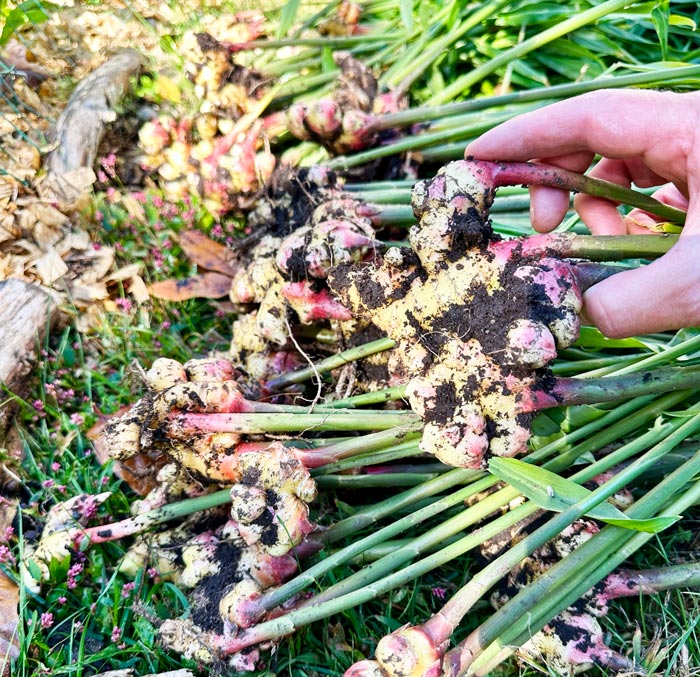
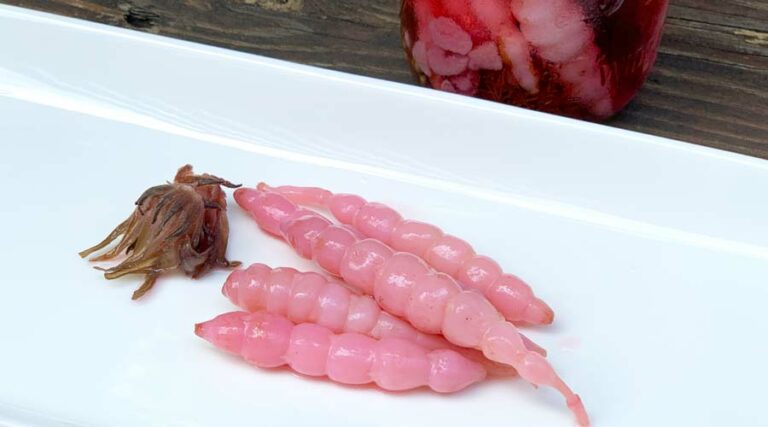
Baby ginger will feature vibrant yellow and pink colors. Mature ginger will be brownish-tan in color.
Tip #4: This tip is for gardeners in warm or tropical climates only, zones 9+. You don’t actually have to harvest your whole ginger plant. Instead, you can leave it in the ground and treat it as an herbaceous perennial plant. Any time you need ginger, just cut off and dig up as much of the rhizome as you need.
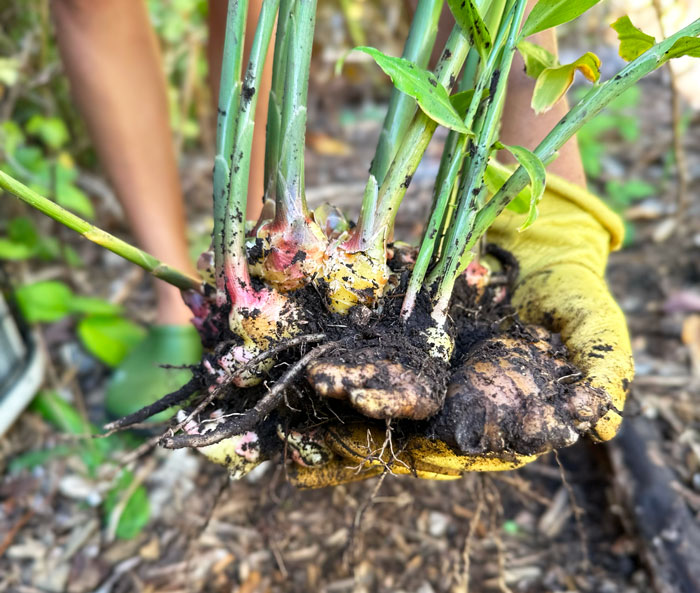
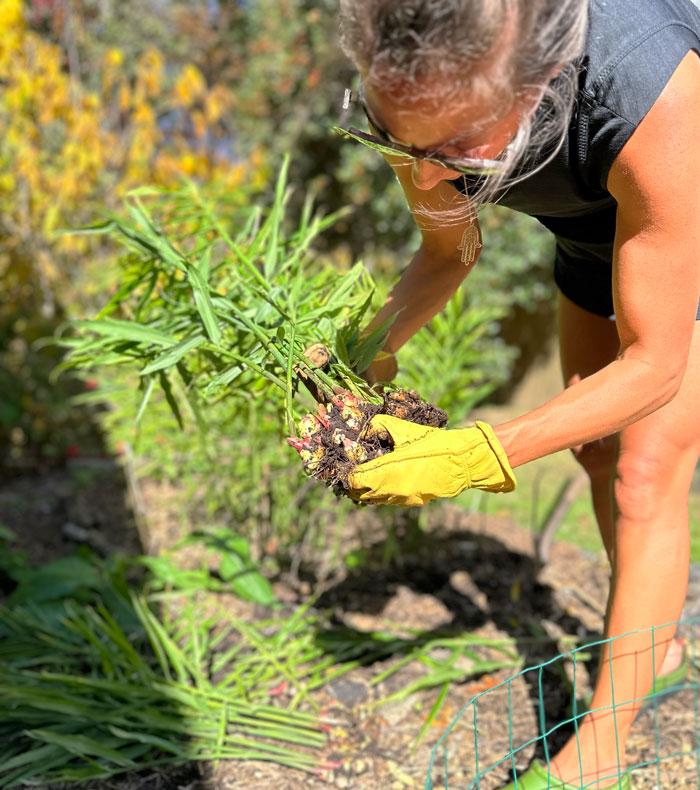
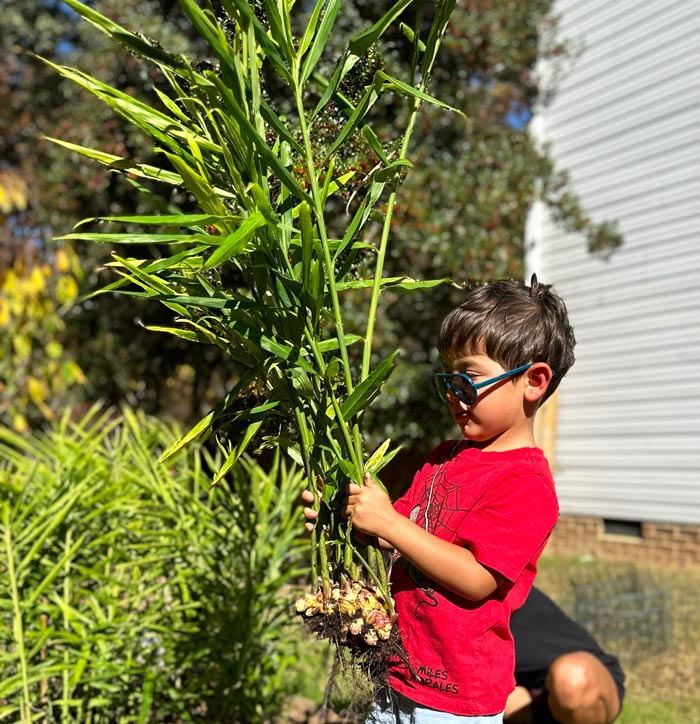
Tip #5: When harvesting ginger your first time, brush back the soil so you can see how far out horizontally the rhizomes extend. Then use a large shovel or spade to dig under and pry up the whole plant while also pulling upward on the green ginger stalks with your other hand. The entire plant should pull right out.
Once you have some harvesting experience, you’ll develop and intuition about where to position your shovel without having to pull back the soil first.
Tip #6: After removing the plants from the soil, cut the green stalks with sharp pruners at the base just above the rhizomes. These are quite tasty to chew on as you work and some people also chop and dry ginger stalks and leaves for use in tea. (When raw, the stalks are juicy and have a very mild ginger flavor that’s not nearly as intense as the rhizomes.)
Also, now is the time to prune off any roots emerging from the base of the rhizomes.
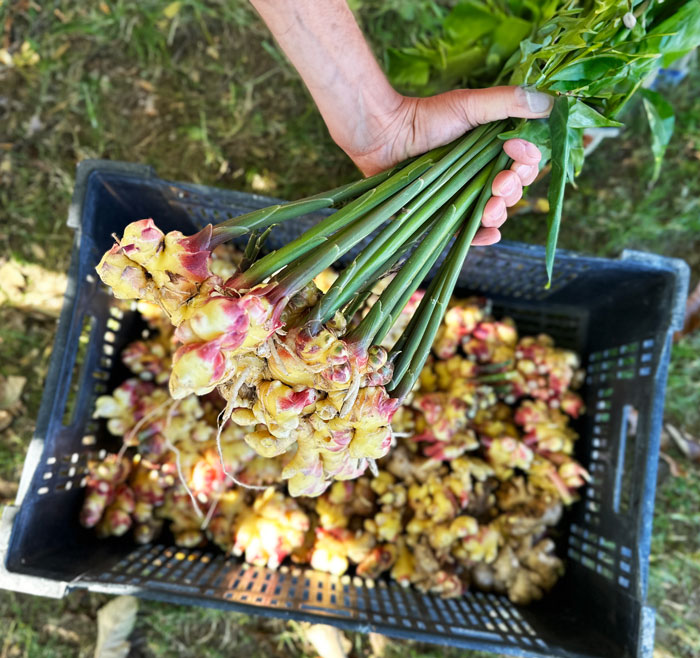
Tip #7: Next step: immediately rinse and scrub your ginger rhizomes with a garden sprayer to prep them for storage. Some people recommend letting the rhizomes dry out before cleaning them, but we find it’s way easier to clean them as soon as possible after harvest.
Also, be sure to clean the rhizomes outside over a garden bed because there are likely to be a lot of earthworms stuck in amongst the rhizomes and roots. Worms love nibbling on ginger root exudates and you don’t want to wash these helpful garden friends down the drain!
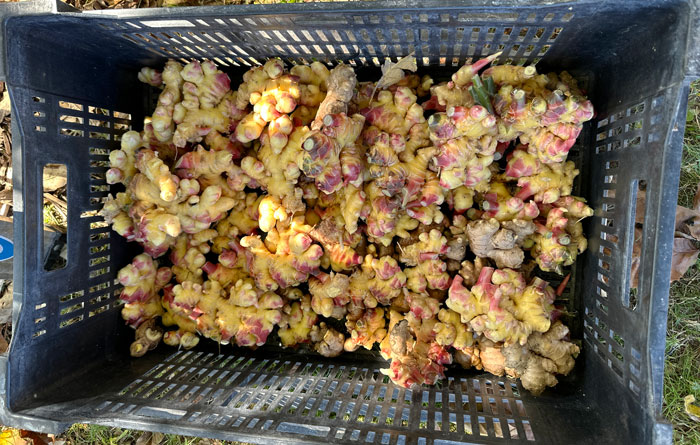
Tip #8: Let your ginger rhizomes dry (out of the elements) for at least 48 hours before storing them. Ideally, you can elevate them on a drying rack or something similar to allow airflow underneath.
IX. Ginger storage tips
Are your ginger rhizomes (baby or mature) cleaned, dried and ready for storage? Great!
Here are 5 tips for storing your homegrown ginger:
Tip #1: Keep the rhizomes whole – the larger the piece of ginger, the better for long-term storage/viability. Breaking your ginger “hands” into smaller pieces gives more surface area and openings for moisture to escape, which reduces shelf life.
If there are just a few accidental cuts or openings made during harvesting and processing, don’t worry. Those will soon scar over.
Tip #2: Store ginger in breathable containers. Examples: open cardboard boxes or wire totes. Wire shelves work great too.
Tip #3: Place the rhizomes in a single layer, not in a pile.
Tip #4: Store them in a cool, dry, dark place.
Tip #5: Don’t eat it all! Be sure to save enough for next year’s seed ginger.
As mentioned previously, if stored in a cool, dry place out of sunlight, even baby ginger can last for 6 months or more, until it’s time to plant again.
X. Ginger FAQs
Answers to common questions about ginger:
Is ginger medicinal?
A review of available research studies on the various medicinal benefits of ginger found that ginger has medicinal properties. The plant’s potent antioxidant compounds are anti-inflammatory, anti-nausea, and anti-carcinogenic. Plus, these compounds have cardiovascular benefits and other disease-preventing effects.

Can ginger overwinter in-ground?
Ginger can overwinter in-ground in zones 9-12. In mild winters and under heavy mulch, it may be able to overwinter in zone 8, but it’s safer to store the rhizomes indoors instead.
Can you eat ornamental ginger?
There are lots of species of ornamental gingers in the Zingiber family. Some contain edible parts, some don’t. Before considering eating a ginger family plant, make sure you know the exact species and have credible sources citing its edibility.
Can you eat the “wild ginger” native to the eastern United States?
In our area, there’s a native wild ginger, Asarum canadense. This plant is not a true ginger, even though it was once used as a ginger substitute.
However, it shouldn’t be eaten since it contains toxic, carcinogenic compounds.
Can you grow ginger in water?
Technically, yes. However, ginger grow only in water won’t get any nutrition and will eventually die. Ginger grown hydroponically can get a slurry of fertilizer in the water, but it won’t be as nutritious or flavorful as ginger grown in rich soil that is teeming with beneficial microorganisms.
Can you eat ginger flowers?
Edible ginger (Zingiber officinale) may start to develop flower stalks and flowers after ~7 months. These attractive flowers are edible and offer a subtle ginger flavor. Note: Flowers from other species of ginger may not be edible.

We hope our guide to growing ginger anywhere was helpful for you!
KIGI,


Hi! My pot grown ginger plants have pencil-size tubers growing down from nice size rhizomes. Can you please tell me what I’m looking at here? Thank you very much and have a great day!
Hi Terry! Those are the roots of the ginger plant. The rhizome (the part of the plant you buy in the grocery store) isn’t actually a root, even though it’s often incorrectly called “ginger root.” Rhizomes are actually modified underground stems. They’re technically edible, but most people just trim them off the rhizomes after harvest.