Winter gardening with low tunnels
Tyrant Farms' articles are created by real people with real experience. Our articles are free and supported by readers like you, which is why there are ads on our site. Please consider buying (or gifting) our books about raising ducks and raising geese. Also, when you buy through links on our site, we may earn an affiliate commission. Learn more
[divider top=”no” size=”2″]
For most areas of the United States, winter gardening is easy to do and full of delicious rewards.
[divider top=”no” size=”2″]
We live in Agricultural Zone 7B on the outskirts of Greenville, SC, at the base of the Appalachian Mountains. This area is considered a moderate/average climate region: not too hot, not too cold. Goldilocks would like it here.
We love all-season gardening, including winter gardening, since it gives us the opportunity to taste each season. We can tell the time of year based on what’s on the dinner table. This practice provides quite a bit of dietary diversity, while allowing us to more richly experience earth’s journey around the sun.

Many gardeners actually enjoy fall and winter gardening more than spring and summer gardening. Why? Plant diseases and pest insects are virtually non-existent. Plus, if you live in an area that gets rain once every 7-10 days like we do, you probably won’t need to irrigate at all once your cool weather garden plants are older than shallow-rooted seedlings.

Resilience: The Key to a Successful Garden In Any Season
With extreme weather becoming the new norm, extreme cold, hot, drought, floods, etc. are becoming more and more common experiences for gardeners and farmers alike. If your farm’s or garden’s productivity is directly tied to what’s happening outside, you tend to notice these things a bit more than the average person.
Over the past few years, we have personally experienced many weather extremes: an extreme 150 year drought that brought forest fires; hail and nearby tornadoes; temps well over 100 degrees; and in the winter, temps that we could count on one hand.

For gardeners and farmers, this means we all need to place an increased focus on designing “resilience” into our systems year round. In our opinion, the four critical factors to designing a resilient agroecosystem are:
1. Soil health
Probably the most important factor is building biologically active soil that is teeming with beneficial, microbial life. Combinations of cover crops, mulches, hot/Berkeley compost, and/or compost teas are the methods we use to promote biological soil health.
Healthy soil is critical for feeding your plants, nutrient & water cycling, and keeping pathogenic microorganisms under control. Conversely, unhealthy plants fed synthetic nitrogen fertilizer are magnets for pest insects and disease-causing pathogens.
2. Plant biodiversity
If one crop fails, you’ve got plenty of others to fall back on. Plus, it’s been proven again and again and again that plant biodiversity equates to better system performance and the ability of that system to endure extreme weather events.
3. Plant selection/breeding
Selecting plants that are both ideally suited to your changing growing conditions/climate region and “tough” plants that can survive various environmental stresses and extremes.
That means:
- Local/regional breeding wherein plants can be quickly adapted to your specific growing region (becoming good at seed saving); and
- using organic seeds whose parents pass on helpful pest/disease response information via their epigenome.
4. Technology
You’ve probably noticed that humans are very good toolmakers. Gardeners might not have to be as high tech as a large scale organic farm operator, but using technologies that help you understand, plan, design, and respond to your specific growing and climate conditions, can help your garden be more resilient.
Something we take for granted today that would have seemed like magic 100 years ago – the ability to predict freezing weather, storms, etc. – can allow you to take protective measures in advance that can save your garden plants.

Winter Gardening: Selecting The Right Plants
There are plenty of delicious garden plants you can select for your fall or winter garden that can easily survive a deep freeze. The most cold-hardy winter greens we grow are:
- spinach
- kale (especially varieties bred for extreme cold tolerance)
- cilantro
- chickweed
- claytonia
- parsley
- Austrian winter peas
We’ve had all these survive uncovered down to about 10°F.
There are also plenty of cool weather plants that will also grow throughout the winter in sub-freezing temps that would otherwise kill them IF you provide them with additional protection. (This is where new technology can really help.) This plant list could probably include hundreds of plants, but here are some examples of familiar ones:
- root veggies (beets, turnips, carrots, parsnips, rutabagas) *some of these can technically survive sustained freezing temps, but they’ll die back to the roots and go dormant
- broccoli
- bok choy
- cabbage
- chicory
- rapini
- lettuce
- mustard greens
- komatsuna
- arugula

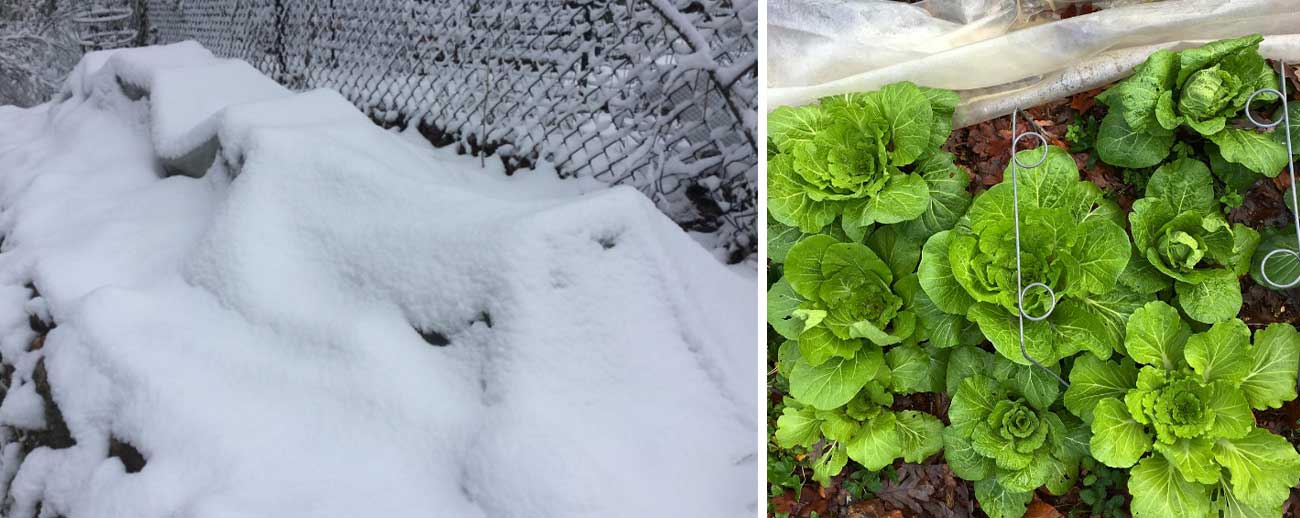
Winter Gardening Using Low Tunnels
Since we like to grow a wide diversity of plants on both of the above lists in our winter garden, we use low tunnels.

Low tunnels are affordable, reusable, and incredibly simple to set up and take down. They’re basically wire caging that you stick into the ground then cover with special polyethylene plastic sheets. We’ve had our tunnels and polyethylene for over three years and they work as well as the day we bought them.
If you want to buy low tunnels for fall or winter gardening, here are the ones we’d recommend:
Small Garden Lowtunnels:
If you want to buy everything you need in a single kit, this is a good one. It’s 9 ft long x 2 ft wide x 18″ tall. If you only have one or two garden beds to cover, this is probably ideal.
Large Garden Lowtunnels:
If you have a large garden with many beds and/or want to make tunnels with custom sizes, you’re better off buying individual “parts” and making your own tunnels using:
- 6 mil clear greenhouse film (this is what we use). *Note: You can’t just go to Lowes and get this type of plastic; most plastic sheets will not work and/or will break down very quickly. This is a type of polyethylene made specifically for greenhouse/outdoor applications.
- We’re going to retire the square wire frames and get these taller hoops instead. We love the height of them – many of our veggies get smashed up against the roof of our relatively short tunnels now. We also wish we’d originally gotten round hoops like these to better keep water and/or snow from accumulating on the top of our current setup.


Tips For Using Low Tunnels In Your Garden
Here are some helpful tips and considerations when buying or using low tunnels:
Round or square caging for low tunnels?
We opted for square caging since we figured it would allow us to grow more plants right out to the edge of the tunnels due to the increased roof height relative to round hoops. In hindsight, we wish we’d chosen round hoops.
The reason: we think round hoops would be far less likely to allow water and snow to pool on top, which can cause them to collapse.
Being careful about temps inside your low tunnels…
Temperatures inside your low tunnels will be anywhere from 5-15°F warmer than the outside temps, depending on the weather conditions.
- If it’s sunny out, the temperature differential will be in the upper end of that spectrum;
- If it’s cloudy or nighttime, it will be in the lower end.
When should you remove the plastic covering on your low tunnels?
- Any time the daytime temps are going to be over 55°F for several hours (especially if it’s sunny out), you’ll need to remove the polyethylene. Just peel back from one side and bunch it on the ground on the other side. If you don’t remove the polyethylene, the hot interior temps are going to stress your plants. If this keeps happening, you’ll cause your plants to think it’s spring and they’ll go to bolt early.
- Any time it’s going to rain, even if temps are going to be in the 30s.
How to weight down the sides of your low tunnels:
You’ll need to use something to hold down the outer edges of the polyethylene. This doesn’t have to be fancy – 5 pounds rocks will do. Don’t go too light on your weights or wind gusts will blow your polyethylene sheets off, leaving the plants underneath exposed.
Will low tunnels work in cold climate regions?
If you live in Maine or Alaska, can you grow food in low tunnels throughout the winter? Probably not – at least not without some modifications.
If you’re desperate to grow green edible plants in the winter in these frigid regions, you’re probably better off growing in a greenhouse or inside your home under grow lights (grow lights are also great for growing microgreens).
However, you might be able to use soil cables in your low tunnels to make this system work even in extremely cold climates. The heat inside the tunnels would also help melt the snow that might otherwise bury the tunnels. If you’ve got experience winter gardening in extremely cold climates, we’d love for you to weigh in down below in the comments!

Good luck with your winter gardening! Questions? Ask us in the comment section.
KIGI,

Hi! Live near the Pacific Southwest and just started growing turmeric and ginger from the store bought Oraganic veggies themselves and it seems it’s taken forever for them to grow. Now finally I started seeing a leaf from the turmeric grow from the ground about 1/2 a Ft. from the ginger plant that now has about 7-8 leaves, but now they seem to be browning. I’ve been watering them daily sue to the intense heat we’ve been having. Wondering how much longer will these plants take to harvest? Also I’m trying to grow green onions in the same method? Please anyone? Thanks for your response
Hi! In our experience, it takes quite a while for dormant ginger or turmeric rhizomes to leaf out – probably about 6 weeks under ideal conditions. It sounds like you may be over-watering your plants and causing the rhizomes/roots to rot, which would explain the brown leaves. Don’t water them for a few days to give them and the soil time to dry out. Then only water 1-2 times per week at most. Also, ginger is a bit more sensitive to really intense heat and sun than turmeric is so afternoon shade (or shade cloth) may be advisable in your growing zone. When you harvest either is a bit subjective. You can harvest “baby” ginger or turmeric much earlier than mature roots. Even in our cooler Zone 7b climate, we’ve found that turmeric can overwinter in-ground here with a thick layer of mulch on top, so we’ve started leaving ours in the ground and just harvesting it when needed. Ginger rhizomes don’t overwinter outdoors here, but would probably do fine in your zone. Lots more info about growing ginger and turmeric here: https://www.tyrantfarms.com/how-to-grow-organic-turmeric-and-ginger-anywhere/
I like
Hi! Wow! I wish I lived as far south as you do. I live in the Pacific Northwest. The biggest problem we have isn’t cold; it is day after day of 30 degree temps and rain and clouds. Least number of days of sun in North America. 🙂 Here is my question; isn’t sunlight, and not just hours of light but intensity/wavelengths, critical to growth? That is, what can you grow in areas where there are limited/short hours of sun and cloudy days? I can’t afford greenhouses, heaters, lights, etc….they would have to thrive under low tunnels. Also a question about your section on temps; I tried some 6 ml tunnels and found temps could jump 20 to 30 degrees above outside temps, but at night crash to pretty close to ambient temps. Also soil temps (critical for nutrient uptake dependent on bacteria action) may warm up a little, but it is sort of like floating a glass of warm water in the ocean — the ocean is so vast the glass water stays close to the temp of the ocean and doesn’t warm up. All this has been so frustrating when I see wonderful pics like yours. Can’t help but think I must be missing something!
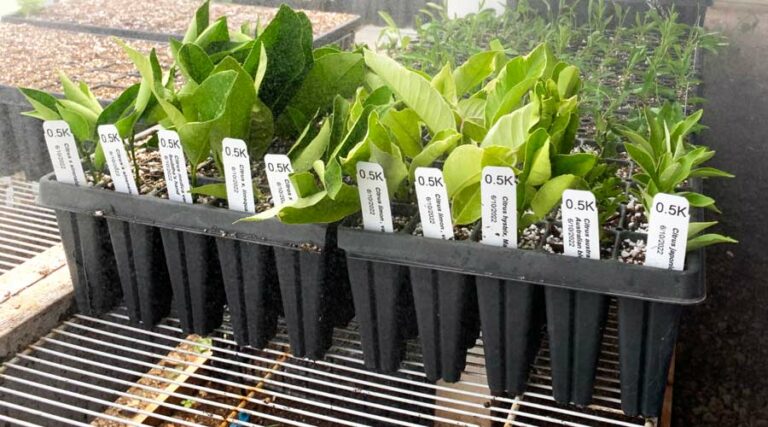
Your article and pictures are very inspiring. Do you prefer to plant from seeds or baby plants bought from store? Thank you!
Tina: Our first couple seasons gardening, we bought starts. The problem with that is: 1) you’re limited to what the stores have which is quite limited and usually somewhat “vanilla” varieties, 2) a packet of quality organic seeds will cost you $3 and (depending on the variety) will contain dozens or hundreds of seeds that you can grow into mature plants. Compare that to the cost of a single nursery plant, and it makes a lot of sense to start from seed. Plus, we LOVE seeing seeds come to life and bringing them all the way to maturity. It’s a magical experience that never gets old.
Yes, that makes perfect sense. I will try to grow some veggies myself this year. Thank you!
You’re very welcome! Good luck and reach out any time you have questions. Thankfully, spring is right around the corner (which means no low tunnels necessary) but this setup really comes in handy during the cold months.