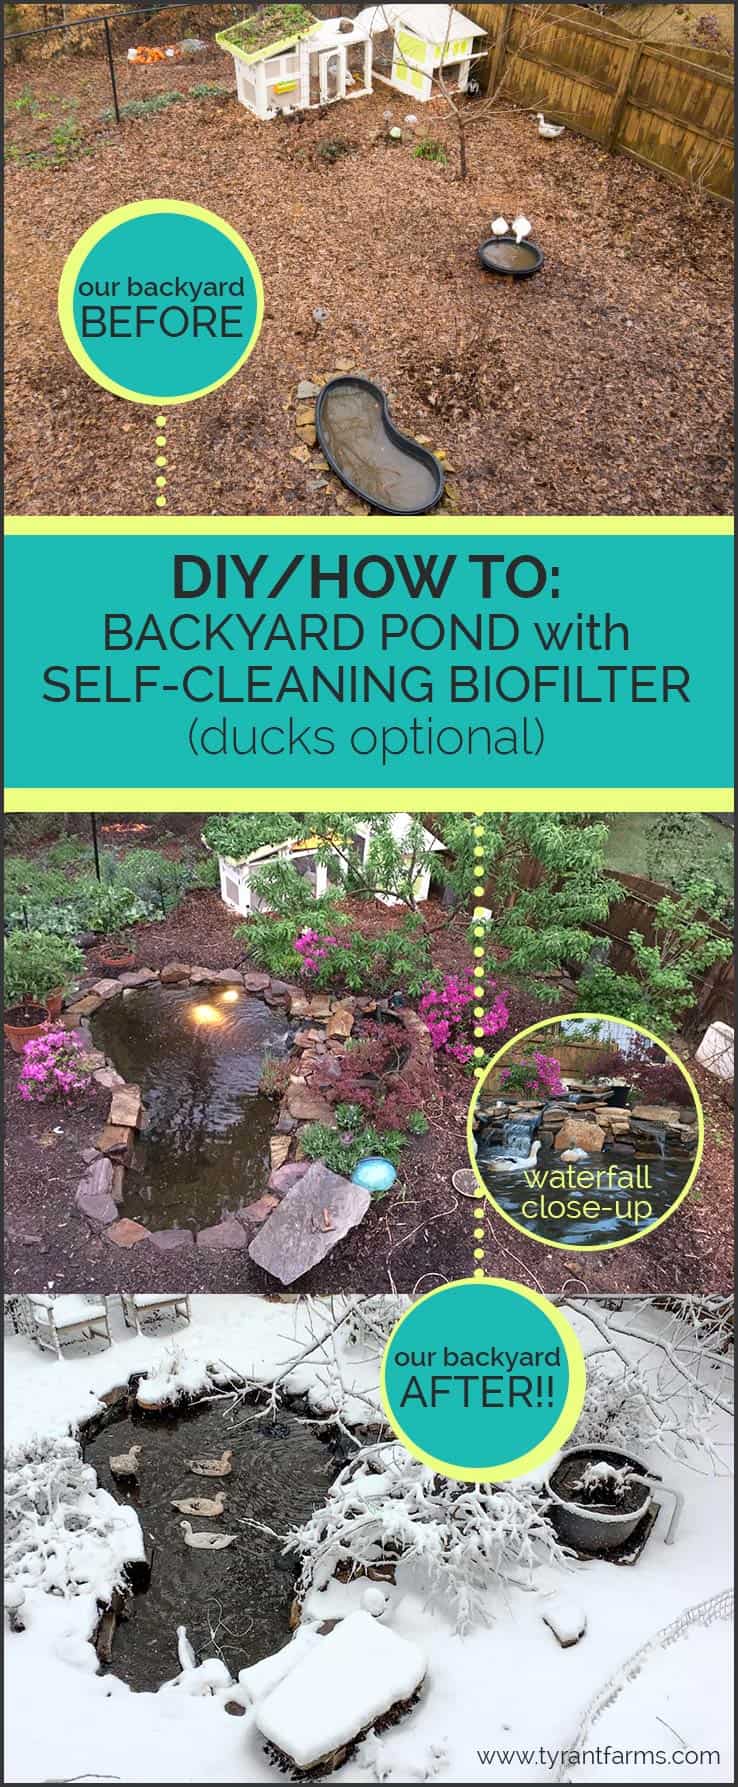
How to build a backyard pond with a DIY biofilter

Tyrant Farms' articles are created by real people with real experience. Our articles are free and supported by readers like you, which is why there are ads on our site. Please consider buying (or gifting) our books about raising ducks and raising geese. Also, when you buy through links on our site, we may earn an affiliate commission. Learn more
Since this DIY backyard pond article is fairly long and detailed, we’ve included a table of contents. You can quickly click the table links below to jump to specific parts of the article you’re interested in. Or you can read the whole article to get the best possible understanding of how and why to build a backyard pond, whether or not you have backyard ducks like we do!
Table of contents
- Duck fanatics in search of DIY backyard pond
- Three ways a pond changed our ecosystem
- Pond-building expectations (time, cost, weather, work)
- DIY pond slideshow: from start to finish
- Step-by-step: How to build a backyard pond and biofilter
- Ongoing pond maintenance
- Itemized pond materials list
Radical Duck Fanatics In Search of DIY Backyard Pond…
In case this is your first visit here, you should be forewarned that we’re duck fanatics… Radical duck evangelists who think more people (as long as they’re responsible people) should have backyard ducks.
Why? As we’ve written about elsewhere, for most people interested in raising egg-laying fowl, ducks often make a superior alternative to chickens.
One big distinction between chickens and ducks is that chickens take dust baths whereas ducks take water baths (waterfowl come by their name honestly).
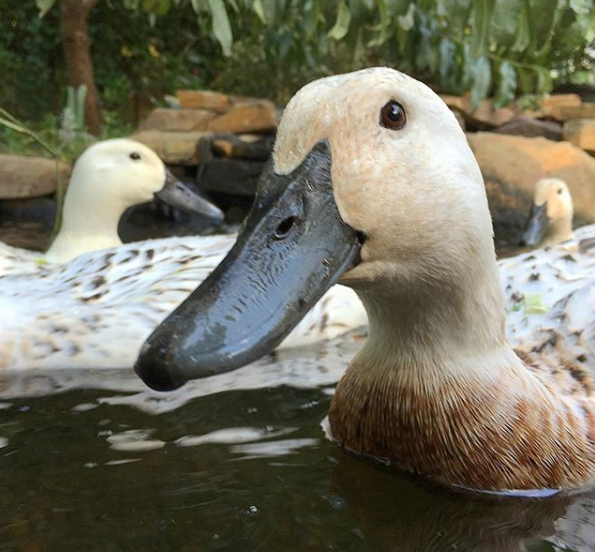
As such, if you’re going to raise happy, healthy ducks, you’ll need a water source for them. This can be a small kiddie pool… or it can be something more substantial.
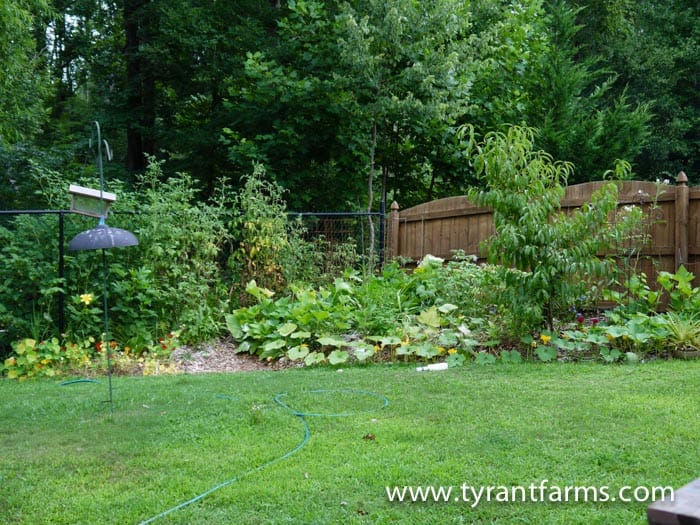
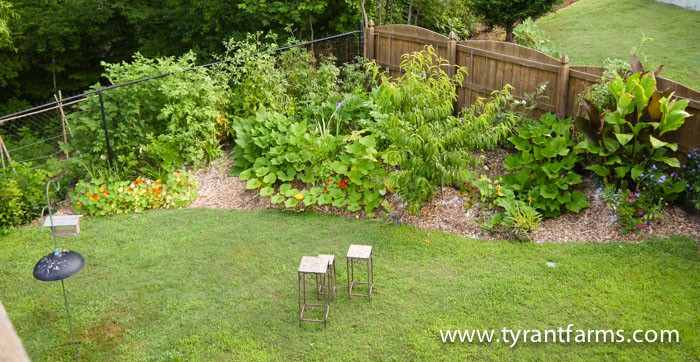
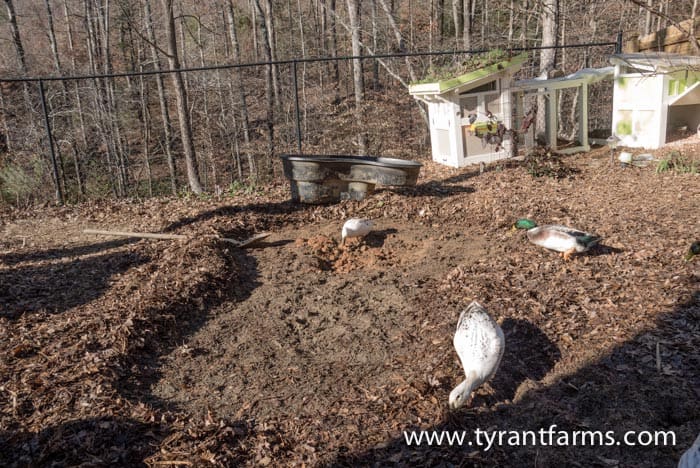
We started off with a kiddie pool, but we got tired of having to dump it out every day after our seven waterfowl quickly turned their water fowl, er foul, which then made the “duck area” of our yard into a muddy pit.
One day, The Tyrant added a new project to my “honey do list”: build a 1,000+ gallon in-ground backyard pond for our ducks. Oh, and it needed to have a natural filtration system that used biology, rather than chemicals, to keep the water clean. Piece o’ cake. I’ll have it done before lunch, dear.
In all fairness, my wife has a biology and clinical research background, so she’d already done the bulk of the research for me. She really just needed me for the heavy lifting. (There’s a reason her nickname is The Tyrant.)
Three ways our backyard pond changed things at Tyrant Farms
1. More diverse ecosystem
As you’ve probably observed, natural water features (ponds, creeks, springs, etc) are a magnet for a wide diversity of lifeforms. Since building our backyard pond, we’ve been blown away by the increase in dragonflies, frogs, salamanders, and other beneficial critters that we didn’t used to see very often.
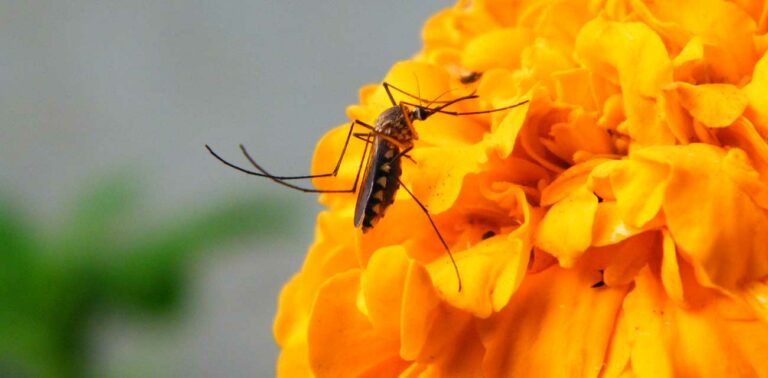
We’ve also noticed a decrease in mosquitos since ducks, frogs, salamanders, dragonfly larvae and other pond critters LOVE feasting on mosquito larvae. (Read about the other way we organically control mosquitos here.)
We have an edible organic landscape with several hundred species of food-producing plants and edible fungi, so having even more beneficial critters around to help us manage things and keep pest insect populations in check is most welcome. We now see why so many permaculturalists rave about the benefits of having a backyard pond and other water features.

2. Happier humans
Humans have a deeply ingrained psychological connection to the sound of running water. On a primal level, burbling water sounds equate to an available water source, something our ancestors would have found quite reassuring before they could simply turn on a tap to get water.
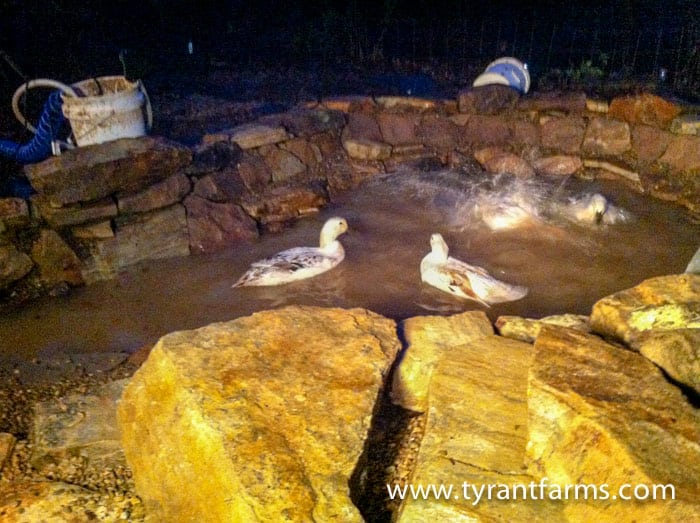
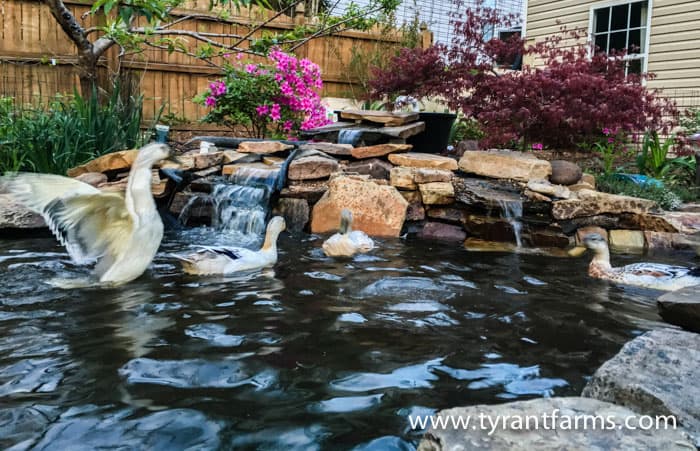
Any time the weather permits, The Tyrant and I finish our day relaxing next to our pond/waterfall with a beverage as our ducks dabble and bathe in their pond.
A waterfall also aerates the water, providing oxygen and/or dissolved oxygen for beneficial lifeforms, including our pond’s fish, crawfish, salamanders, and perhaps most importantly: aerobic bacteria. If you’ve ever noticed a foul, sewage-like smell from a pond, a sewer, a swamp, etc. – that’s actually caused by various species of anaerobic bacteria (bacteria that don’t need oxygen to survive).
Anaerobic bacteria are often pathogenic, causing disease and illness in larger critters that ingest them. In an oxygenated environment, anaerobic bacteria can not survive or proliferate. (Side note: this is also the same reason you turn compost – turning compost introduces oxygen and encourages aerobic bacteria while discouraging anaerobic bacteria).
Yay to waterfalls and pond bubblers!
3. Happier, healthier ducks
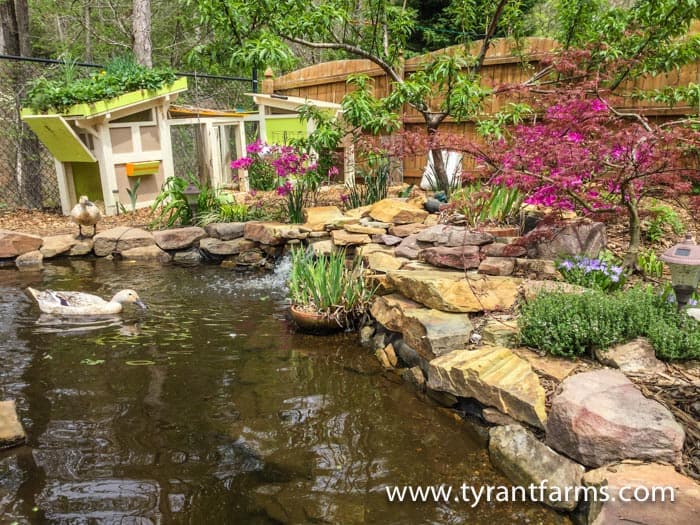
Our ducks’ rigorous daily schedule usually includes about 3+ hours swimming, playing, dabbling, and cleaning themselves in their backyard pond. Because of their pond, our ducks are much cleaner, healthier, and happier than they’d otherwise be.
Since we have ducks, we were much more adamant about figuring out a natural, self-cleaning DIY pond filter system that relied on biology rather than chemicals to clean itself (e.g. a biofilter).
Planning & building your backyard pond & biofilter
I. Expectations
Building a self-cleaning backyard pond isn’t a small project, but we’d absolutely do it again because of all the benefits it’s added to our life — and our ducks’ lives. Here’s what you should expect, assuming you decide to build a 1,000+ gallon backyard pond similar to ours:
Time
About 75 hours of labor (maybe you can be more efficient than us).
Money
Plan to invest roughly $1,500-$2,000 if you don’t have ducks and $2,000-$2,250 if you do have ducks (we recommend additional cleaning and pumping infrastructure if you have ducks, as we’ll go over shortly).
Outdoor Weather
Ideally, the outdoor temps will need to be above 50°F (10°C) and sunny during the time that you’re applying sealer around your waterfall or doing your plumbing joints. You can always pause the project until the right weather conditions come along.
Strength
If digging, lifting large rocks, and hauling heavy wheelbarrows sounds like a lot of work, get some help or consider hiring extra labor.
[divider top=”no” size=”2″]
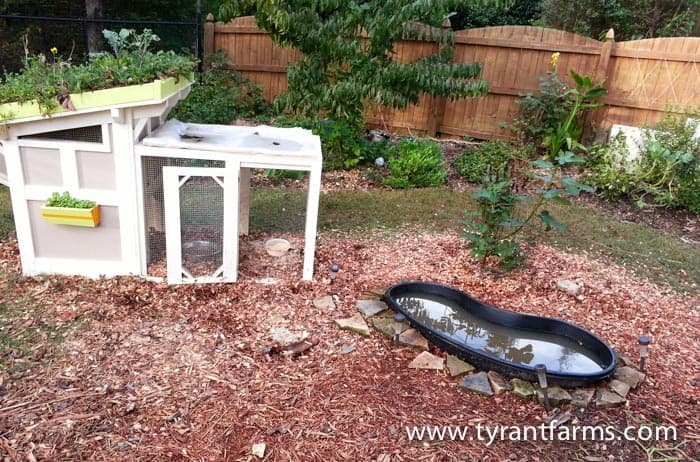
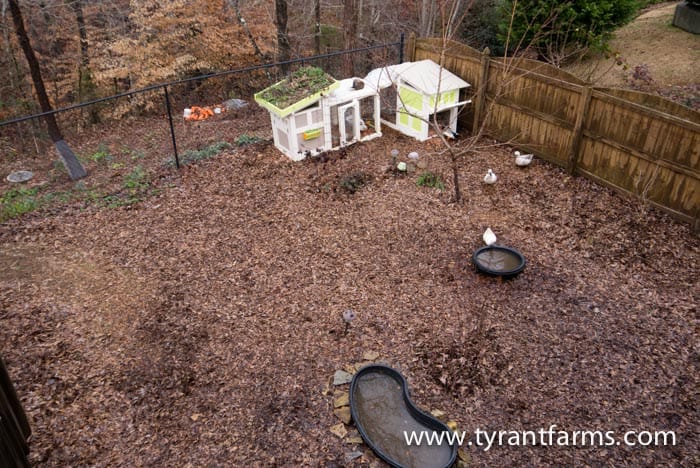
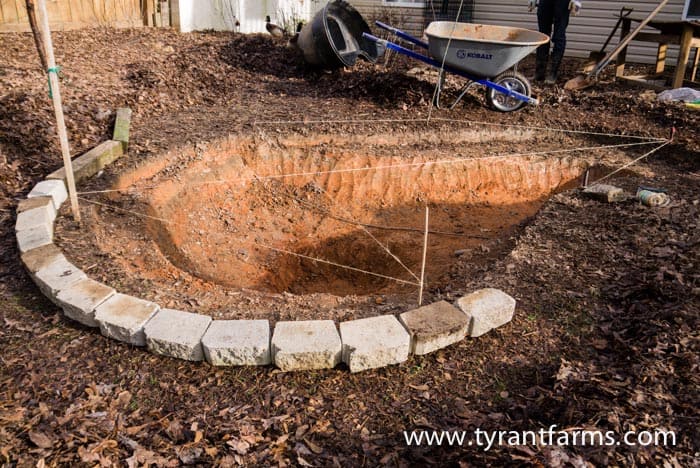
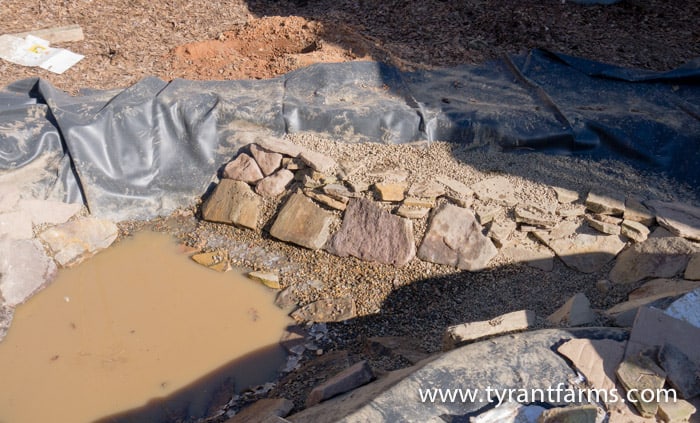
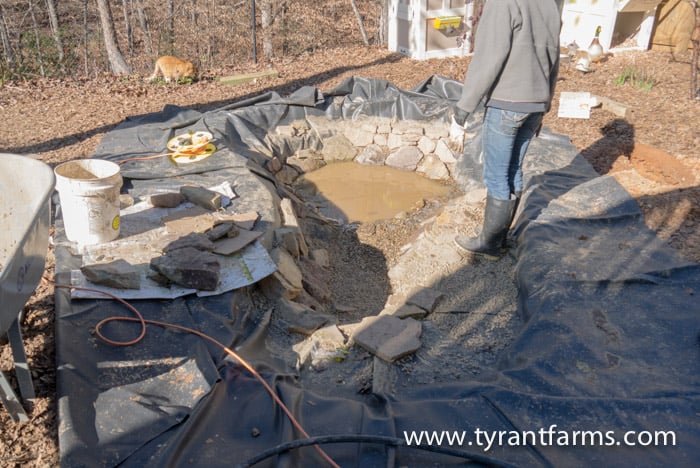
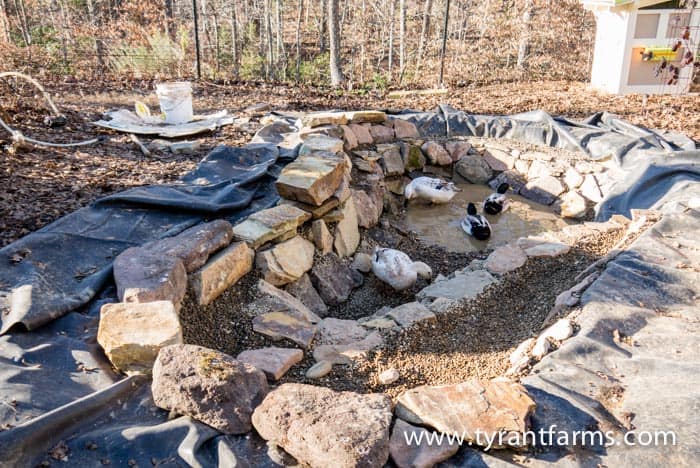
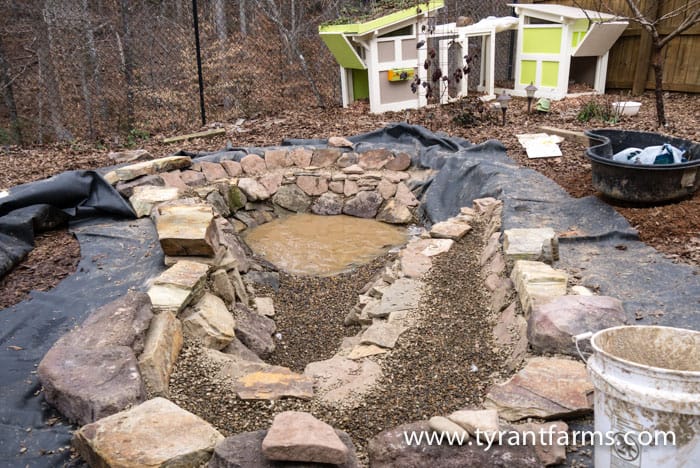
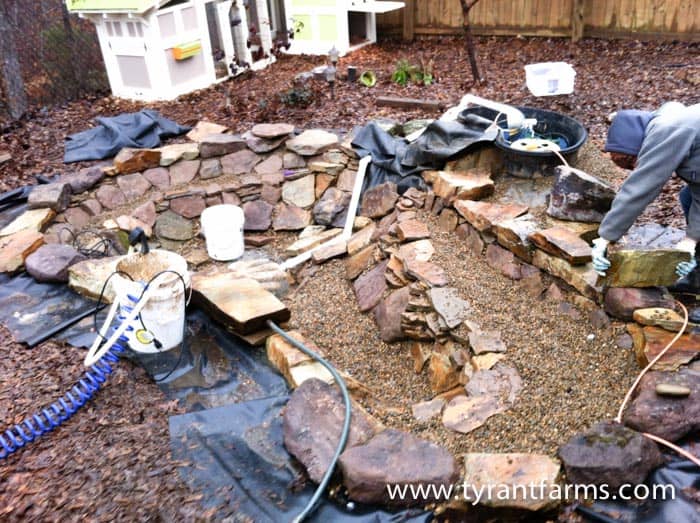
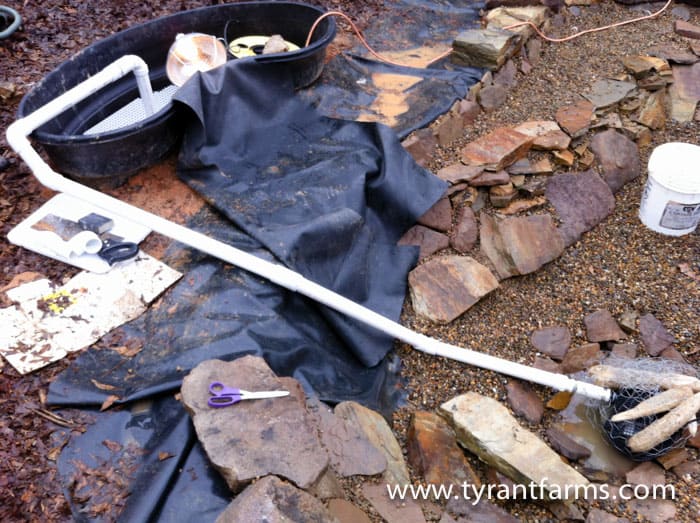
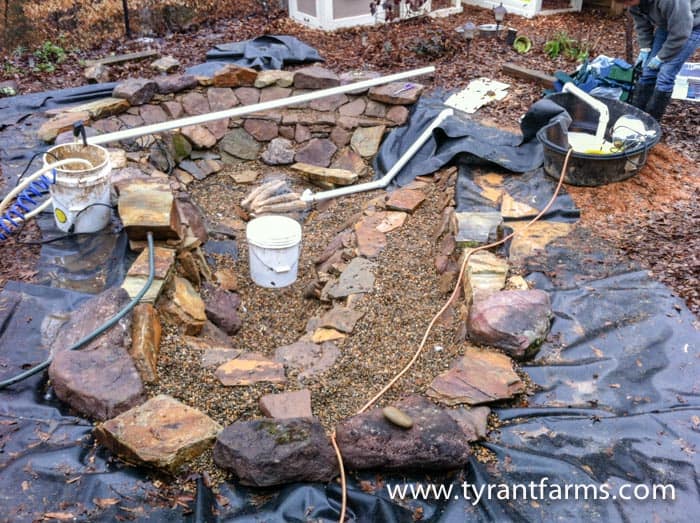
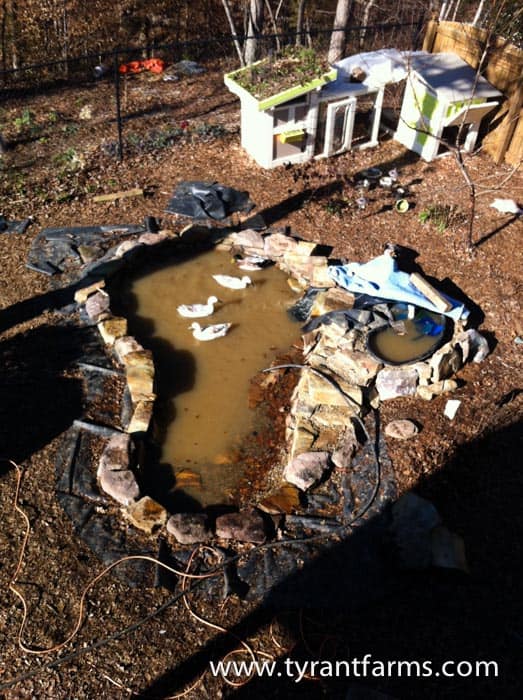
II. Backyard pond pictures, from start to finish
If you’re like us, seeing pictures of something in addition to instructions is REALLY helpful.
These DIY backyard pond pictures are intended to correspond with the next DIY sections of this article, and some of these images are redundant with the images included in Part 3. If you read something that you’re having trouble visualizing, hop back up here to the slideshow and you’ll probably find an answer!
Click the images if you’d like them enlarged!


[divider top=”no” size=”2″]
III. Step By Step: How to Build a Backyard Pond With a DIY Biofilter
Since we have ducks, we needed to plan for our pumps, plumbing, and pond filter system to handle a lot of extra poo and feathers (aka “solids”). If you don’t plan to have waterfowl in your backyard pond and you don’t think lots of leaves and other plant debris will fall into the pond throughout the year, you’ll probably do perfectly fine with a single pump and filter pond.
Whether you want to build a backyard duck pond, a meditation pond, a koi pond, a garden pond, or just a beautiful DIY pond to make your backyard extra flashy, let’s get started!
[highlight background=”#f2996c”]*Note: There’s a full materials list you can use at the bottom of this article, so we won’t exhaustively list out each item in the step-by-step pond building section.[/highlight]
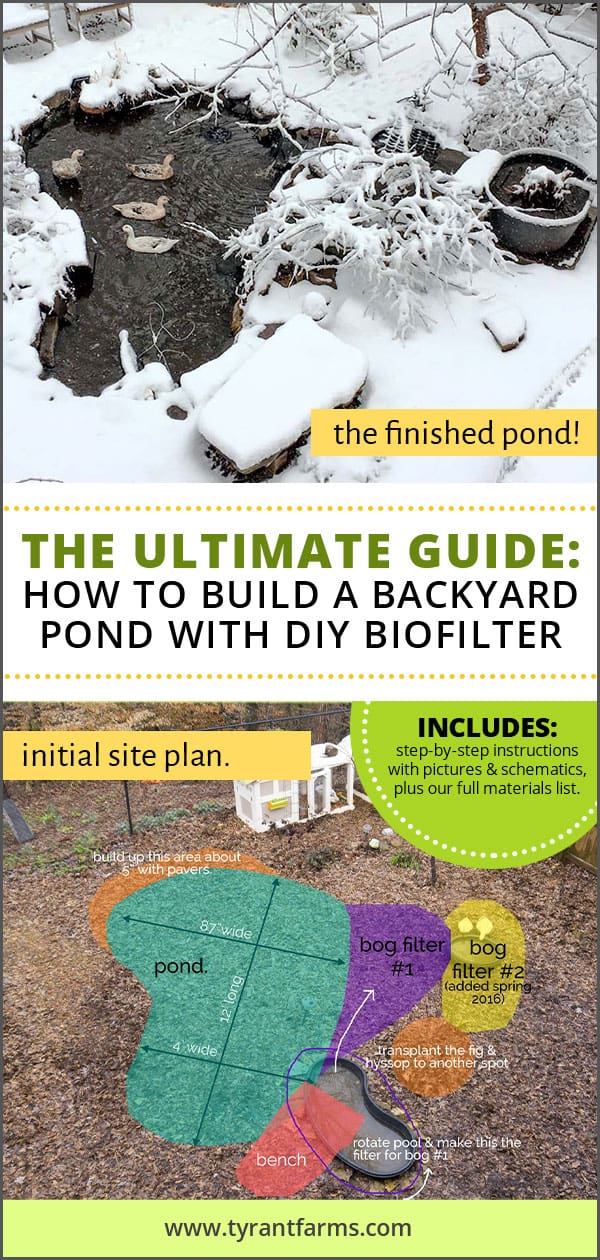
1. Identify the location of your backyard pond.
Carefully consider the location of your backyard pond. Are there likely to be large tree roots where you’ll be digging? Is the area flat or sloped? How will that slope (or lack thereof) alter your pond/waterfall designs?
Also, are there underground pipes or wires? To be safe, call the service in your area that marks utility lines in yards, which is most likely free. If you live in South Carolina like we do, you have to do this step by law, and the service is free. (Call 811.)
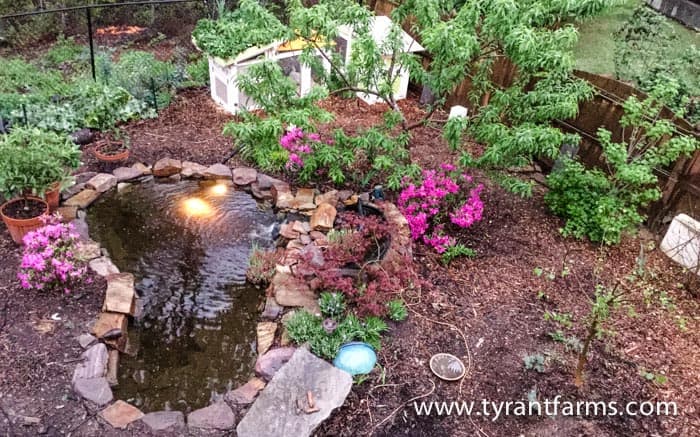
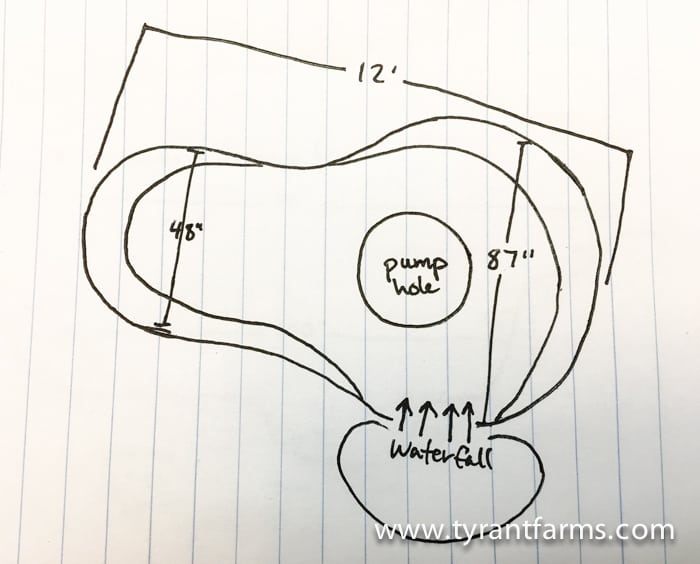
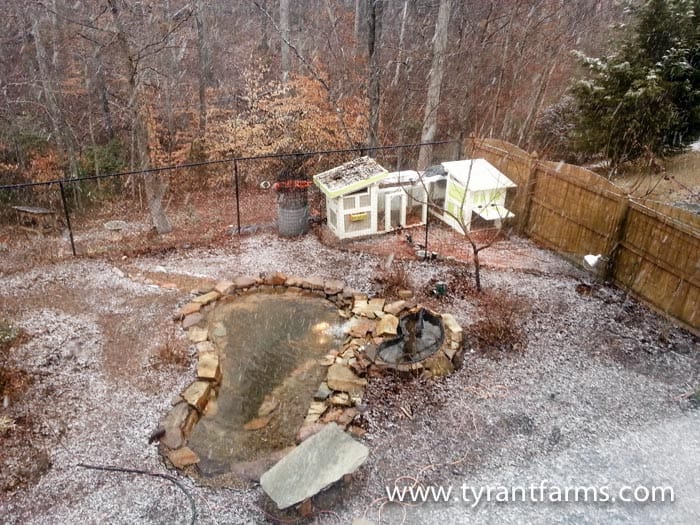
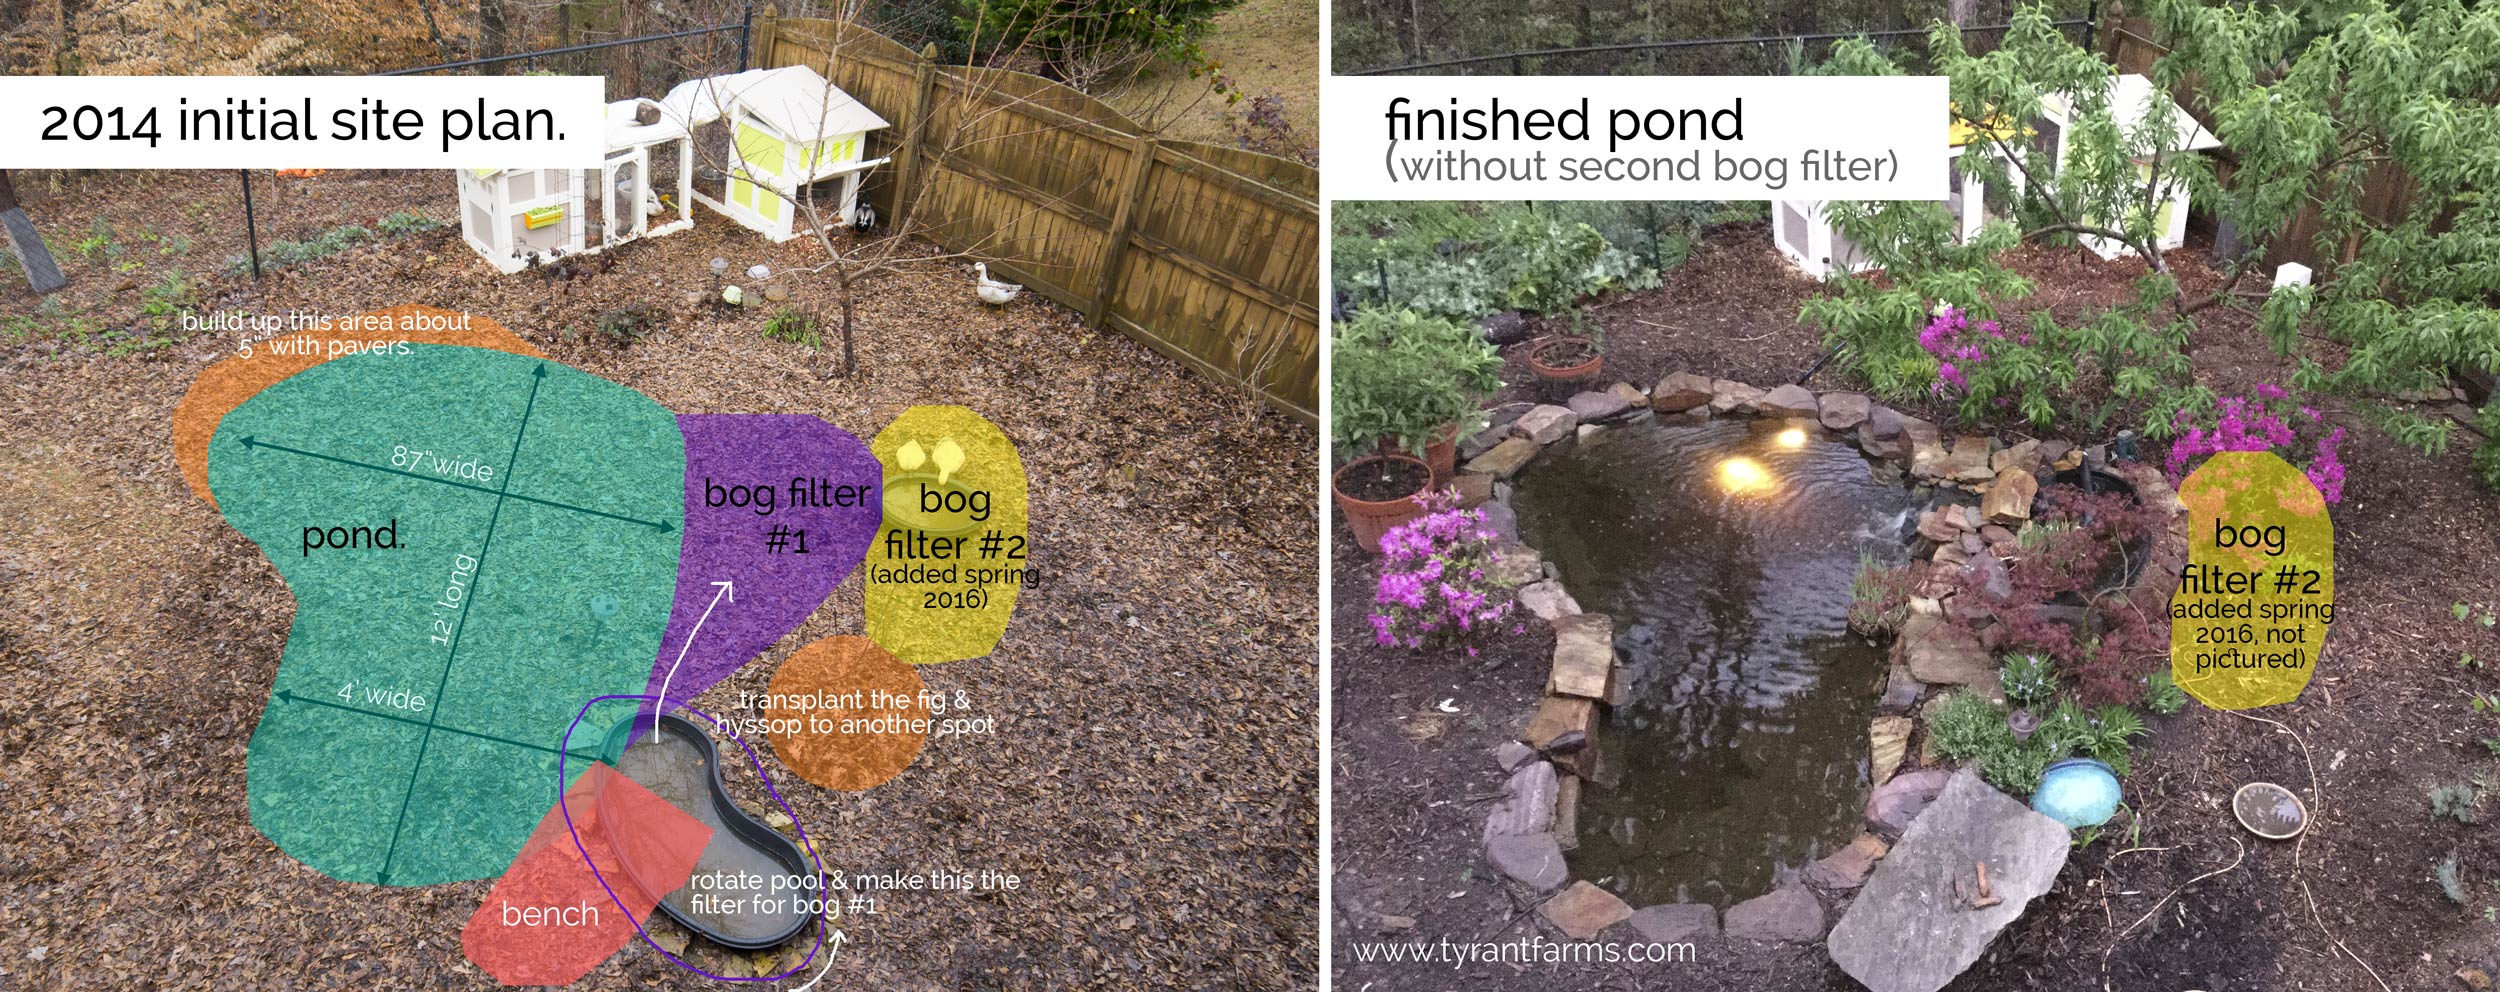
If you want to use our backyard pond as a model, see the dimensions in the above slideshow and our general site plan below.
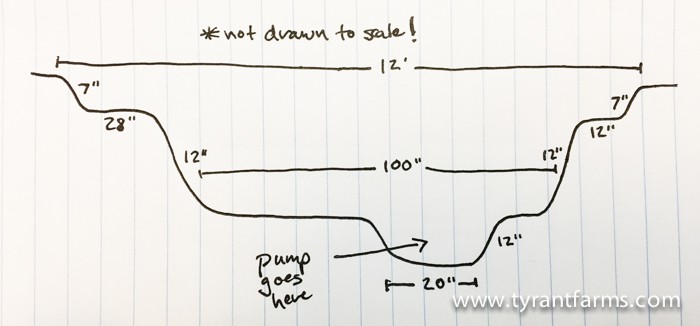
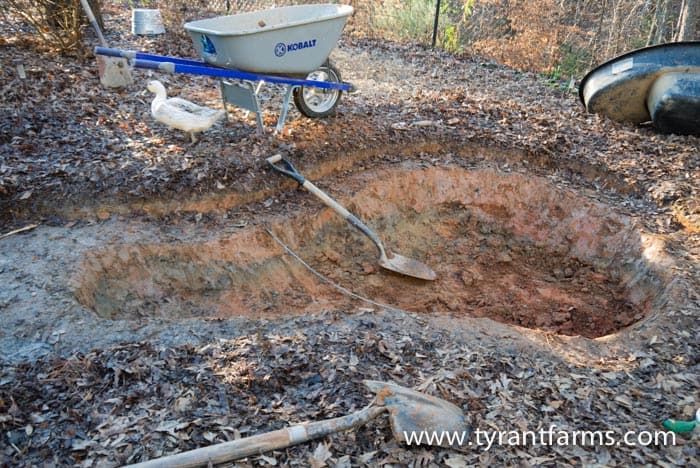
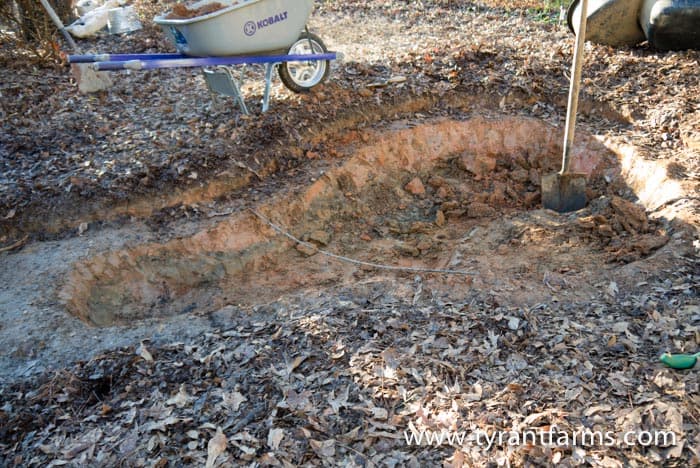
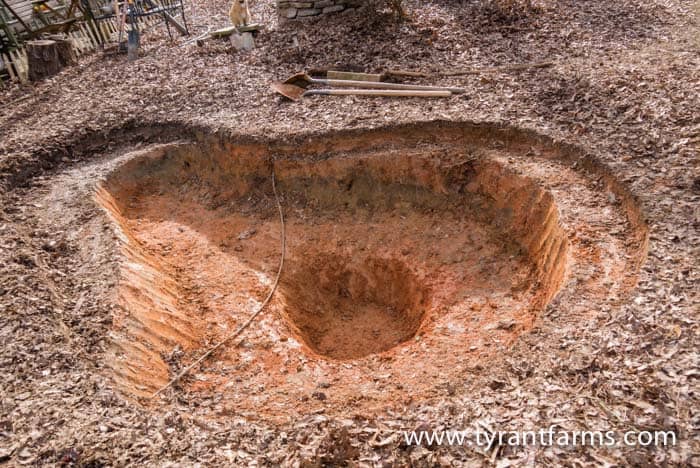
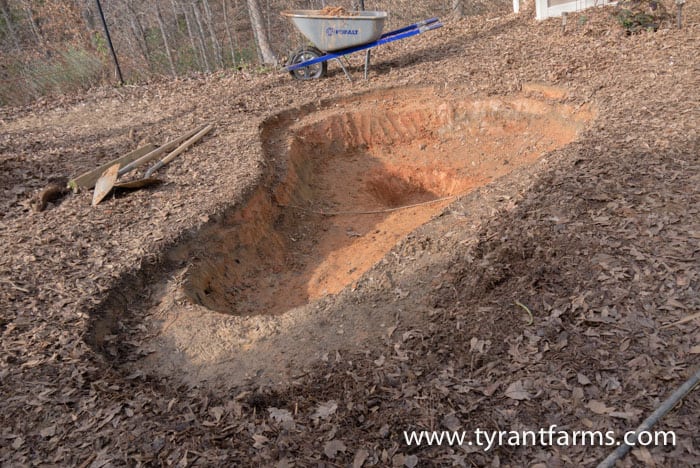
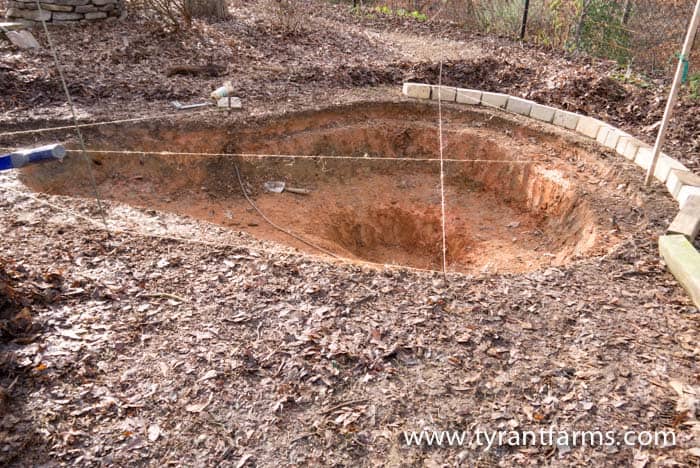
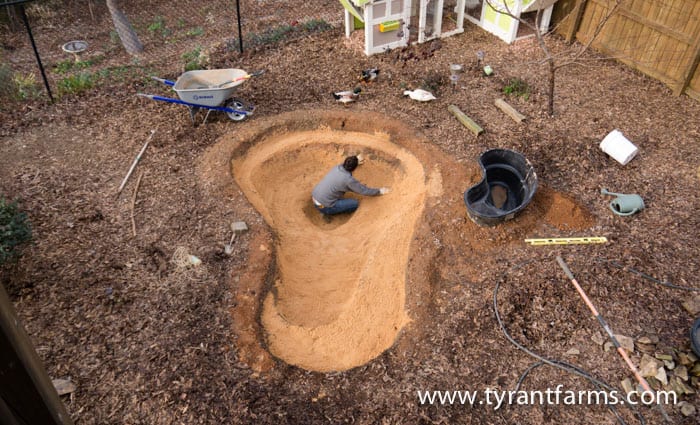
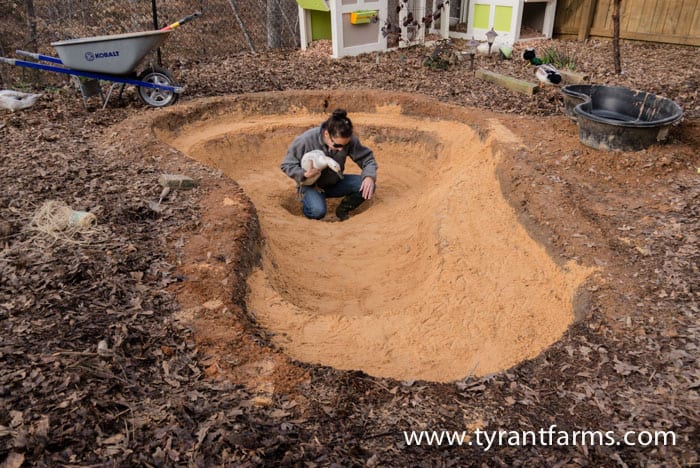
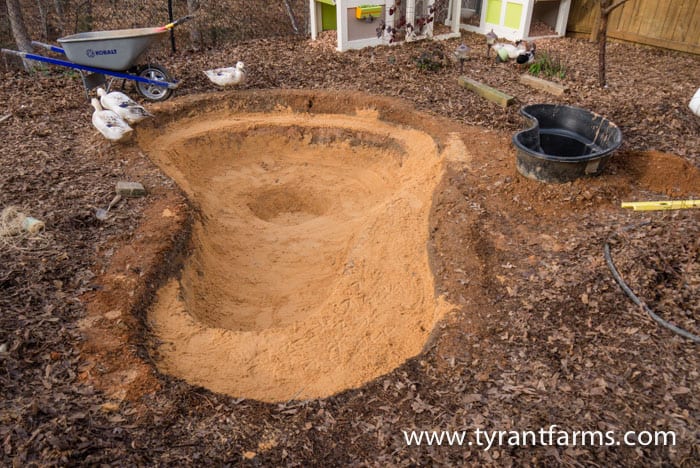
2. Dig your tiers & level the pond foundation.
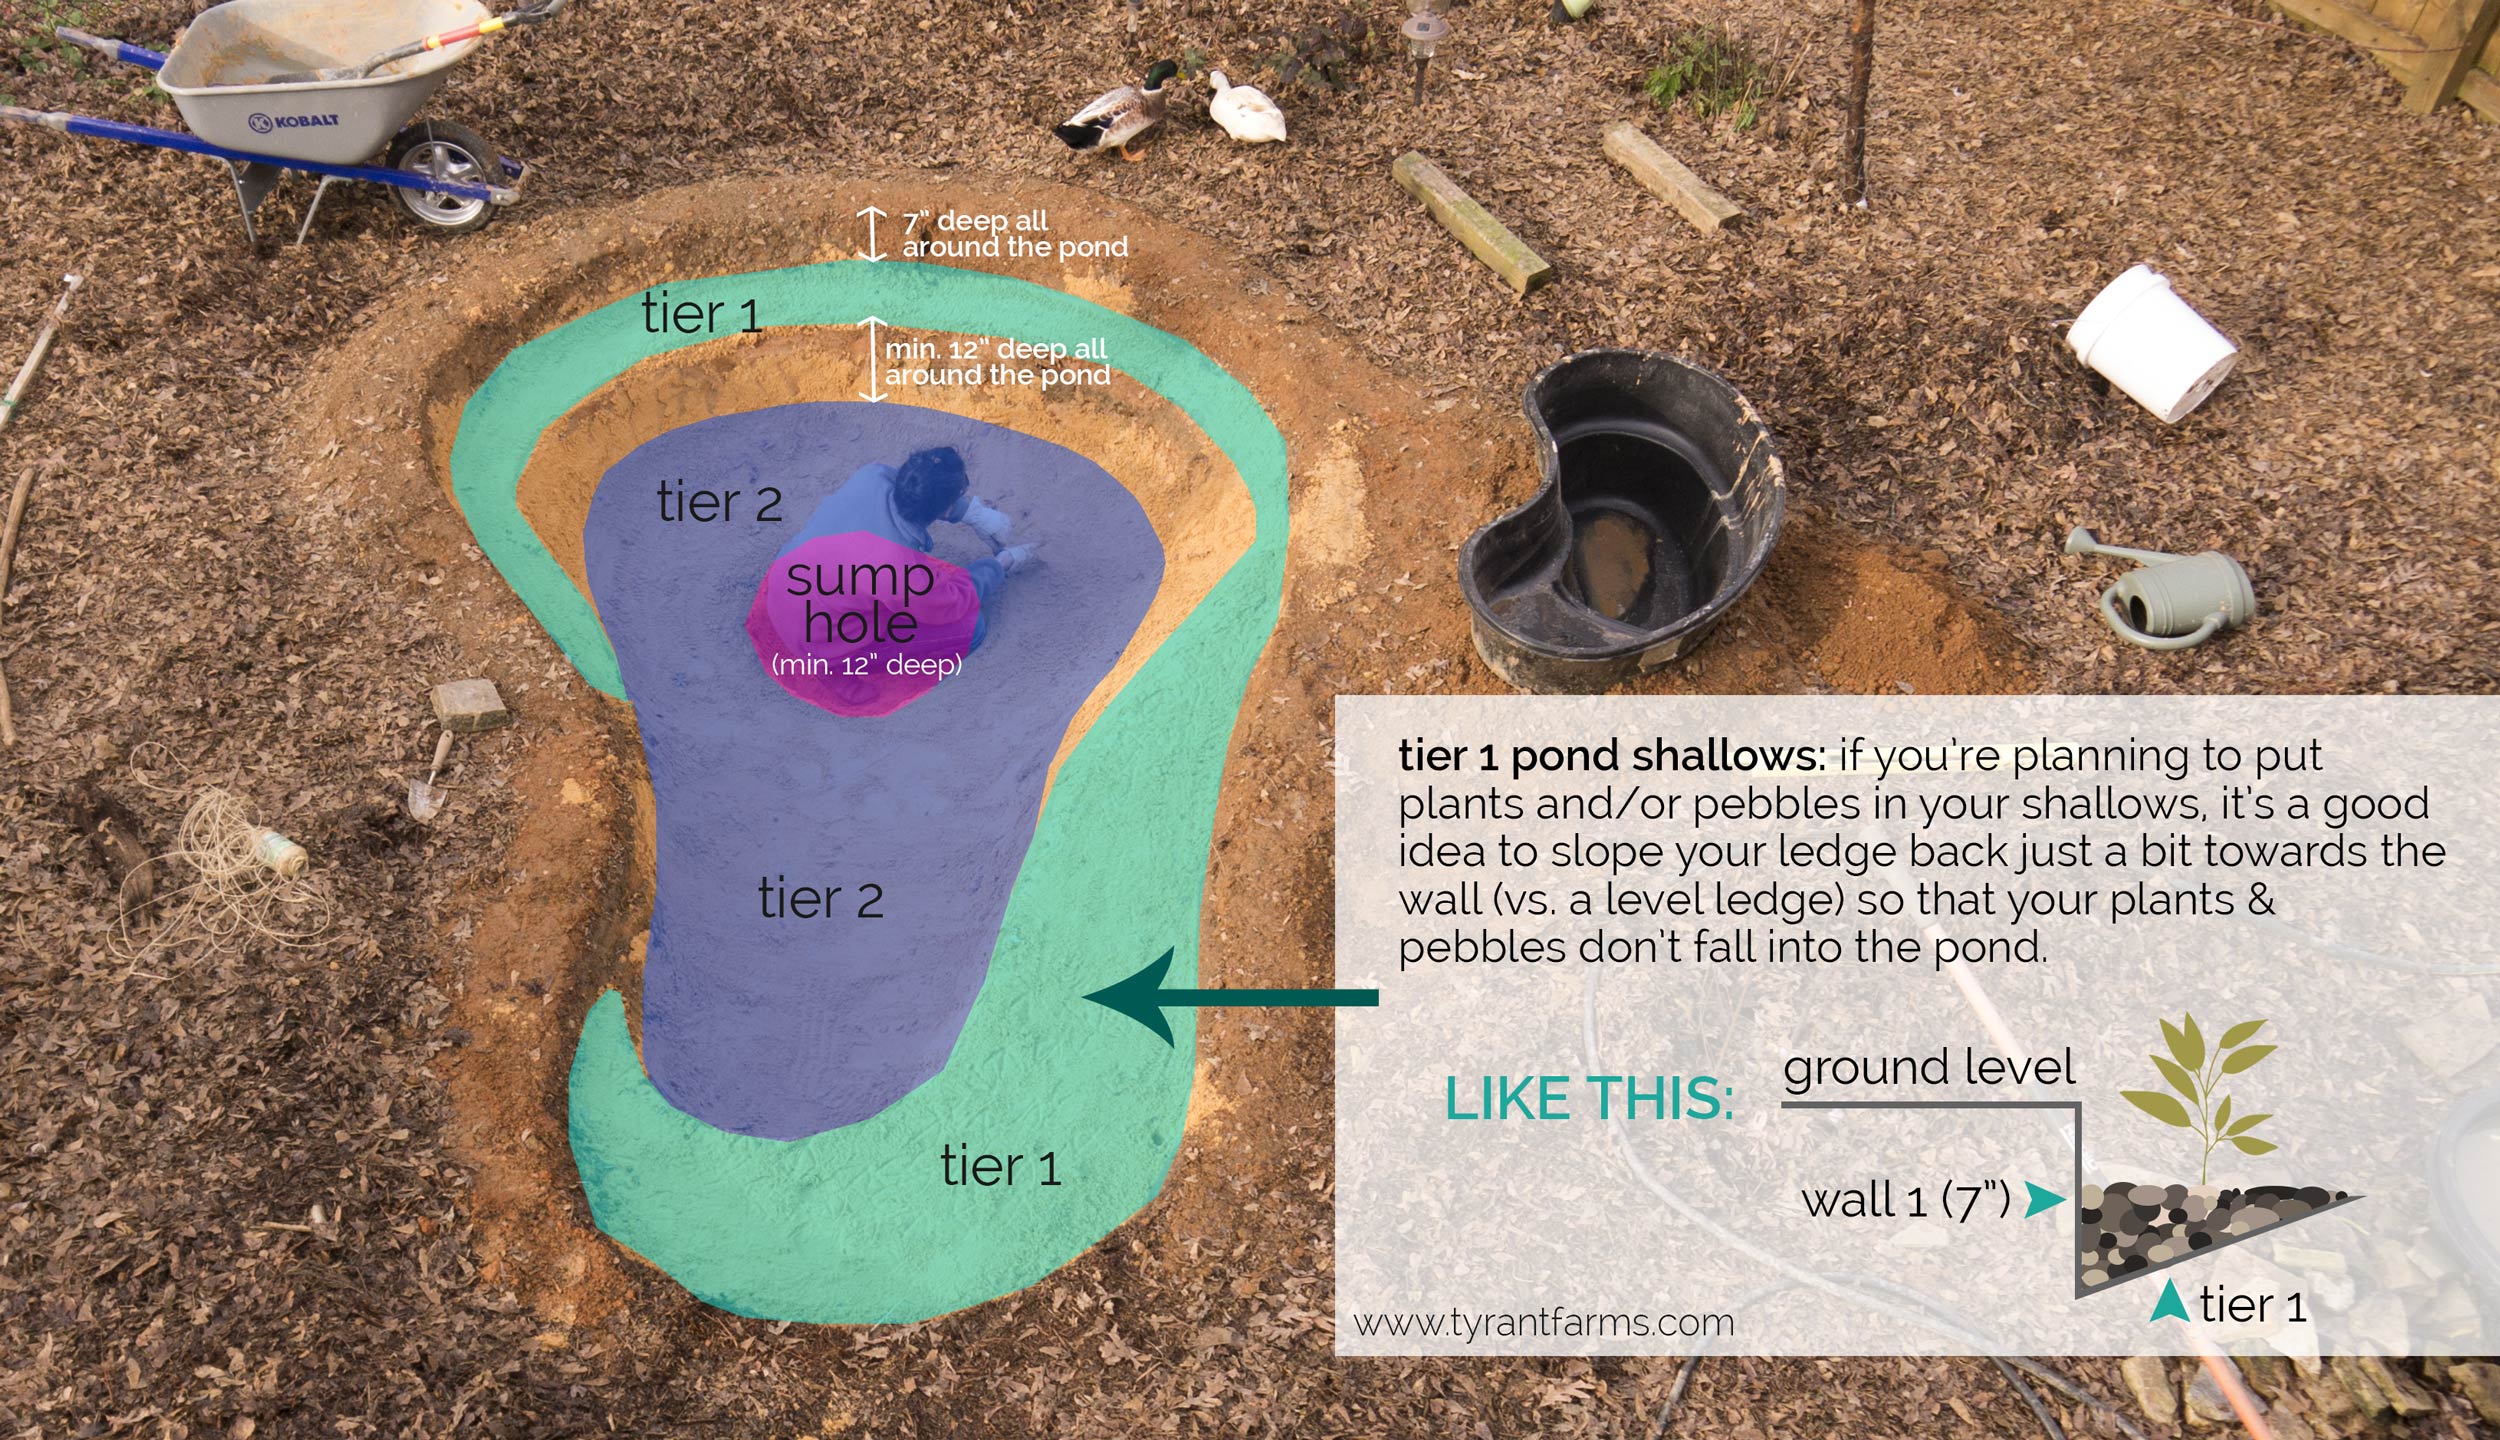
Use the dimensions in the above images to measure out your pond. You can use a string, chalk, or flour to mark the outline of the pond before you start digging.
First tier – Once you’ve marked the outline of your pond, dig the whole thing out 7″ down (or more if you want deeper pond shallows).
If you are planning to put plants in your backyard pond, it’s a good idea to slope your shallows back just a bit towards the wall (vs. a level ledge) so that your plants & your pebbles don’t slowly slide into the center of the pond. *see sketch above*
Next, mark where you’d like your subsequent tiers to sit and begin digging.
Second tier – Mark the outline of the second tier, then dig it down 12″>
Third tier/pump hole – Mark the outline of the third tier, then dig it down another 12″.
When planning the depth of your backyard pond, keep in mind that in the months and years ahead, you will likely need to occasionally get into the pond to check on the pump and/or temporarily remove the pump in the event of a clog. That’s why our pond is thigh deep, not waist deep.
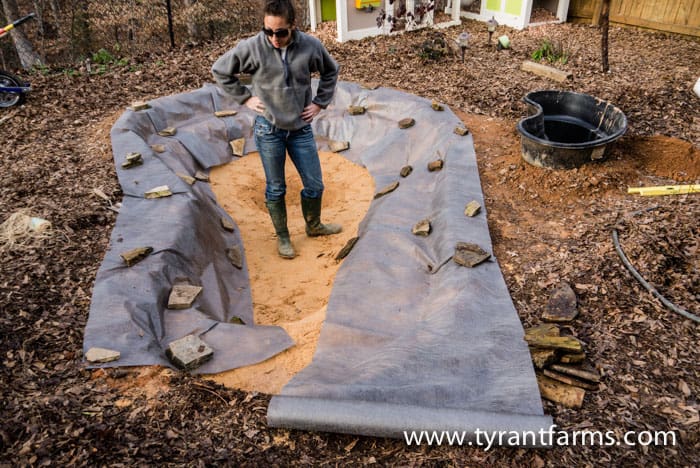
3. Sand, Fabric Underlayment, and Pond Liner
Sand foundation
Put about 1″ of sand on the flat surfaces of your pond foundation (we got 1/2 scoop from our Landscapers Supply). This helps ensure that no sharp rocks or pointy objects punch a hole in your pond liner – you do NOT want to have to trace down a hole in your liner after you’ve filled your pond.
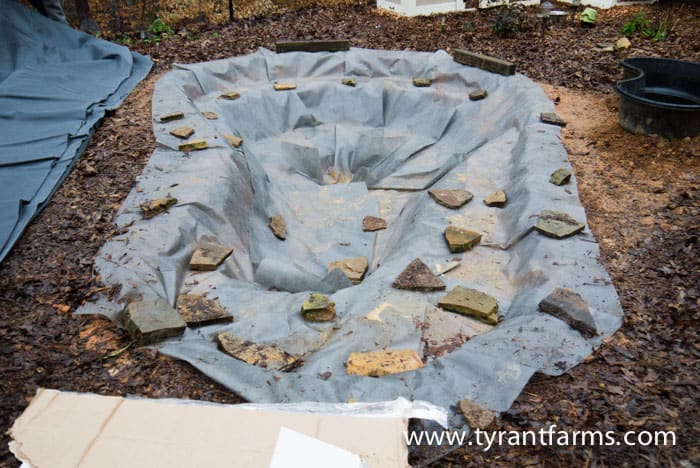
Fabric Underlayment
Now you’re ready for your protective underlayment, which prevents abrasion & punctures, further extending the life of your liner.
There are different things you can use here. We had some old landscape fabric sitting around, so we used that. The landscape fabric came in a long roll, making it difficult to universally cover the tiered pool foundation, as you can see in the slideshow. That’s why we’d recommend using this this 15′ x 20′ geotextile underlayment instead.
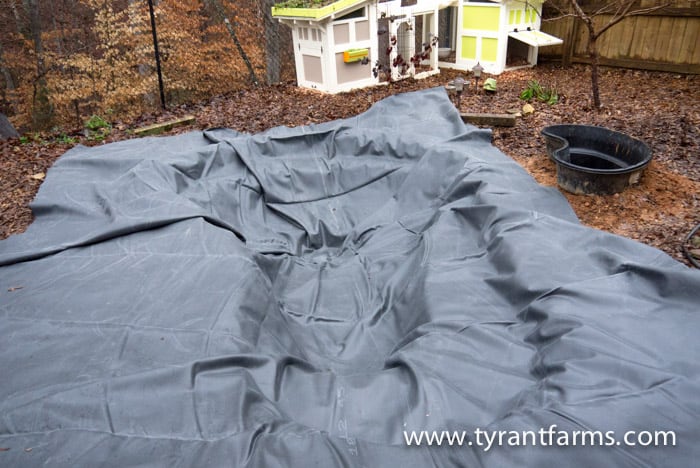
Pond Liner
Now comes the liner. We did a lot of research here, and we recommend using this Firestone 45 mil. EPDM, 15′ x 20′. It’s a UV-resistant, highly flexible yet stable waterproofing membrane with a proven performance history in exposed applications – equally tolerating extreme cold and heat while maintaining its flexibility/not tearing.
The liner is also safe for exposure to wildlife and aquatic plants, which is important to us given that we’re owned by ducks. The liner fit snuggly into the contours of our pond and the black color allows any exposed surfaces to blend in with our rocks.
Some people we read about opted for a PVC liner – don’t do it! You’ll likely end up with cracked liner and water leaks within a couple years, whereas the 45 mil. Firestone will last for 20+ years (it has a 20 year manufacturer warranty).
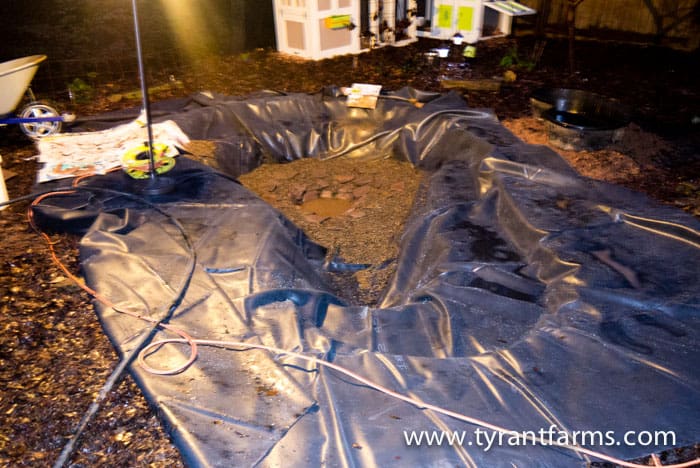
4. Pebbles & Rocks
Now it’s time to start making your backyard pond beautiful!
Build up, tier by tier, from the bottom of your pond to the top. Let us repeat that: do not start from the top and work down or you could end up with stretched liner or rock problems.
Want to calculate how many large rocks and pebbles/gravel you’ll need? Here’s a calculator.
Place large landscaping rocks along the sides/walls of the third tier (bottom) of your pond. Fill in the flat surfaces with 2″ of river pebbles and an occasional large flat rock to add stability and keep the pebbles from shifting too much. Repeat, tier by tier.
*We put a large flat rock in the center of the bottom tier/hole on our pond to provide a base for our pump and keep the pump off the very bottom of the pond (this helps keep the pump from getting clogged).
Begin slowly filling the pond with water as you finish lowest tiers to help expedite settling. We ended up scooping it back out later to plumb the pond.
On the outside lip of our backyard pond, we used concrete edgers/bricks covered with our native red clay to: a) provide a smooth, solid lip that was level all the way around, and b) raise the level of the liner up ABOVE ground level (that way, full pond = ground level or slightly below).
The underlayment went over this lip, then the liner went on top. Large landscape rocks were then placed on top to hold the liner down and hide it.
The liner extended out about 6-8″ past the lip to allow for any settling or future pond expansions/alterations. (You can also easily seam together the liner with special pond liner adhesive.)
All around the outside of our pool we put down wood chip mulch.
Double check to make sure every tier of rocks is solid and stable – no shifting, slipping, or sliding rocks. Everything nice and snug.

5. Skippy BioFilter, Plumbing, Pumps
Once your rocks and pebbles are all in place, it’s time to let your jeans slip down partially off your behind to show off your inner plumber. (Actually, don’t do that.)
Step 1: Set Filter Pond
First, get your filter pond placed. To prevent the filter pond from sinking/settling, you’ll want to really tamp down the foundation soil underneath it, then add about 2″ of gravel/sand mix, then about 1″ of sand over top of the gravel to prevent the gravel from roughing up and potentially puncturing the underside of the filter pond. Alternately, you could use concrete pavers or pour a concrete pad below your freeze line.
We recommend using at least a 50+ gallon filter pond. This is the one we wished we’d used on our first filter pond (we used it later on a second filter/bog pond), but we used the old pool we already had instead. A 50 gallon filter pond should be more than adequate to clean a ~1,000 gallon pond IF you don’t have ducks – we added a second 50 gallon filter pond a year later since we have seven ducks.
The exact ratio of filter pond to main pond is hard to determine. There are probably too many potential factors to come up with a precise ratio that works for every scenario. For instance, if you have ducks, you’re going to want to have a much higher filter-to-pond ratio than someone who just has a couple of fish in their pond.
One fact remains: you can’t have too much filter pond, but you can certainly have too little – so err on the side of too much biofilter/filter pond, especially if you have waterfowl.
Step 2. Plumb the Pond
Position your pump on the rock in the center of your pump hole. We highly recommend the Laguna 2900 Max-Flow pump – especially if you have ducks. You want a pump that can handle solids and one that has enough power to turn your pond water over 2-4 times per hour (calculations here).
The Laguna is also extremely energy efficient. Once your pump is positioned, measure and sketch out the lengths of PVC pipe and joints you’re going to need to run pipe from your pump into the base of your filter pond. (Again, the full list of plumbing supplies we used is at the bottom of this article – but the exact joints and lengths of pipe needed may vary depending on where you locate your filter pond.)
Do NOT seal any plumbing joints until you’re confident everything is sized and fitted correctly. Once you’ve linked it all together and everything fits, seal your plumbing joints one by one, locking everything into place.
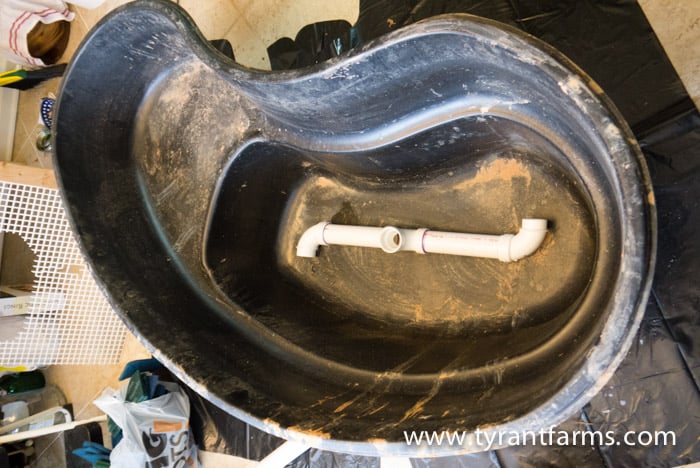
Step 3. Add Pond Biofilter Pads
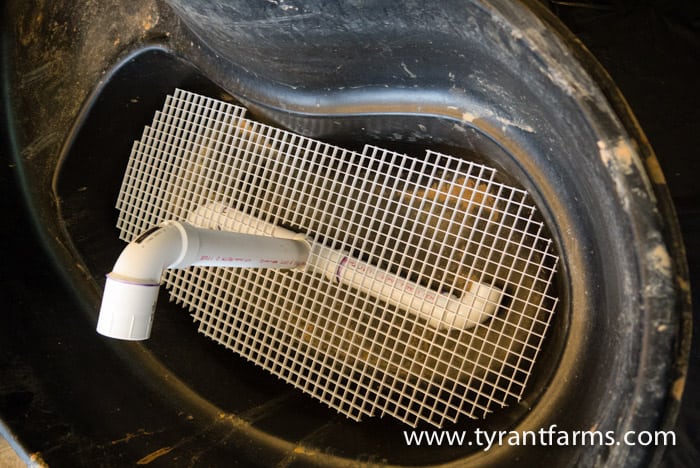
Place protective framing over the inflow in the bottom of your filter pond to make sure the pipes don’t get clogged with filter media when you unplug your pump (due to gravity, the pump sucks back out when turned off since the filter pond is higher – unless you plumb in a cut off valve at the top).
In the original version of this article, we recommended hogs hair filters which work great. However, they break down over time, lose their filtering ability, and eventually require replacement.
In April 2019 (years after we originally built the first iteration of our pond), we installed a different filter media that we read really good things about: a combo of Matala Filter Media Pads – (Green) and Matala Filter Media Pads – (Grey). The different colors correspond with different filter density – grey = more dense, green = less dense.
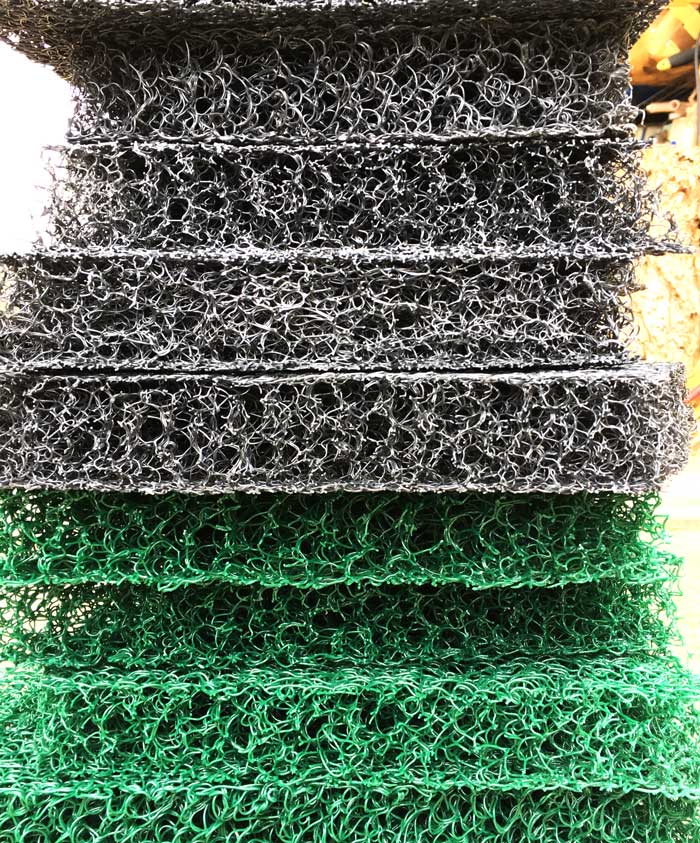
We cut both the green and grey filter pads exactly to the size of our filter pond and stacked them on top of each other.
Then we put the remaining scrap pieces on top of the fitted ones.

The green filter went in first to filter out the larger material. The grey filter went on top to filter out finer material.
Now, six months later, we’re happy to report that the Matala filter pads have made a huge difference in water quality in our pond. AND they’re still in like-new condition. (Covered with good pond bacteria and muck but not breaking down like hogs hair does.)
Despite 6 ducks swimming and pooping in our pond all day long, we haven’t had to do a thing to our pond since putting the new filter pads in (other than adding beneficial pond bacteria when we first put the new pads in).
When you’re done putting your filter pads in to your bog filter, fill up the bog with water, *then squirt in this beneficial pond bacteria (follow quantity instructions on label based on size of your pond). This is the primary bacteria that’s going to clean the water in your backyard pond, and its home is going to largely be in your filter pads.
(*Important note: Only put the pond bacteria into your new pond if you’re going to be able to turn it on and have water flowing within a half day or so. Pond bacteria needs water and nutrients to survive.)
This setup is called a skippy biofilter – you can geek out on the details here if you’d like.
6. Build Your Waterfall
It might seem counterintuitive, but we built our waterfall last. We wanted to have all of our plumbing and the filter pond in place BEFORE we put in the rocks that hide and support it.
There’s no single formula for building a waterfall, and yours will be unique because your rocks are unique. Some people concrete their foundations in, which is perfectly fine – but that doesn’t allow you to easily change things/iterate later, which is why we went a different route.
We simply built up a foundation with gravel, sand, and stone, then put pond liner under our final top-level rocks going down the waterfall in order to prevent water from escaping out of the system via the waterfall.
Since we’d never built a waterfall before, we looked at hundreds of photos of waterfalls online for inspiration. We’d recommend you do the same.
You’ll also need to cut an opening in the siding of your filter pond, and use a scrap of pond liner and “fish-safe” silicone sealant to attach the liner to the inside of your filter pond. The liner will need to extend out of the filter pond and onto your first waterfall rock to prevent water from leaking out behind your waterfall.
7. Testing, Testing, 1, 2, 3
Show time!
Fill up your backyard pond with water. Ideally you can use a dechlorinator to filter the chlorine out of the water you fill your pond with since chlorine can kill beneficial bacteria.
It’s a good idea to take a close look at your rock pond walls as the water fills around them to make sure they’re not settling or moving too much, thus requiring you to reposition them.
Once your pond is full, plug your pump cord into a yard outlet (we’ve been using this Yard Master 6-Outlet power stake since day one and it still works). It’s a magical thing to watch your backyard pond come to life for the first time!
If your water is muddy and turbid for the first 7-14 days after you fill it, don’t despair! That’s normal. It will take a bit of time for your filters to kick into full gear and your pond to clear up.
Also, as your pond is filling AND for the next 24-48 hours after it’s full, keep a close eye out for any signs of leaks. Is the ground wet where it shouldn’t be? Is the pond level dropping? If so, there’s a good chance you have a leak, and 9/10 times that leak is happening somewhere in your waterfall and can be easily fixed by rearranging rocks or pond liner.
Depending on the time of year when you build your backyard pond, you’ll probably want to add a second type of pond-cleaning bacteria to your water once the pond is full – either a warm water of cold water bacteria (see materials list below for links).
Congratulations, you’re now the proud new owner of a gorgeous backyard pond that you built yourself!

[divider top=”no” style=”dotted” size=”2″]
IV. Ongoing Maintenance and Alterations To Your Backyard Pond
Ongoing maintenance on your backyard pond will be minimal if you don’t have ducks. Ha! The fewer ducks you have, the less maintenance your pond will require.
Given that we have ducks, we decided that our single biofilter pond needed a friend, so we added a second 50 gallon filter bog with a waterfall that cascades into the back of the first filter pond. The general rule is you want your bog/filter portion of your system to be at least 20% of your pond; ex: 100 sq ft pond surface would need 10-20 sq ft bog/filter system.
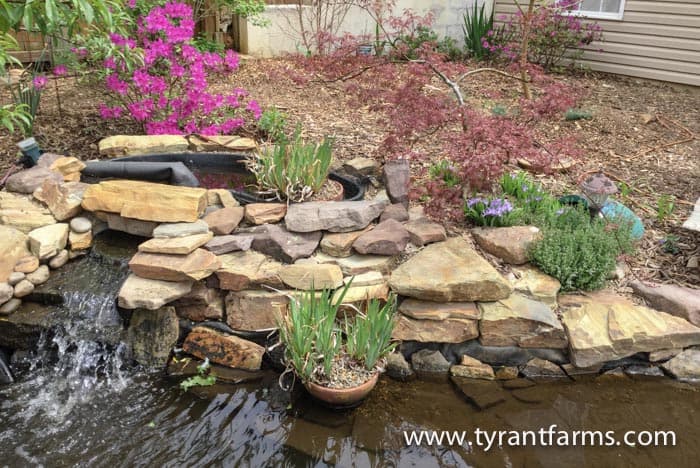
We also ended up adding a second waterfall off of our original filter pond to add additional waterflow/aeration to the near side of our pond. You can see that project pictured below:
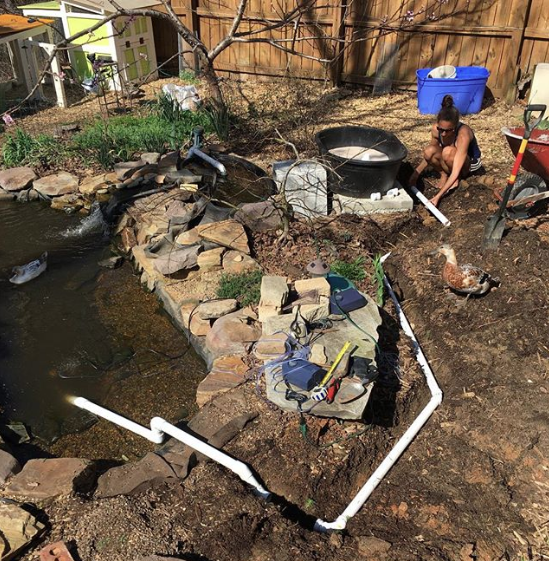
Additionally, to get even more oxygen into our pond to keep Sid Fishest and his fish family (our four pond fish) happy, we got two of these small aerators. More oxygen into your pond = healthier pond water. We do clean our filter media at least 1-2 times per year as-needed, but without ducks you should rarely (some people say never) have to clean your filter media. That’s one of the neat things about the Skippy biofilter system.
Using the test strips in our materials list below, we test our pond water periodically throughout the year. The water has yet to measure anything less than ideal.
Pond Maintenance Schedule
Here’s what a normal ongoing pond maintenance schedule might look like:
SPRING pond maintenance
- Check pond water quality with this Pond Water Quality Test Kit (here are the ones we use). If high nitrate levels detected, add seasonally-appropriate beneficial bacteria, then test water again a week later.
- IF waterfall has slowed due to debris clogging it, unplug the pump. The water reversal will usually dislodge whatever is in the pump impeller; if not, you’ll need to hop in, disconnect the pump, bring it to the side of the pond, pop off the top and remove the clog manually.
SUMMER pond maintenance
- Same as spring.
FALL pond maintenance
- Same as spring, plus remove fall leaves by hand or with a net so they don’t clog your pump.
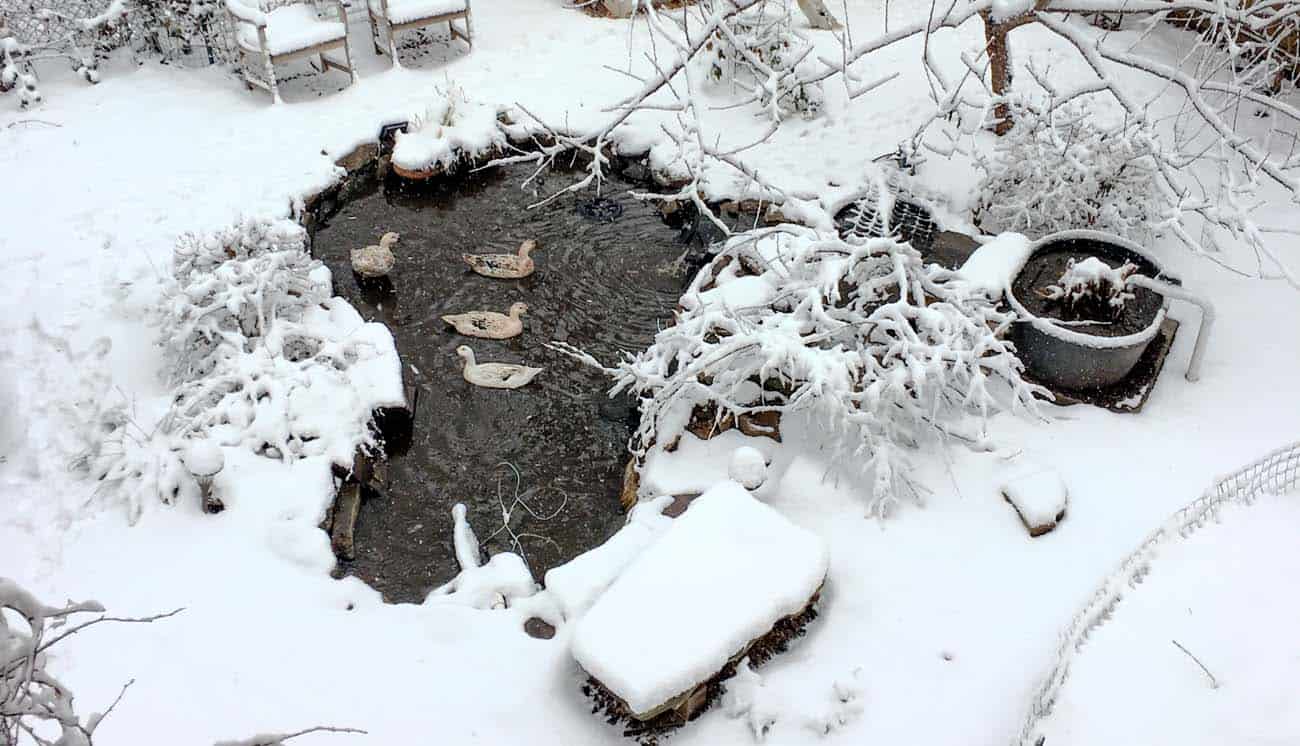
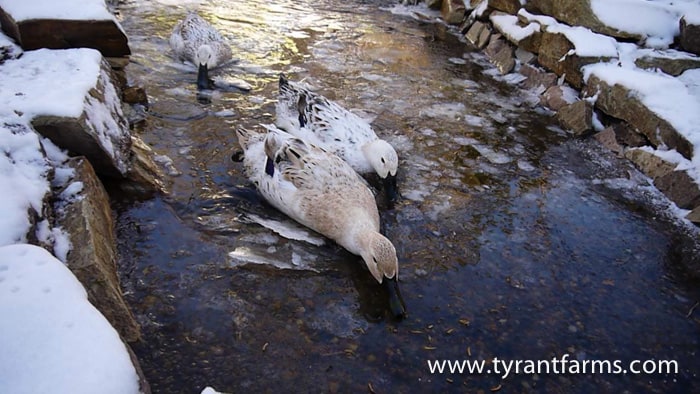
- Same as spring, but we recommend getting a pond de-icer if you live in a cold area. We live in Greenville, SC (Ag Zone 7B), which is not exactly known for frigid temps. However, our pond will still freeze over on really cold winter nights. After breaking apart and removing the ice with our numb hands enough times, we finally decided to get this floating de-icer. It’s kept our pond completely ice-free down into single digit temps, which makes us and our ducks very happy.
[divider top=”no” style=”dotted” size=”2″]
Complete Materials List For Backyard Pond
Stones, Pebbles, Gravel, Sand
Easily found at local landscape supply companies.
- 2-4,000 lbs rock (1-2 pallets)
- 1/2 scoop sand
- 1/2 scoop river pebbles
- 1/2 scoop gravel
The Skippy Biofilter
Materials List:
- 50 gallon tub
- 1 – length of 1 1/2 inch PVC pipe.
- 1 – PVC tee.
- 3 – PVC elbows.
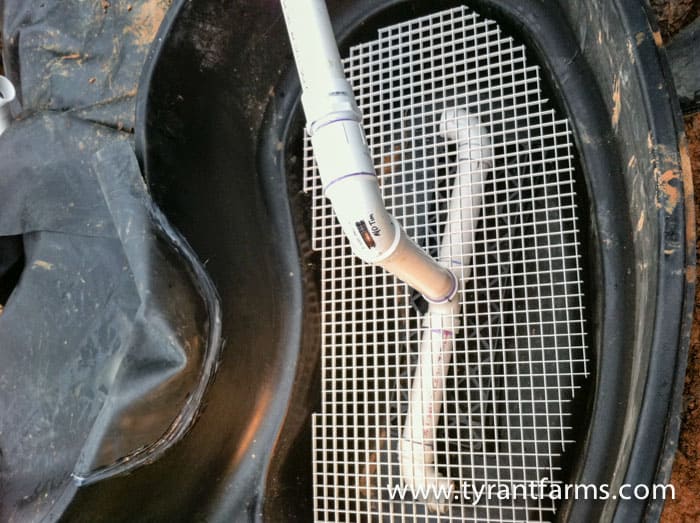
- 1 – 1 1/2 inch to 1 1/4 inch threaded nipple reducer.
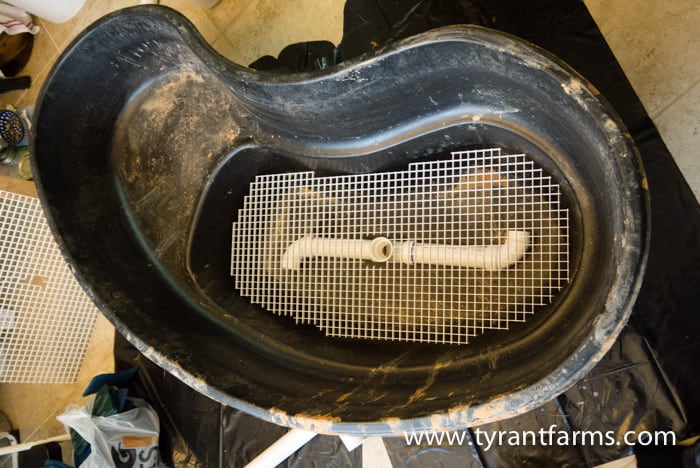
- 1 – plastic egg crate style overhead 2×4 light grate (or something similar). You can find these in the ceiling tile section of Home Depot or Lowes or other hardware store. It’s a ceiling light grate panel. *You don’t have to get this IF you use a really stiff filter media like Matala filter pads.
- 4 – 1/4 inch x 1 1/2 inch bolt, nut and washer combinations.
- Filter media/pads: Matala Filter Media Pads – (Green) and Matala Filter Media Pads – (Grey).
- Bacteria inoculant for filter media
Pumps & Aerators:
- Laguna 2900 Max-Flow (for main pump)
- Pump, Laguna 960 Max-Flow (*optional if you want to add a second filter pond because of your ducks)
- Pond guy aerator (we’ve tried a LOT of aerators and this one has been by far the best)
Pond Making Materials:
- Underlayment (15′ x 20′)
- Liner – Firestone 45 mil. EPDM (15′ x 20′)
- “Fish-safe” silicone sealant
- Insulating foam sealant for ponds (optional but great for sealing waterfalls or liner leaks)
Miscellaneous:
- Yard Master 13547 6-Outlet Power Stake with Light Sensor and 6-Foot Cord
- Pond De-Icer>
- Pond water quality test strips
- Warm weather pond bacteria
- Cool/cold weather pond bacteria
- pipe/plumbing glue (to connect & seal the joints)
- sump pump (really comes in handy if you need to drain part of your pond for cleaning or to reposition rocks, or to water garden beds)
Update: We recently added new pond lights and a solar-powered aerator from Poposoap to our duck pond. We’ve tested them throughout the coldest winter months plus multiple winter storms and they’ve performed wonderfully!
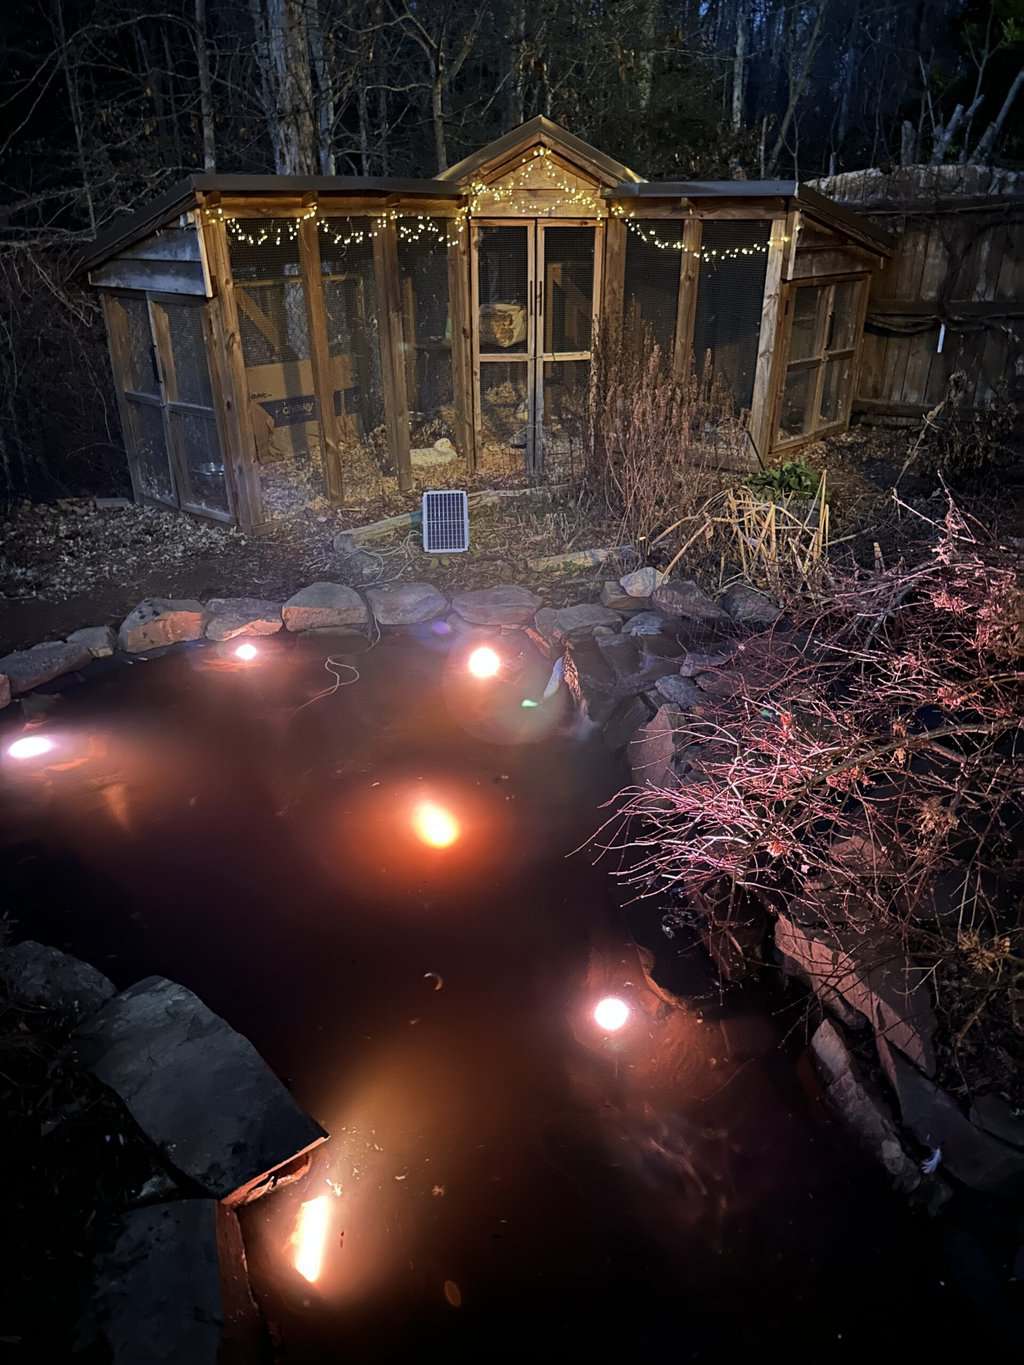
So we also recommend you check out the Poposoap store for high quality and affordable pond-building supplies (filters, pumps, lights, aerators, and more).

Questions?
Got questions about building your own backyard pond? Ask away in the comments section below!
Or read our other pond articles:
- Answers to frequently asked pond questions people have emailed us
- How to clean a Laguna Max-Flo pond pump (with instructional video)
- 14 surprising benefits of adding a backyard pond
[divider top=”no”]

Want to see a quick video summary of this article? Check out our Google Web Story about how to make your own DIY backyard pond!

Thanks for the detailed post! We have 7 ducks too, and for the last many years we’ve been cleaning a 50 gallon stock tank nearly daily. We’re hoping to follow these directions but we do have 2 very small children and not a lot do time. Would using a 1000 gallon stock tank work for now for the main pond? Or are the rocks in the pond critical to keeping the water clean? I would layer some rocks so the ducks can get in and out more easily, and I’ll be careful to make sure the waterfall isn’t leaking. Apologies if someone asked this already! Thank again
Hi Stephanie! Our son is now 6 and an excellent swimmer, but we were always with him when he was younger if he went into our backyard near the duck pond. So we certainly understand your concerns about having young children around a duck pond. To answer your question: no, the rocks are not critical to keeping the pond clean although they do help establish a pond ecosystem. The main filtration/cleaning comes via the filter pond and filter pads which you’ll inoculate with beneficial pond bacteria. Secondarily, the waterfall + bubblers help keep things aerated and aerobic. So as long as you have a good filter pond and aeration, a stock tank should work fine. Good luck!
Hi!
We are planning on building a smaller version of this pond (around 300 gallons) for our ducks, but I am having a hard time seeing and visualizing the plumbing from the Laguna pump to the filter pond. I see the photos for setting up the PVC going into the filter pond and that makes complete sense, but looking at pictures of the Laguna pump online on Amazon, it looks like the outflow was made for attaching to a hose. How did you handle attaching the pump to PVC and did you just connect pieces of PVC as needed to get from the pump to the filter pool?
Thanks! We are excited to get started on this project for our feathered friends!
Hi Amanda! Apologies for any confusion. There’s no single right way to plumb a duck pond and/or connect the plumbing between your pump and the filter pond(s). It sounds like with your setup, flex piping/hose may be the way to go. You’ll probably need some sort of heavy duty clip or tie to attach it to the pump. Whatever you use to attach your pipe to the pump, make sure it’s easy to remove when the pump is underwater but needs to be turned off and removed for cleaning. The way we attached our pump (which was tied in with PVC) was to use a 1 1/2 inch to 1 1/4 inch threaded nipple reducer that then tied into the existing hardware supplied with the Laguna pump. We also ended up adding cutoff valves to our PVC at the top of our filter pond, which I don’t think you can do with flex hose/pipe. Reason: when you cut your pumps off, the water sucks out and back in to the pond. When your filter ponds are mucky, that means a lot of the muck will get sucked back into the main pond when the pump is turned off, which isn’t ideal. Again, there are different ways you could plumb things so don’t feel the need to do exactly what we did. Also, you can always redo things and iterate later, so don’t be too stressed that you have to get things exactly “right” the first time. Good luck!
A very detailed and informative bio filter pond building blog. I’d like to recommend a pond sealer that can withstand seasonal freezes and thaws from -62 F to 130 F scale. Pond Pro 2000, it’s a butyl liquid rubber one-coat solution that never needs a primer, so it’s time and cost saving product. It’s UV-resistant, puncture-resistant, and non-toxic, so it’s 100% safe for fish, plants, and other aquatic life within the pond. It’s the only pond sealer in the market that has more than 30 years of history of success and offers a 5-year warranty. Its coverage on a smooth surface is 50 sq. ft. per gallon. Avoid rain the first three hours of application. Any leftover material can be stored for up to 2 years. It’s available in black and white colors and in quarts and gallons.
thank you for the article
We just bought 4 runner ducks & don’t have the space for building a full pond like this. I was hoping to create some small bath for them using a bio filter so I don’t have to dump the water every morning but don’t know if it’s possible. We just are looking at buying a 50-100gal pool and putting it underground. Then using a filter & pump and water aerator to get the water moving. Will this even work to clean out the duck solids or will this be way too small of a pond to filter? We also live in zone 6A and I’m worried about freezing. If I add a de-icer in the winter, will it help keep it drinkable for the ducks or does the water need to be moving with a waterfall to keep the water drinkable? And if not, any suggestions on what I can do to have drinkable water that doesn’t freeze in the winter for these ducks?
Hi Kara! There’s a lot to unwrap here… pond size, aeration, water quality, and freeze-prevention. Yes, you could do a miniature version of the pond we detail in this article and things should work the same. In Zone 6A, an in-ground pond with moving water/waterfall and a pond de-icer should stay pretty well unfrozen for most of the winter. Having aerators and/or a waterfall to help bring oxygen into the water is essential for water quality, as is: a) establishing a healthy pond microbiome of beneficial bacteria and other cleaning microorganisms, and b) filter pond/pads to help remove solids. Or you could opt for a different, simpler setup. For instance, in the winter, you could just have heated water bowls and only provide access to a small pool on days when temps are above freezing. Hope this helps and good luck to you and your flock!
Hello!! I’m so impressed, my husband and I are planning our duck pond details. Just made our Amazon purchase, the links were so easy, thank you! Quick question: how did you know what rocks to order? The materials list states “2-4,000 lbs rock”. How would I go about ordering this at a landscape supplier to get the type of rocks you have?
Hi April! We’d recommend going to a local landscape supply house and picking out some sort of fieldstone product with pieces that are: a) about 3-4x larger than standard bricks, b) don’t have sharp edges, and c) are in-line with your aesthetic desires.
Hi Aaron,
Just discovered and really enjoying your content. Wondering what type of fish are best in a duck pond? I’ve read some fish can harm birds, and some birds will eat the fish. Appreciate your recs!
Hi Anita! We went to a nearby PetCo and got about 20 feeder fish as a treat for our ducks one day years back. The fish were maybe a couple inches long each. We’re not certain of the species (there could have been multiple species, but some were black, some were orange, and some were mottled colored). We dumped them in our pond and our ducks went crazy eating them for about 20 minutes. We thought they ate them, and we didn’t think anything of it until a year later when I noticed a few fairly large fish swimming in the bottom of the pond one day. Sure enough, a few of them had survived and grown large enough not to be eaten by our ducks.
The fish survived for about 5 years, including through our Zone 7b winters. Unfortunately, during a rushed annual pond cleaning, I accidentally killed them by exposing them to concentrated tap water for too long.
Long story short: I’m not sure where you live, but if it’s a mild climate, you might try the same approach and get feeder fish from PetCo. Otherwise, you might consider some sort of native freshwater fish species that isn’t likely to have teeth or fins that could potentially harm a duck once they got large. We’ve decided not to have fish in our pond in the future since it adds more waste to the water and also complicates things whenever we have to clean out the pond. But that doesn’t mean that’s the right decision for you.
What a great article I have loved following your work since I discovered you when I got my ducks this past spring. I really would like to build this pond, but it is a ways from my house and accessible electricity – wondering if you have any information or experience with solar powered pumps? Thanks so much, Alison
Hi and thanks, Alison! Unfortunately, we do not have experience with solar powered pumps for our pond. As long as the solar system you’re using has some sort of battery to store electricity, it should work fine. Otherwise, your pumps will stop working at night or on cloudy days, which wouldn’t be ideal.
Before deciding what to do, you might want to price out both options: 1) running a dedicated hard-wired line with outlets to the duck pond area vs 2) installing a solar system with outlets. Our guess is it would probably be less money to run a line, especially if you can dig the trench yourself. If you have a handy friend or electrician who might do you a favor on the installation, Option 1 would be even less expensive since material costs would be comparatively low.
Good luck and reach out any time you have questions as you get going!
Hey Aaron, Thanks for all this great info. We are looking to build a small pond for our 5 ducks. It is already in place I now just need to build the filter system. I wanted to confirm that you permanently plumbed your pump in place? Because I have seen some people use the flexible rubber tubing from the pump to filter pond. I would obviously worry about digging this into the ground and collapsing the tubing but I am also worried about permanently plumbing my pump in place as I am in a much colder climate than you (5a). I don’t think I will be able to keep the pond running all year. Was thinking I would have to empty it during the really cold months up here (jan/feb). Any suggestions for how I should plumb the pump? Is it still removable if you use pvc tubing and glue it?
Thanks!
Hi Brendan! Yes, our pond plumbing is permanent. Maybe I should put “permanent” in air quotes because we could pretty easily remove and re-plumb it if we needed to. We’re in Zone 7b, so our winters are obviously way more moderate than yours. The coldest temps our pond has ever been through were multiple nights around 5°F with daytime temps rising into the low 20s. Our pond water surface mostly froze over but the pipes and pumps had no problems since the water was in constant motion.
In your situation, it might well make sense to focus on the easiest possible setup for disconnecting and removing the pipes and pumps, e.g. go with accessible (not buried) flex tubing. Or at least do so for any plumbing that would be filled with water or submerged in water that might cause them to crack or shatter during the cold months.
Hope this helps and good luck with your buildout! Feel free to reach out if you have any additional questions as you go.
Love all your duck articles! I have 4 ducks and I’m planning on building a pond like yours. Do you have a video of your pond setup anywhere?
Hi and thanks, Daisy! No, unfortunately we don’t have a video. Next time we do our annual pond cleaning, we’ll try to make time to do a video as well.
Hello! I help run a therapy farm for kids and we have roughly 17 ducks/ducklings. We want to build a pond similar to yours, I’m just wondering how many bog filters you would recommend putting in?
You’ll need 23 bog filters with that number of ducks. Just kidding! It actually depends… You could run the exact same pond setup we have with that number of ducks, but you’d just need to clean your filters and pond more frequently. Or you could simply make a much larger single filter pond, which would be a lot easier and affordable from a materials and plumbing standpoint versus having multiple smaller filter ponds. The other consideration is whether you plan to allow your ducks full access to the pond throughout the day or limit access, since the less time they’re in the pond pooping, molting feathers, etc, the less pond maintenance will be required. Sorry not to give you a crystal clear answer, but those are the questions you’ll need to think through before deciding on the best duck pond design for your situation.
Awesome project and follow through, glad it has worked out for you! I’m curious about the electrical bill, between the two pumps running 24/7, the occasional freeze protection and what not, any idea the electrical consumption rate?
Thanks Randall! I wish we could tell you the exact energy costs of the pond pump, but we just don’t know. I can say that Laguna pumps are known as the most energy efficient pumps on the market (they utilize Watts energy saving technology), and we didn’t notice any appreciable difference in our overall energy costs after installing our pond.
As for the pond de-icer, that’s only something we use occasionally during REALLY cold snaps where the pond freezes over. Since we live in a mild climate (Zone 7b), that might mean we use a de-icer for a few weeks each year. Some winters, we don’t have to use our pond de-icer at all, so $0 energy costs!
Hi Aaron & Susan!
Thanks so much for posting so much helpful duck info. I am a new duck mama with eight 1-month-old ducklings and just finished building a pond for them that follows your design. 🙂 They love it!
I have a question – well, several, really, I’d love to have more info/any advice on how you handle your pond plants.
Which varieties do you have?
How do you plant them – baskets, bags?
Which kinds will your ducks not eat/do you have to protect?
How many plants do you have?
Do you have to plant new plants every year?
Where do you buy your pond plants?
Are there any varieties you’ve had that you will not get again/particular favorites?
Sorry for so many questions! XD
Thank you!
Thanks Lydia! Glad our DIY backyard duck pond article was helpful for you — and your ducks! Answers to your questions about duck pond plants:
With repeat exposure, ducks will destroy/kill pretty much any SMALL/YOUNG plant you put in their pond, even if the plants are technically inedible. Case in point: yellow water iris (Iris pseudacorus). Years ago, we saw this plant growing on the shoreline at my parent’s lakehouse and brought some home to put in our duck pond. This plant is considered an invasive species in our region, but we can keep it contained to our pond area so decided to give it a try. (Yellow water irises are also great at slurping nitrogen and phosphorus out of water, which ducks produce in abundance – ha!)
We figured the iris’s large rhizomes, tough leaves, and inedibility factor (they’re considered poisonous) would be enough to keep the plant safe from our ducks. Nope, they constantly pulled at the plants and eventually destroyed the colony when we tried to plant the rhizomes directly into the pebbles/rocks on the shallow parts of the pool.
Eventually, we put mature yellow water iris rhizomes into ceramic pots covered in rocks with the whole pot slightly submerged in the shallows of the pool. That approach has proven effective at minimizing the damage they do to the plants since our ducks can’t dislodge the rhizomes. The plants have now been in our pond for at least 3 years (they’re perennials), so we’re confident saying they can withstand duck pressure when grown this way.
Every edible plant we’ve ever tried to grow (from duckweed to water lilies) lasts about 1 hour in our duck pond before being completely destroyed.
However, what we have done in the past few years is grow edible pond plants in our top filter pond with fencing placed around the filter pond to keep our ducks out. Our #1 recommendation for edible pond plants to put in a duck-protected filter pond is pickerelweed (Pontederia cordata). It’s a low maintenance perennial that’s also great at eating duck poo nutrients, AND you can feed it to your ducks. (In fact, you can eat it too.) Our ducks love it and one will occasionally figure out how to break through the fencing and ravage the plants. However, mature pickerelweed is pretty hardy and deep rooted, so it can tolerate a few sessions of duck pillaging. Pickerelweed is also considered an invasive in many places, but we’re able to keep it tightly contained in our setup. One other benefit of pickerelweed is it tolerates part shade well. Ours might get 3-4 hours of direct sunlight and the rest of the day it’s in the shade of an oak and peach tree.
Again, both the plants mentioned above are perennials, so you can plant them once, not yearly. You can probably source both plants through online retailers, but invasive species laws in your state may not allow retailers to ship them to you – you’ll have to check. Another good option to consider for your filter pond is cattails, which are also: a) low-maintenance perennials, b) good feeders, and c) produce edible parts for humans.
Hope this info helps and please let us know if you have any additional questions!
Yes, this is SUPER helpful!! Thanks so much! That’s especially good to know about young pond plants, I will keep experimenting. 😅
I do have a few more qs… 🙂
1. My Laguna pump has consistently gotten clogged every few days with feathers over the summer, and I have to pull it out a few times a week and remove them. Have you ever had this issue? I’m wondering if I need to build a screen cage around the pump to help catch feathers/debris…
2. I’m curious to know how you fence in your filter pond. Do you use flexible netting over it, or a cage?
3. Do you plant the pickerelweed in pots in the filter pond or right on the Matala filters?
Thanks! You rock!
Answers to your questions:
1. The only times our Laguna pond pumps (we have a large one for our main filter pond and smaller one for our secondary filter pond) have trouble getting clogged is when: a) our ducks are molting, and/or b) fall leaves are cascading into the pond by the bucketful in October/November. For most of the year, the pumps are clog-free, and we might remove and clean them once every 4-8 weeks just to keep the waterfall at maximum pressure to optimally aerate the pond. Unfortunately, when your ducks are molting, there’s no avoiding pump clogs. However, you can reduce the frequency of clogs by making sure your pump is elevated slightly above the pond floor and putting some sort of caging/screening system around your pump. Just make sure your cage/screen is relatively easy to remove and clean because it too will get clogged with duck feathers during molting. You might even make some sort of square cage that you could pull out via an attached cord and then put back without having to get into your pond. The other thing you’ll need to be careful of is not having any spiky wires or sharp edges on the surface that could injure duck flippers.
2. I went the cheap and ugly approach, e.g. function over aesthetics. Basically, I just put 2′ tall flexible wire garden fencing in a circle around the filter pond (crossing over the waterfall) supported by garden stakes to prevent the fencing from being trampled over by a herd of ducks. Doing something more attractive has been on my to-do list for two years, but since the current system works, that to-do item will likely continue to be relegated to the bottom of my list. Something more attractive would probably be fitted 1/2″ mesh caging just over the top of the filter pond, rather than fencing IF you’re just using Matala filters. If you also have plants in your filter pond, you’ll need to keep the ducks from being able to reach in.
3. There are multiple methods you could employ to get pond plants (including pickerelweed) in your filter pond. If you’re putting something like pickerelweed into a deeper filter pond that also has Matala filters in it, you’d want to construct some sort of floating/rasied island system so the plants are: a) easy to remove during annual pond clean-outs, and b) aren’t too far below the water surface, which would kill them. Our second biofilter pond is something of an ongoing experiment that has seen both successes and failures. Rather than Matala filters (like our main filter pond) our second filter pond is filled with a mix of lava rocks and large cobbles below with pickerelweed rooted on the surface (the roots extend all the way to the bottom of the filter pond by the end of the growing season). Initially, this second filter pond was plumbed the same as our primary filter pond, with piping going up and over the lip to an on/off valve, then into the bottom of the filter pond where it then percolated back up and out of a waterfall. However, the sediment would build up to the point that the smaller Laguna pump couldn’t pump water in, which would cause the pump to kick off. So we re-plumbed it such that water now comes out of a split pipe system near the surface at the back of the pond. Then it has to go past/through the pickerelweed patch before going out of the waterfall and splashing into the top of our primary filter pond. (Hopefully, this description makes sense.) This latest iteration has worked great and the pump has had no problems.
Thanks for putting this guide together – we’ve recently built a pond following your guide!
We are wondering about how to test the water for the duck’s safe drinking. Is pH, Ammonia, Nitrite, and Phosphate the only ones that matter? How do we know what ranges are safe?
Thank you and happy holidays!
Hi Gordon! Glad this diy duck pond guide was helpful for you.
Ducks/waterfowl can tolerate drinking water that would put a human in the hospital, so they don’t really require pristine drinking water. However, long-term consumption of water with high levels of nitrogen and phosphorus could pose a health risk to ducks.
When we first built our duck pond, we’d check our water quality monthly. Since we’ve now had the pond for many years, we’ve gotten much more laissez faire with water quality and pretty well trust our pond bacteria and other biology to keep things in balance.
At this point, we only test our pond water quality with the water testing kit mentioned in the article (product link: https://amzn.to/3z9k1um) if: a) we suspect something is off, or b) we’re just curious and want to conduct a quick check. Those test strips are a good guide for keeping things within a “normal” range on nitrate, nitrite, total hardness, total alkalinity and pH. For instance, if we haven’t cleaned our filter pond/pads in a long time, we might get an algae bloom in the spring which turns the water more greenish in color. We know that means high nitrogen levels and will just clean things out and add a round or two of new pond bacteria rather than worrying about testing the water quality.
Long story short: we were happily surprised by how well the water quality in our pond stayed within normal ranges. However, when you’re getting started or you suspect high nutrient levels in your pond, it’s a good idea to conduct a check and take corrective action immediately.
Hi Aaron,
Thank you for the reply – much appreciated.
Do you have any suggestions on products / strategies for manipulating the levels for the pond? For example, the PH level for my pond is a bit on the high end (close to 8.0) and phosphorus was a bit higher than expected at 2 ppm.
I’m looking into some of the API Pond products, which look like they are meant for fish ponds but should work for ducks ponds as well:
https://www.chewy.com/api-pond-ph-down-pond-water-ph/dp/192560
https://www.chewy.com/api-pond-ecofix-sludge-destroyer-pond/dp/151031
https://www.chewy.com/api-pond-zyme-sludge-destroyer-pond/dp/151019
Any thoughts?
Thanks and hope you are off to a great 2022.
Hi again, Gordon! A pH of 8 is fine in your pond. In fact, pond water with a pH range between 6.5 to 8.5 is considered good. No need to stress there.
2 ppm would be high on phosphorus but one caveat (that also applies to pH) – take your water measurements in the morning BEFORE your ducks go into the pond and before the plants and algae in your pond cause a temporary bump up in pH in the afternoon. Ducks pooping and stirring up the sediment could throw off your nutrient readings, and plant/algae could throw off your pH readings later in the day.
With those caveats out of the way, if you take a morning reading and you’re not happy with the nutrient results, either of the two Sludge Destroyer products you linked would work well in helping to biologically degrade the sludge. You will still need to periodically clean out your pond and filter pond though, especially if you have a lot of ducks utilizing it. For instance, our primary filter pond is currently nearly full of muck beyond what pond bacteria can manage (lots of broken down fall leaves + duck poop). That means it’s time for me to turn the pump off, switch off the turnoff valve to prevent sludge backflow, and remove the muck + clean the filter pads. Thankfully, that’s something we only have to do 1-2 times per year at most. It makes our compost and fruit trees happy though!
Hi Aaron!
The ducks are loving the pond! It’s been about 3 weeks after we’ve put them in, but our ammonia levels seem to be consistently rising (4.0 ppm now). However, we haven’t detected any nitrates or nitrites. Does that mean the bacteria isn’t working? We’ve added the filter pad bacteria, as well as the other denitrifying bacteria you’ve suggested. Do we just need to wait it out or add more bacteria?
Thanks,
Gordon
Sorry to hear you’re having pond problems, Gordon. 4.0 ppm ammonia is quite high. It’s hard to diagnose problems/solutions online without knowing more, but a few considerations and thoughts:
1. Yes, those high pond ammonia levels indicate that Nitrosomonas and/or other ammonia-eating bacteria are either not present or haven’t proliferated to the point of keeping up with the ammonia levels. If they are present, they should have been able to start making a dent in ammonia levels after 3 weeks.
2. Most of the pond bacteria products (like Sludge Destroyer) recommend using them twice per week for two weeks when you’re first inoculating your pond, then once every two weeks for regular maintenance. So, it’s not a one-and-done application.
3. Something I should have considered previously is the time of year given that it’s now winter. I’m not sure where you’re located but pond water temperature has a big impact on what type of bacteria (and natural pond-cleaning products) are going to be effective for you. It’s possible your pond ammonia problem is entirely due to the bacteria you’re adding NOT being able to survive or function at cold temperatures. Hate to suggest something else to buy, but there are specific COLD water pond formulations like Aquascape Cold Water Beneficial Bacteria that could be the ticket to lowering your ammonia levels. Before you buy anything else, look at the bacteria-based products you’ve already used and see what the product specs/instructions say about temperatures at which they’re effective.
4. In the meantime, you might want to go ahead and do a partial water change out, maybe 1/3 of total volume, to immediately drop the ammonia levels down.
Out of curiosity, what’s the total gallon volume of your pond and how many ducks are utilizing it?
Hi Aaron, thanks so much for your reply! Having trouble replying directly to your message, so will start a new reply thread.
To answer your questions:
– We have a 3000 gallon pond, with 3 ducks. It is fully enclosed and connected to their coop, so they end up spending 95% of their time in the pond.
– Good point about the cold weather – The pond water has regularly been below 40 F the past few weeks. I will your recommended product. We’ve been using the Microbe Lift filter pad gel and the Microbe Lift PL, which does say it works, but slower during cold weather. We’ve also used the Microbe Lift Autumn / Winter, but it looks like that one has to be used in water above 40F.
– I think the bacteria might have been working, but slowly. After the first week, the ammonia was at ~1.5ppm. We then kicked the ducks out for a week, and it seemed to have dropped to around 0.5ppm. We then put the ducks back in for a week, but its gotten up to 4.0 ppm.
– I’m not sure whether this is relevant information, but we found that the water got foamy / bubbly during the times when the ducks did not have access to the pond. But when we put the ducks back the bubbles seemed to disappear.
– When we kicked out the ducks, we also emptied the bog to adjust it to fix a leak. We did add more filter gel at that point, but I wonder if that messed up the bacteria that was growing in there.
A few follow-ups:
1. What do you think is a safe level of ammonia to have the ducks in? What levels do you generally have it at?
2. When the water gets really cold or even starts freezing over, does that mean all the helpful bacteria will end up dying? Do you have to “restart” things in the spring when that happens?
3. We’ve gotten 2 power outages – does the bacteria die without aeration when that happens? Especially the bacteria on the filter pads that isn’t submerged in water anymore?
Again, thanks so much for your help!
Best regards,
Gordon
Hi Gordon. Sorry for my slow response. Haven’t had much spare time past couple days.
Two thing we’ve probably under-appreciated over the years is:
a) having an established microbial ecosystem in our pond which probably really helps our water quality through the seasons, and
b) having an open pond that regularly gets new rain water added and overflows during heavy rains, helping to do small but regular water changes. For reference, we have 6 ducks in a 1200 gallon pond and our pond is very low maintenance.
Foam occurring in your pond when your ducks are NOT using it is odd. That’s usually caused by protein in the water, frothed up by the waterfall. The source of that excess protein is duck excreta (or fish excreta in fish ponds).
Answers to your questions (as best as I can):
1. What do you think is a safe level of ammonia to have the ducks in? What levels do you generally have it at?
We haven’t tested our pond water in so long I don’t know what our ammonia levels are. Unfortunately, I don’t know where our water quality test kit is so I’ll need to order a new one. As far as ammonia levels for poultry drinking water, below 25 ppm is the rule for most birds so the same would likely apply to ducks.
2. When the water gets really cold or even starts freezing over, does that mean all the helpful bacteria will end up dying? Do you have to “restart” things in the spring when that happens?
I can speculate here, but not being a microbiologist, you should take my answer with a grain of salt. It’s likely going to depend on the species of bacteria. Some species will stay active. Some may remain active but slow way down. Some may go dormant until optimal temperatures return. Others may die.
If you’re adding beneficial pond bacteria specifically produced for sub-40F water, I don’t think they’ll perish when your pond freezes over.
Depending on where we are in our pond cleaning cycle and what the pond water looks like, we often add warmer weather beneficial pond bacteria in the spring. That also often coincides with a big annual pond and filter pond cleaning. We’re not very regimented in our pond treatments – we more do things based on observation, intuition, and time availability at this point.
3. We’ve gotten 2 power outages – does the bacteria die without aeration when that happens? Especially the bacteria on the filter pads that isn’t submerged in water anymore?
There’s actually two questions here: a) can the beneficial pond bacteria survive without oxygen — and if so for how long? and b) can beneficial pond bacteria survive out of water — and if so, for how long? Again, this is beyond my expertise but I’m happy to speculate…
a) My understanding is that there are all different types/species of beneficial pond bacteria with varying degrees of oxygen requirements. Even bacteria that need oxygen can survive for hours or days without oxygen, depending on the species. My guess: most of you beneficial pond bacteria would probably survive at least 24 hours on residual oxygen with your pump off, perhaps longer.
b) If your filter pads completely dried out or froze solid, the bacteria in the pads would likely perish. If the filter pads stayed damp and unfrozen, they’re likely fine.
Sorry again that you’re having water quality challenges. Please do check back in once your new cold water pond bacteria has a chance to go to work!
I’m a bit late to the party, but so grateful to find such a great plan and details for the build. We’re moving back to my home state of Oregon and I definitely want to graduate from dumping and cleaning the stock tank every couple of days! In our current home the chickens and ducks are too far from the house — I want a beautiful area close in so I can enjoy the sound of the waterfall and interact with our pets. My husband will appreciate all the design details. Can’t wait to begin!
Glad the information is helpful and best of luck on building your duck pond! Let us know if you have questions as you get underway.
Hi, Aaron. I just wanted to say thank you for providing such a detailed explanation of your process here. We followed your instructions, used the same materials, and have a beautiful pond for our five ducks. We have one problem, though. It has been close to three weeks since we turned the pump on and began filtering our water. We added bacteria to the filter pads and the water, have had the pump running almost constantly, and our water is still very murky. It has developed a strong odor now, too. I’m not sure what we did wrong, but I’m concerned about the ducks using the pond with the water looking and smelling like it does. Should we give it more time to filter? I’m tempted to drain it and start over with fresh water, but I’d hate to go through the whole waiting process again if it’s going to correct itself soon. Any advice would be hugely appreciated. Thank you!
Hi Emily! Sorry you’re having issues with water quality. Best guess, there are two possible causes here (and they may be happening concurrently):
1) When we first filled up our pond and turned on the water, the water was quite turbid due to all the residue on the rocks and pebbles. It took quite a while for the sediment to settle, but there was no associated smell.
2) Municipal water has quite a few chemical additives put in to kill microbes to ensure people don’t get sick when drinking it. These additives may also kill the beneficial pond bacteria you add when you’re first filling the pond. The chemicals do dissipate and/or become diluted by rainwater over time. This would mean that the good bacteria was killed, leaving the “microbiome” of your pond sterile and wide open for inoculation by bad bacteria, which would create an odor as they proliferated.
The first thing we’d recommend is re-introducing beneficial pond bacteria one evening asap once you put your flock up. We’d recommend Microbe Lift PL Bacteria which will consume lots of nitrogen and algae as well: https://amzn.to/3iS50Fm. If that doesn’t improve the water quality within 3-5 days, then you may unfortunately want to consider removing and replacing the water. Please check back and let us know how things go!
Thank you for the advice! We ended up draining the water out yesterday. I ordered the bacteria you suggested and added it, but the water continued to get worse, so we figured it was time to start over. Now that we’ve cleaned everything out and refilled the pond with fresh water (still city water, unfortunately) I have a few follow-up questions.
1. When should we add the first dose of bacteria to the new water and inoculate the filter pads? If the chemicals in city water will kill everything, would it be better to wait a bit until said chemicals have dissipated?
2. Should we have the pump running and filtering right away, or wait until we add the bacteria?
3. Is there a particular type of feeder fish you’d recommend to help with the pond gunk? I’ve read they can be very beneficial to the health of the pond, but I don’t know what the options are as far as cold-hardy (needs to survive Ohio winters) and big enough to not get eaten by the ducks. We purchased 40 large minnows and goldfish already, to the ducks’ delight, and have had no survivors.
Again, thank you so much for your help. I’m sure you have much better things to do than answer my endless questions, so I really appreciate you taking the time to respond.
Sorry for your troubles, Emily. Answers to your questions below:
1. Unfortunately, there’s no simple, universal answer here. That’s because different municipalities use different types and ratios of chemicals to treat their water and make it safe for human consumption, which is not the same thing as being safe for fish, beneficial microbes, and other aquatic life to live in. Case in point: some municipalities use straight chlorine which would probably completely dissipate from pond water on a hot summer day within 24 hours. Others use chloramine, which is a combination of ammonia and chlorine that makes the chlorine much more non-volatile, e.g. it won’t dissipate. Aquarium owners usually have to use special water treatment products to neutralize chloramine or it kills their fish. There’s no risk to your ducks, but depending on the concentration, chloramine may very well kill the beneficial microbes. Maybe your town/city water department publicly posts what additives are used in the water on their website, otherwise you could call to find out.
Either way, any chemicals in your water that would volatilize out would likely do so in 24-48 hours. So you could add Microbe Lift PL Bacteria after 2 days. Frankly, you may want to keep adding it every week or so if your pond water becomes malodorous (fancy way of saying stinky) or has high amounts of algae growing in it. We’d be really surprised if it doesn’t work because it’s a great product that we’ve found very helpful over the years.
2. Yes, you definitely want to keep your pond pump on. That will at least filter out solids through your Matala pads and aerate the water via whatever waterfall system you have set up. Both of those factors are very important for promoting and maintaining pond water quality.
3. We had pretty much the exact same thing happen with fish in our pond! Our ducks ate about 50 small feeder fish we got from a local pet store within an afternoon. Miraculously, a few of them somehow survived and became large fish (we didn’t realize until a year later). The problem with using fish for cleaning your pond is they also poop and pee. As you said, we’re also not sure which fish in the “cleaner” category could survive the winter. Plants are a much better option for improving water quality IF you can keep your ducks from eating/destroying them with fencing or other methods. We have some yellow flag irises in pots in our pond that our ducks pretty well leave alone. We also have pickerelweed in our second pond filter which our ducks ravage at every opportunity (somehow they always end up figuring out how to get over/under/through whatever fencing we erect). Both of those are perennial plants that go dormant in the winter but slurp up a lot of pond nutrients from spring – fall, which also overlaps with periods when pond water quality can be more of a challenge.
Hope this helps and please keep us posted.
We have grown to love our ducks after our daughter brought home a set from a farm supply store 7 years ago. I just built a duck pond (filled it up about 10 days ago) based on your site and so far the ducks are liking it. But, i’m getting green buildup on the rocks and waterfall and pump hose (its clear so i can see the inside of it). I’m no biology or chemist so i don’t know how to diagnose what it is. The pond gets sun until mid afternoon and we have had some scorcher days. Could the sun be killing the bacteria in the filter pads or is it algae? I do have an oxygenator in the pond. I don’t have test strips purchased as i’m not sure what to do with results anyway. The ducks still get in and our dogs drink (but don’t get in). Any recommendations? Oh, we have 5 ducks for our pond and have used a 50 gallon tub for our filtering bog. We were able to use one layer of the green filter and two layers of the finer gray filter.
Hi Mark! Sounds like algae, which is normal and expected (to a point) when you have a steady nitrogen/nutrient source like duck poo + heat. We have some algae in our pond and on our rocks too. When there is excess nitrogen, it can cause a large algae bloom which turns your water green – that’s when it’s a problem. Since your pond is new and sounds like it’s set up well, you probably don’t too severe of a problem. One thing we wonder about is when pond bacteria is added to a pool full of fresh municipal water that contains additives intended to kill microbes (for good reason), if it also kills the good bacteria you’re adding. The answer is probably “yes.” At this point with your pond, the chlorine & other antimicrobial compounds in the municipal water have probably dissipated or diluted with rainfall and open air exposure. Long answer short: you may want to go ahead and add another round of pond bacteria tonight once you put your ducks up. Not sure which bacteria you’re using, but the one we’d recommend for you is Microbe Lift PL Bacteria which will consume lots of nitrogen and algae as well: https://amzn.to/3iS50Fm. Hope this helps and please check back to let us know how things go!
Hey my name is Riley and we want to build a pond we have three ducks that are indian runner ducks we don’t need a very large one just like four hundred gallons with out a water fall and we’re wondering what y’all could suggest our price range is preferably under 1500 if y’all could get back that would be great rhanks
Hi Riley. You can easily modify the pond plans/specifications we detail in this article to make a smaller pond with a smaller budget. Please note that the waterfall is not merely cosmetic: you have to have a pump + filter pond + filter material in order to filter out duck solids and clean the water in your pond. The waterfall simply connects the filter pond to the main pond while aerating the water (another important feature for improved water quality). Once you understand the basic requirements for creating a pond like the one in this article, you can modify your plans to match your budget/scope. Hope this helps!
Hello, and Happy New Year!
First, know that I’ve stalked your site for about a year now, and am finally ready to build a pond because of it! You did a great job presenting a lot of general, good to know, information with just enough detail to work. The wife has 11 ducks (calls and teals), so I’m scraping out a pond that will have a 110 gal filter w/ waterfall, and a second waterfall into a stream that will also feed into the pond. I’ll have a Laguna 4280 feeding both, hoping to create some circulation from the two waterfalls angling in to keep it from freezing in a Virginia winter. I (think I) recall that you used to have a circulation pump, in a case of some sort, in your pond – do I recall that correctly, or is that from some other site I stalked and don’t remember? I’m looking for a way to help out circulation a little so I can avoid powering a de-icer for ~1800 gallons of water.
Thank you!
Hi Herb! We were wondering who was stalking our site, so thanks for outing yourself! 😛
As for our DIY backyard pond: other than the small and large Laguna pumps + two filter ponds/waterfalls, we haven’t used any additional pumps or circulating systems in our pond. The flow from the waterfalls and the direction at which they enter the pond keep the pond water in motion and circulating. We do have cold snaps here in Upstate South Carolina where the pond will freeze over IF we don’t plop a de-icer in, but that’s maybe only 2-3 weeks over the course of a winter. It has to be consistently below freezing for multiple days and nights for the pond to freeze over. A de-icer really doesn’t draw that much energy, so it may well be worth considering for your setup up in VA. Hope this helps and feel free to reach out anytime we can be of help as you’re putting your pond together.
Just wanted to say thanks for your excellent step by step instructions. I have installed 2 ponds for my sweet ducks following you instructions with a few modifications. One large 2000 gallon pond out side and one 150 gal pond insider greenhouse where the ducks live. The indoor pond is in service all year. They both have 50 gallon filters, I have matala pads at the bottom and clay balls or k1 biomedical on top. Though I found that plants growing in the bio media made a huge improvement to water clarity. I will add more plants next year. I also found the barley straw extract to be very helpful, but you can’t get behind. I did find an easy fix if the pond gets really green. I replaced my pump profiler with an old poly filled pillow for 2 days and it filtered out all the algae. Anyway, thanks for your help.
That sounds like a great pond setup, thanks Kristin! Yes, plants definitely make a huge difference in pond water quality – the trick is keeping the ducks from accessing and eating/destroying them. The best plant we’ve found thus far is pickerel, which we keep in our top filter pond with caging to keep the ducks out. Every now and then, they’ll figure out how to get over the fencing and eat it to a nub. Thanks also for the other pond care tips!
Do you run your pump at all times?
Yes, we run our pond pump at all times. Over time (especially when leaves are falling or our ducks are molting) the pump cover and our pump impeller will get clogged, causing the flow rate to decrease. When that happens, we’ll turn off and clean the pump, which only takes a few minutes. Otherwise it’s always running. Water flow + aeration is really important for maintaining good water quality. Here’s a quick tutorial showing you how to clean a Laguna pond pump (the one we use and recommend), with video: https://www.tyrantfarms.com/video-how-to-clean-a-laguna-max-flo-pump-in-your-backyard-pond/.
Hi Aaron & Susan,
Thank you so much for documenting and publishing your experience building your pond. We followed pretty much every step of your guide, and we now have a beautiful (and a bit smaller) pond for our future ducks! (If someone could tell me how to add pictures, I’d be happy to share!)
One question for you: How are you running the electrical cords from the pumps to the power stake? Did you run them through some conduit and bury them? & I assume you leave the pumps running 24/7. Have you had any issues with moisture getting into the connections between the pump cords and stake?
Thanks again!
Hung
Hi Hung! Glad to hear you’ve got a beautiful duck pond up and running. We run a cord from an outside GFCI outlet to the power stake. Yes, we run our pumps 24/7. No, we haven’t had any issues with moisture in the outlets since the power stake we use is made for outdoors. As far as photos, if you have them somewhere online in a public album, you can share the link here – we’d love to see them! Unfortunately, this commenting system doesn’t allow file/photo uploads.
Hi Aaron. Where did you find the research on pond size? I’d like to do something similar but about half the length. Thanks.
Aaron D.
Oh, man… We did our digging on how to make a DIY pond about 10 years ago, and I have no idea what resources we utilized at this point. You can use the same basic layout we have here — just smaller — and downsize your pump a notch. But the basic mechanics are the same regardless of size.
Hey Aaron. I’m going to be building a pond a lot like yours for our three ducks in the next few weeks. I couldn’t find the 50 gal version of the filter pond tub you recommended, just 40 gal, so I bought the 110 gal version instead of planning a second filter pond in the future. Would the one Laguna 2900 be enough to feed one big 110 gal filter? Thanks!
Hi, and so sorry for the slow response. Crazy week. Yes, a Laguna 2900 will be more than adequate to cover you on a 110 gallon filter pond. Best of luck on your duck pond build and reach out if you have questions along the way! 🙂
So our Skippy filter has kept our water crystal clear, we even added plants in the filter (out of ducks reach). Our only issue has been algae growing on our rocks. The pond is unfortunatly in direct sunlight and won’t have shade until our trees grow up. Do you guys deal with rock algae at all or just accepted it as a part of pond life? I feel like I need to educate myself more on algae and a ponds ecosystem. Our only solution for now is adding shade via a cow panel trellis overstretching the pond with plants but it’s a WIP.
Hi! Sorry for our slow response. Been a hectic couple days. Yes, we have algae on our rocks, too. It’s part of a pond ecosystem and creates habitat (and food) for other pond critters. For instance, we now have a population of small water mollusks – we didn’t put them there, they just appeared. It seems that they eat the algae on the rocks and our ducks then eat them. So, don’t be too concerned unless you have an over-proliferation of something, which would indicate an ecosystem or nutrient load that’s out of balance. For instance, if your water turns green due to an algae bloom (different species than what lives on your rocks), that can mean high nitrogen levels.
Hope this helps put you at ease!
Hello Aaron and Susan!
I had a couple questions for you as we start our duck pond adventure. Did you use just one layer of each of the filter materials in your skippy biofilter? Also, if I’m reading it correctly, you cut a section of the lip of the filter tub to direct the water onto the waterfall. If that is correct, how far below the rest of the lip did you cut and how wide did you go? Lastly, the best place for our filter is on the pond wall just behind where our pump will be sitting. Will that be an issue with circulating the pond water? I’m just worried that one area of the pond would have good turnover but the far side (about ten feet away) might not be moved as much. We noticed that your first filter was near the pond pump but the second pump was placed into the far end of the pond. Was that to get the water around the entire pond to circulate better?
Thank you and hope all is great with you and the family!
Karen and Doug
Hi Karen! Answers to your questions:
1. We ordered one sheet each of the grey and green Matala pond filters. Then we cut a form out of each one to match the size/specs of our primary filter pond. The green filter form went in first to filter out the larger material/solids. The grey filter form went on top to filter out finer material/solids. Then we put the scrap cut pieces on top of the larger fitted forms.
2. Yes, for the top of our waterfalls, we cut a chunk out of the lip of both of our filter ponds (about 2″ deep x 5″ wide) then glued pond liner into the filter pond and over the lip using a pond adhesive. Note that the 2″ x 5″ opening isn’t a hard and fast rule, that was just an opening that fit our particular waterfall.
3. Yes, we put in our second pump + filter + waterfall to get more circulation and aeration in our pond AND to get additional filtration of solids. If that’s not ideal for you, another possibility for you to consider is doing a split waterfall to get some extra water down to the far end of your pond. But as a general rule, the more the water moves, aerates, and filters the better it will be for water quality. That’s why we also added additional aerators to our pond.
Hi Again Aaron and Susan!
Thank you so much for the quick, very detailed and extremely helpful response! My husband and I are almost done with the digging and ordered most of the supplies from your website suggestion list and now are ready to roll ehehe 🙂 Again, thank you so much for all you do on your blog and website which are so truly inspirational and fun 🙂 Not only now we are going to have a pond, but baby ducklings too boot !! Next project will be the cob oven lol …well first is first…finish the pond…eheh….we will send pictures to show you what you have started eheh :))))) again ….redundantly I know, THANK YOU TO YOU BOTH…
HUGS
Karen and Doug and our son Jetrick
Really appreciate the kind words, thanks Karen! Love to see your photos when you’re done. 🙂
Hi Aaron, are you guys just using 1 grey and 1 green full sheet filter media pad or are you using more? I’m assuming you have all green first then the grey stacked on top. Thanks!
Yes, we ordered one sheet each of the grey and green Matala pond filters. Then we cut a form out of each one to match the size/specs of our filter pond. The green filter form went in first to filter out the larger material. The grey filter form went on top to filter out finer material. Then we put the scrap cut pieces on top of those.
Hello Aaron!
I love what you and you wife have done with your duck pond and now in the process of building one too along side our school house chicken coop. Waiting on soil to level our 12 by 10 pond and hopefully the rest will be done by June 15th. I love the pictures you shared which really helped in defining the size and level of our pond. I am still in the process of figuring out how to work the skippy bio filter but will use the ideas you guys used for yours. Thank you for posting this pond and in a few weeks we will be adding 4 baby Welsh Harlequin duckling to our brood.
Thanks, Karen! Glad our DIY pond article & instructions have been helpful. Since we originally built and did step-by-step photos of the pond construction, there were two changes (both noted in the article): 1) We added a second filter pond & small pump. That filter pond has a waterfall that goes into the first filter pond. 2) We switched to Matala pond filters (linked in article) which are SO much better than what we started with. The biofilter system isn’t terribly complicated, so don’t stress. It’s basically just filter material inoculated with beneficial pond bacteria. Water from the primary pond pumps into the bottom of the filter ponds, is strained of solids by the filters (which are then largely digested by bacteria), then the cleaned water goes back down the waterfall and is aerated in the process.
Reach out if you have any questions as you get going! Best of luck to you and your Welsh Harlequin flock. You’re in for quite an experience. 🙂
Hi Aaron. After reading this article a couple months ago, I was really inspired to build a pond for our ducks! My boyfriend and I got three ducklings from Tractor Supply. A few weeks later, we got two more ducklings from another feed store. There already was two ducks living in the duck yard, so now we have seven duckies. Before the pond, we had 3 baby pools that weren’t doing the trick. The duck yard is on a hill, so we couldn’t follow your design exactly, but we tried to keep it close(for the most part). The pond is about 6ftx11ft and 1.5ft at the deepest. I think we calculated somewhere between 900-1200 gallons. We originally started with two 20gallon garbage cans as the filters. Before the ducks felt comfortable enough to get in, the garbage cans had our water crystal clear and flowing good. Once they realized the pond was for them and started enjoying it, the water turned reddish. It started out light red and as the days went on, it turned deeper red and eventually had bubbles floating in the top. The ducks wouldn’t even get in it then! We decided we needed more filter, so we used two 55 gallon drums and filled them with lava rocks and a hodgepodge of filter matting material. We also added another 100 gallon pond above the original that connects with a little stream. We fenced off the top pond and put some plants in it. After a couple of days, the water is turning red again. We went out and bought some algae treatment that is safe for pond plants and animals. The day after that treatment, the water was a lighter red, but still red. We also treated it with some barley extract and have two barley balls floating around. Today, the water wasn’t bubbly and wasn’t a deep red, but it definitely had a red tint to it. I was wondering if your pond experiences any of the red water that we seem to be?
Hi, I just have a couple of questions
did you have to tip the filter in a certain direction so the water spilled that way
also, could you plant any plants on the bottom of the pond
other than those things I believe I understood, thanks for the post
Hi, Thank you for all the great info. We have 5 ducks and are about to build them a pond! Would you recommend using two 50 gallon tubs? 100 gallons? or maybe an 85 gallon instead? Also would you recommend one or two pumps for added aeration? Thanks
Hi Liane! Unfortunately, there’s not an exact formula to determine how big of a pond or how many pumps you need in your pond based on the number of ducks you have. A lot of it has to do with your budget, the size of the space, and just your personal preferences. However, with 5 ducks I’d recommend you have at least a 100 gallon primary swimming pond. If you’re going with a self-cleaning skippy biofilter setup like we have in this article, you’ll want to have a secondary filter pond that cleans out the solids while providing aeration via a waterfall that connects back to the main pond. That means you’d need at least 1 pump and another 50 gallon tub for your filter pond.
Hope this helps.
Love the pond. Our ducks will hatch in the next two weeks and we’ve decided to build them a pond. How many layers of filter pads did you use? Is it just one of the green and one of the gray, or are there multiples or some other media?
Hi Nathan! With the Matala filters, we only went two layers deep with single pieces. (Green filter went in first to filter out the larger material; the grey filter went on top to filter out finer material.) The Matala filters come in a giant rectangle shape, so we cut a single piece out of each color filter and put that in the filter pond. With the filter material that was left over, we cut smaller chunks that we then put on top of the larger fitted filters. They’re extremely efficient at filtering out muck – wish we’d known about them years ago. Please let me know if that answers your questions or if you all need any help as you get going on your duck pond. Fun project! It’s tough work, but so worth it when you’re done and get to enjoy it for years to come. Your ducks will love it too. 🙂
I just bought the pump and pond liner a few mouse clicks ago. I’ll get the Matala filters also. I’ve used them before in Aquaponics gardening and they’re really amazing. Do you put anything in the filter besides the Matala and the bacteria, like, some kind of cover or lid with holes for air, or does it just do it’s thing?
Hi Nathan! Nope, we don’t cover our filter ponds. Just put filter material in and let it do its thing. That doesn’t mean you can’t do something differently, that’s just what we do. But there’s no functional or beneficial reason we know of that would make having a cover a necessity. One interesting thing we’ve noticed is that all kinds of interesting aquatic critters just show up in our filter ponds (and main pond) – frogs, salamanders, various water mollusks, dragonfly larvae, etc. So we just try our best to mimic a stream/pond ecosystem and leave things open.
Hi,
We are planning to build a pond and following your great directions. We are going to do an oval design probably measuring 10 by 20 ft for six ducks and hopefully a few fish. We have a really big yard and we are building this pond next to our chicken/duck Garden Coop/enclosed run. I was going to do an 85 gallon bio-filter, the Laguna 4200 pump and increasing the size of the liner/under layment. I was hoping to do one filter and pump but I guess we had pumps and filters if needed.
Hi Jessica! Best of luck with your pond. Please share pics when you’re done! Also, let us know if you have any questions along the way.
I did it! built my pond works great. it’s been almost a year and I’ve added 2 things. I added a ball valve shutoff to the bottom of waterfall, hooked a hose up to water a nearby garden. Also I can just open it up to clean bottom of waterfall sludge. I stir it the sponges on top with an old broom to clean everything. Then I added a uv light for algae since my pond is in sun all day I had a real problem.
I wanted to thank you for posting this design without it I don’t know if I would have taken the plunge.
Hate to be that guy but 2 questions:
Did you ever consider a bog filter? I’m curious about the idea but don’t know how it would do side by side with ducks.
When cleaning your current bio-filter, does it require completely dismantling it, washing then putting back together?
what are the 8k lbs of rocks for? I see the large ones lining the pond. Is that really 8k rocks?
Thanks for taking the time to document how you put in your duck pond. I have bunches of questions….
1. How is your system working so far. If you were starting from scratch over again, is there anything that you would change?
2. Can you provide a brief description of how you clean your biofilter bogs
3. Do you get sediment forming at the bottom of your pond and if so, do you need to clean out your pond? I’m wondering whether a swirl pool between the pond and the skippy filters would remove large particles and reduce the bioload on your skippy filters.
4. In addition to your skippy (microbe) filter, have you thought about filtering your water through an hydroponic system? The plants you use could provide additional filtering and landscaping to your pond. Also, some of the plants you grow could be given back to your ducks as an additional source of nutrients
5. I see that you keep your pool open year round. What happens to your microbe population during the winter time? Do you need to re-populate it in the spring again?
6. Can you explain where your pumps are placed. Are they both in the skippy filtering pools? How long do you think your pumps will last since they are dealing with pumping water with heavy bioloads in them?
7. Would you consider shooting a video of your pond system and narrating each section of your pool. A video would help out a lot with visualizing how your pool and biofilters work together.
Thanks again!
Great questions! It seemed impossible to properly answer them all here in the comments section, so we created a new article that answers every one of your questions point-by-point: https://www.tyrantfarms.com/questions-diy-backyard-pond/ Hope that helps!
Hello! How often are you having to clean out the biofilter?
Hi! It depends on whether you have waterfowl or not. If you don’t have ducks pooping and molting feathers into your backyard pond, you might not ever have to clean the biofilters (although you might have to replace them if/when they biodegrade). However, we have seven ducks that spend a good portion of their lives in our small pond, so we have to clean the “solids” out of our filters about twice a year just to make sure the water stays in ideal shape. It’s not the most pleasant job in the world but our plants and compost benefit greatly from the byproduct. 😛
We have seven khaki campbells and I was cleaning out our old pond which was just a kiddie pool several times a week. Thanks for the response! I have been following your plans and we are almost done, just have to finish the rocks. Any other suggestions?
Sounds like you’re about to have some very happy ducks! You’re going to get a good laugh out of how happy your flock is when you first fill up the pond. They’ll be in there constantly, cleaning, diving, dabbling, etc. Ours still love their pond as much as the day they got it but they’re asking for an expansion or a second pond. Spoiled birds. It’s never enough.
As for other suggestions, sounds like you’re right on track. If all you have left is rocks, you’re close to the finish line. Did you have any specific questions about construction, design, or plumbing? Happy to help you as you finish up.
So my pond is pretty much complete, just have to put the hogs hair material in the biofilter. Did you do layers of scrubber pads in between layers of hogs hair?
Ideally, you can layer it based on porosity: filter material that catches largest materials goes on the bottom and filters that catch the smallest material goes on top. Depending on what you’ve got there, that’s probably going to mean your hogs hair filters are going to go on the bottom and your scrubber pads are going to go on top. Does that make sense?
Great article but the pics that you have here are really small is there anyway we can see normal size. 150 x 150 really doesnt help understand whats going on.
Does anyone actually look at this?
Dave, sorry for the delayed response! For some reason, I’m not getting comment notification emails despite my settings showing that I should be. The native slideshow function on our site is also a little wonky, but you should be able to click the pictures now to enlarge them, then click back on your browser to return to the images. Apologies and hope that helps!
Lovely post I like it particularly you are advising with respect to all basic issue to be thought in conspiring and setting up of a scene. For pond Pondpro2000 would one sure solution of leaks.