How to grow organic turmeric anywhere

Tyrant Farms' articles are created by real people with real experience. Our articles are free and supported by readers like you, which is why there are ads on our site. Please consider buying (or gifting) our books about raising ducks and raising geese. Also, when you buy through links on our site, we may earn an affiliate commission. Learn more
In this article, you’ll find out how to grow organic turmeric in your garden or small farm regardless of what climate zone you live in!
A decade+ of turmeric-growing experience
My better half (aka The Tyrant) and I have been growing multiple varieties of turmeric in our own organic garden for about a decade. I also grew turmeric commercially, when I was the farm manager at a local farm.
Over the years, we’ve learned quite a bit about how to get large yields of turmeric from both in-ground and container-grown production.

Why grow your own organic turmeric?
Here are five good reasons you should consider growing your own turmeric:
1. Turmeric is easy to grow.
As you’ll find out in this article, turmeric is relatively easy to grow. Yes, even for beginning gardeners — and even if you live in colder climates!
If you live in tropical or warm climates (9-12), turmeric can easily be grown as a low-maintenance herbaceous perennial herb that also makes an attractive landscape plant, with an appearance akin to cannas.
2. Grow interesting and unusual varieties.
As with pretty much every other crop on earth, there are multiple varieties of turmeric to choose from, some of which you won’t find on a grocery store shelf.
3. Better quality – and grow organically.
It’s hard to beat the quality of your own organically grown turmeric. Also, food doesn’t get any more local than your own yard!
4. Grow ‘baby’ turmeric.
We love making turmeric and ginger candy. The best way to do this is using “baby” turmeric and ginger, e.g. the younger, immature rhizomes, not the mature, more fibrous rhizomes that you get in the grocery store. (Those are great in other recipes, but usually not tender enough to make an ideal candy.)
5. Joy of growing your own.
If you’re like us, you love growing plants and the joy that comes from growing new things. If you’ve never tried growing turmeric before, why not give it a try?
Plus, as you’ll read below, turmeric also has many interesting medicinal properties. That means you can grow medicine!
Research on medicinal properties of turmeric
As you’ve probably heard, gardening helps keep you healthy.

Aside from the health benefits of gardening in general, another great reason to grow turmeric is that it has proven medicinal benefits. A few highlights:
Turmeric’s medicinal benefits:
- Memorial Sloan Kettering Cancer Center notes that “turmeric demonstrated anti-inflammatory and anticancer activities in lab studies.”
- A 2016 meta analysis concluded that turmeric, taken orally or topically, provides numerous skin health benefits.
- The NIH’s National Center for Complimentary and Integrative Health cites studies showing that turmeric reduces pain caused by osteoarthritis and can reduce future heart attacks in bypass patients.
- University of Michigan Medical University cites studies showing turmeric can help treat depression and various digestive ailments.

By growing your own turmeric, you’re growing edible medicine and getting all the health benefits that come with gardening!
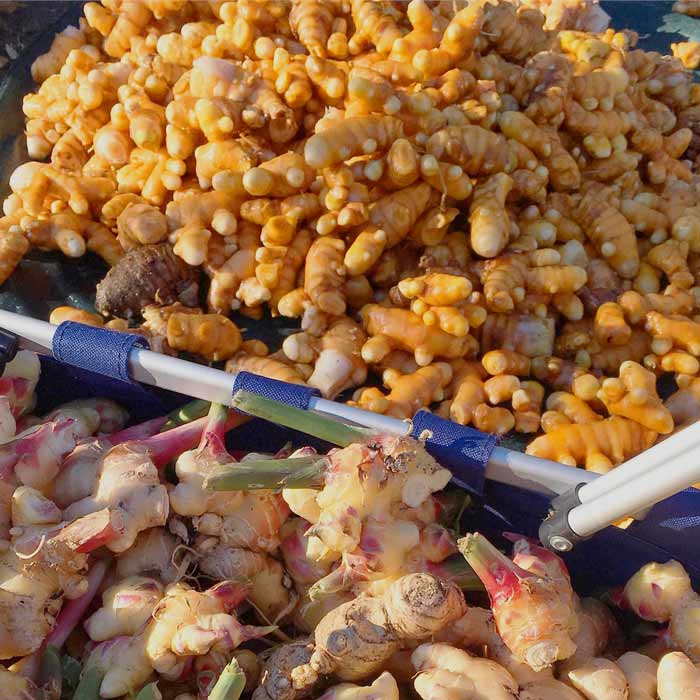
Side note: “Turmeric root” is often what’s on the label of various commercial products, such as turmeric powder. However, this is a misnomer. Turmeric rhizomes (which are technically modified underground stems) are what’s used. Small roots grow off the rhizomes (see above picture) but are not used. The roots are trimmed off after harvest.
Step-by-step: How to grow your own organic turmeric anywhere
Turmeric (Curcuma longa) is a tropical plant native to Southeast Asia that is prized for its edible and medicinal rhizomes. It’s a member of the ginger family (Zingiberaceae).
Despite its tropical origins, turmeric also grows quite well in cooler climates, as we’ve previously mentioned.
Step 1: Select the turmeric varieties you want
Unless you’re a breeder, turmeric is typically grown from pieces of a previous year’s rhizomes, not actual seed. Even though they’re not technically seeds, these pieces are referred to as “seed” turmeric.
There are two ways to get hold of seed turmeric:
Option 1: Grocery Store
You may be able to find organically grown turmeric at a local grocery store or farmers market. If so, those store bought rhizomes can be used to grow your own plants.
However, grocery stores don’t usually carry rare varieties and sometimes the rhizomes have been sprayed with growth retardants to extend their shelf life.
Option 2: Specialty Retailer
If you want to grow more unusual species and varieties of turmeric, we’d recommend you source your seed rhizomes from a specialty retailer (nursery or breeder).
We purchased our original rhizomes from Hawaii Clean Seed.
The two varieties of turmeric we grow are:
1. Indira Yellow, Curcuma longa
This is the classic Indian variety with dark yellow/orange flesh. Fastest to maturity and robust flavor.
Indira Yellow is less cold-sensitive and will actually overwinter in-ground in zone 7b under a heavy mulch layer. (More on its overwintering abilities further below.)
2. White Mango, Curcuma mangga
(Also called “Mango ginger.”) The rhizomes or White Mango have a pure white flesh. The flavor is very mild with notes of green mango.
This is a variety you want to grow if you want to eat raw, fresh turmeric. Originally from Java, this turmeric is more cold-sensitive and will not over-winter in-ground in our zone 7b garden.

Step 2: Choose the optimal growing spot (or container)
Turmeric grows best under the following conditions:
- in rich loamy soil with good drainage and amended with compost and/or worm castings,
- full sun,
- consistently moist soil but not wet, and
- temperatures between 70-90°F.
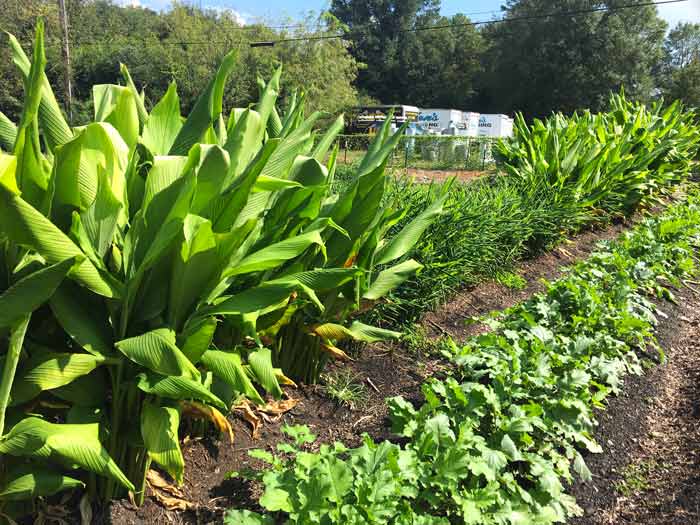
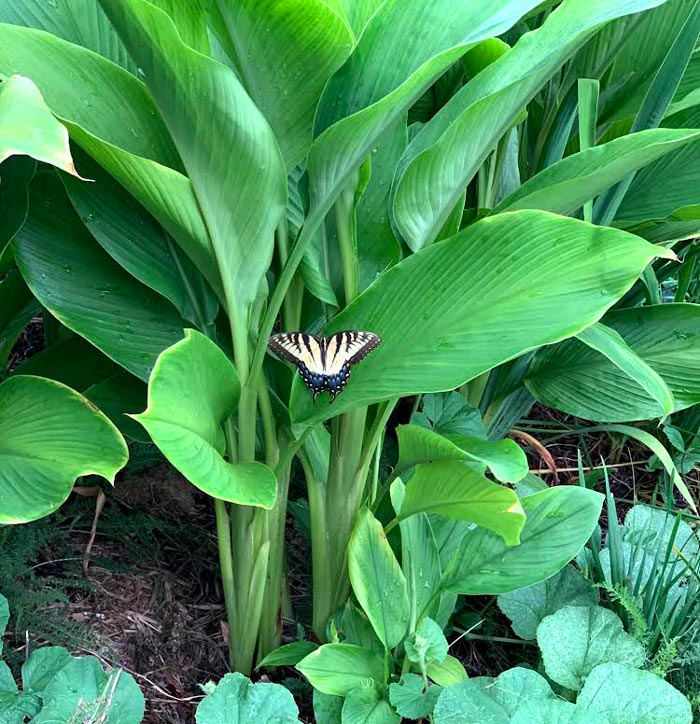
Turmeric can grow up to 6′ tall x 3-4′ wide and produces wide flat leaves.

The following information is important to consider when selecting the location(s) to plant your turmeric:
- “Baby” turmeric takes about 6-8 months to develop;
- Mature turmeric (like you get in a grocery store) takes about 9-12 months to develop.
Given our location in USDA hardiness zone 7b on the outskirts of Greenville, SC, we technically only grow “baby” rhizomes, which are delicious, more tender, and milder in flavor than the mature rhizomes. (Ours go in the ground mid-April and come out around Nov 1.)
Baby rhizomes can still be stored indoors and used as seed for next year’s crop.
Climate variability notes
Depending on your specific climate/ag zone, you may want to select sunnier or shadier spots to plant your turmeric. You may also want to use pots or grow bags, rather than growing your turmeric in-ground.
For instance:
- Tropical or hot desert climates – If you live in a hot climate, you can get away with planting turmeric in partial shade (6 or fewer hours of direct sunlight). Ideally, the spot could get morning and/or evening sun, but midday shade.
- Moderate climates – If you live in a moderate climate zone like we do, you’ll want to grow your turmeric in a sunny spot that gets 8+ hours of direct sunlight per day.
- Cool climates – If you live in cooler, northern climates, you may want to consider growing your turmeric in pots of grow bags, 5 gallons or larger per plant, to provide ample room. Grow bags will make it easy for you to start your rhizomes indoors before last frost, carry them outside after last frost, then bring them into protection as-needed to finish maturing when cold weather returns in the late summer-fall. Grow bags also allow for healthier root growth relative to standard gardening pots as you can read about here.
Step 3: Sow your seed turmeric
Important details when sowing your seed turmeric:
When to sow turmeric
Turmeric will not break dormancy until there are sustained soil temperatures close to 70°F (21°C) or higher, so don’t bother planting it until after your last frost date. You can check your local soil temps here.
We’re in USDA zone 7b and our last frost date is mid-April. In warm years, we’ll put our seed turmeric in the ground in late April; in cool years, we won’t put it in the ground until early May. There’s no reason to put our seed ginger in the ground in early spring.
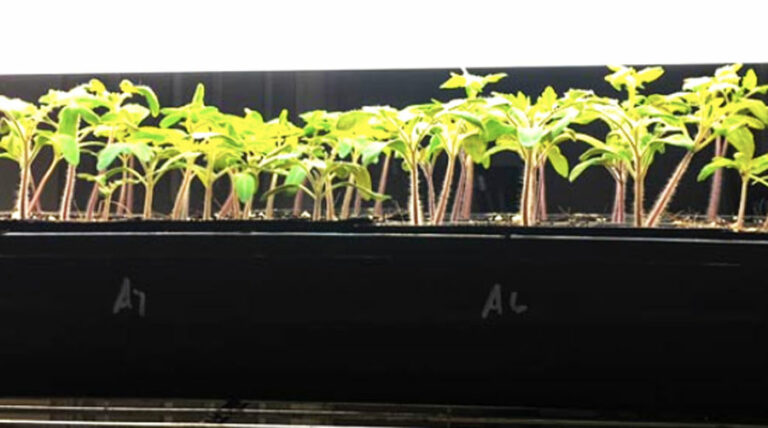
If you want to get a jump on the growing season, you can start your turmeric indoors in smaller nursery pots filled with dampened potting soil, then transplant them outdoors once soil temperatures are ideal. A heat mat can help speed up the process, but isn’t essential.
With the Indira Yellow turmeric that we overwinter in-ground, we won’t see the young shoots emerge from the ground until late May.
Break or cut turmeric “hands” into “fingers”
Turmeric rhizomes develop into large “hands” which contain multiple smaller “fingers.” Botanically, the fingers are called nodes and each node is comprised of internodes covered with thin papery scales.
From the tip of each node, arial shoots will form to produce the above ground plant that you see. Roots will form on the bottom of each node.
Before sowing your turmeric, cut or break each hand of turmeric into individual nodes/fingers. These small pieces are your “seed” turmeric.

Plant spacing
Sow seed turmeric about 12″ apart in rows that are 24″ apart. If you’re putting the plants in an edible landscape, you can cluster them together a little more densely.
Depth
Bury each finger about 2-3″ deep.
Soil Fertility
Turmeric will grow best in rich, deep, fertile soil with lots of organic matter to help maintain even soil moisture (if the soil is too wet, the plants may develop root rot). We always put compost in the planting hole and also top-dress the beds with 2-3″ of compost when planting. We also recommend top-dressing with an additional 2-3″ of wood chips or chopped leaves to boost biological soil fertility, moderate soil temp fluctuations, maintain even soil moisture, and block out weeds.
It will take anywhere from 2-4 weeks for the first turmeric shoots to emerge from the ground after planting.
Step 4: Care for the plants
Thankfully, turmeric plants are very low-maintenance, requiring little care throughout the growing season. A few important notes:
Pests & Diseases
Don’t like dealing with plant pests and diseases? Then you’ll love growing turmeric.
There are virtually no pests that will damage turmeric — at least not where we live. And if you grow turmeric in good biologically rich soil, there are virtually no diseases that will affect them either.
Irrigation
If you don’t get at least 1″of rain per week in summer, you might want to irrigate you turmeric to get the best results (optimal rhizome development), even though it’s a fairly drought-tolerant plant.
Prolonged periods (10+ days in the summer) without water will stress the plants and slow rhizome growth.
“Topping Up”
After a few months of growth, you’ll probably see the tops of your turmeric rhizomes pop through the soil surface. At that point, you’ll want to apply another 2″ of compost + 2″ wood chips around the plants, aka “hill them up.” This will protect them, give them a boost of nutrition, and lead to larger rhizomes.

Step 5: Harvest, Clean, and Store
Turmeric rhizomes have an intense and unique earthy flavor that’s a staple in Indian cuisine. However, the entire plant is edible, including the flowers, stalks, and leaves.
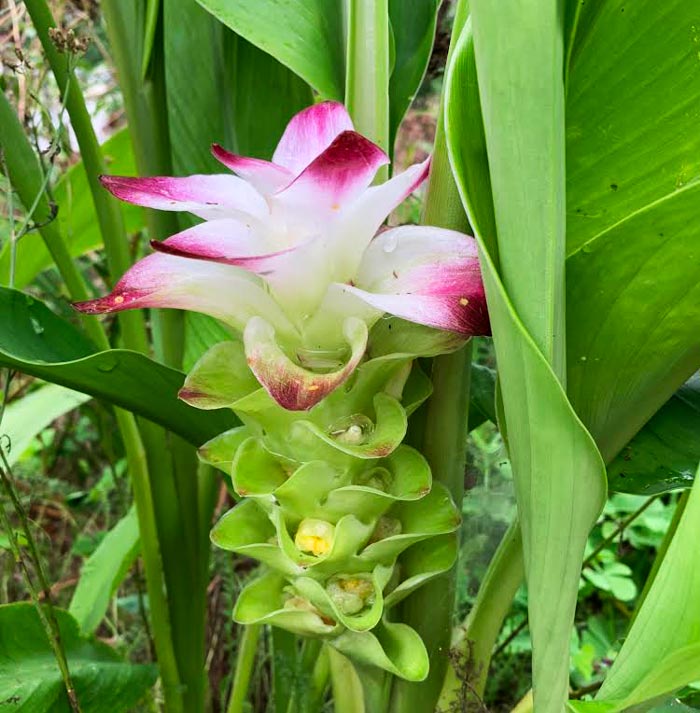
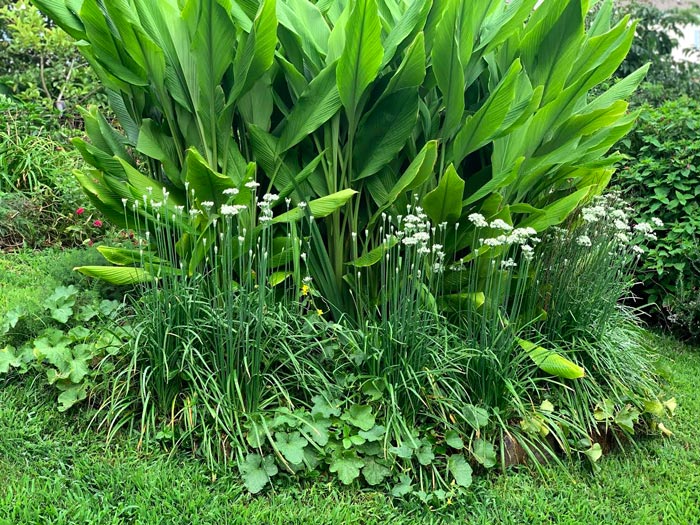
Edible turmeric flowers
Turmeric that we over-winter in ground will produce gorgeous showy flower stalks in late summer. Individual turmeric flowers/petals can be used as a garnish, in salad, added to a stir fry, etc.
Edible leaves and stems or turmeric
The leaves and stems of turmeric are also edible, though harvesting them aggressively will reduce rhizome development. The leaves and stems taste like a mild versions of the rhizomes and are used to flavor teas, soups, and sauces.
The large leaves of turmeric are also perfect for wrapping food inside for steaming or cooking over a fire. We’ve seen turmeric leaves used for wrapping everything from a piece of fish to Asian desserts like coconut sticky rice.
Again, keep in mind that removing the plant’s leaves does take energy away from rhizome production, so don’t harvest too many leaves from a single plant.
“Baby” turmeric rhizomes
Depending on growing conditions, baby turmeric can be ready to harvest 6-8 months after planting.

“Baby” simply means the rhizomes are younger, more tender and less fibrous, with a less potent flavor than mature rhizomes. These baby rhizomes are perfect for making candied turmeric and ginger, or for other recipes that call for the fresh rhizomes. (Here’s our delicious chewy candy ginger and turmeric recipe.)
We LOVE making Asian dishes like summer rolls and ramen with diced ginger and white & orange turmeric added).
Mature turmeric rhizomes
After 9-12 months, you’ll have fully developed, large mature turmeric rhizomes.
When and how to harvest turmeric rhizomes
Our last frost date is around April 20, which is when we put our seed turmeric in the ground. You can start yours earlier than your last frost date by either: a) planting them under low tunnels, or b) starting them indoors in containers (pots or grow bags) early then transplanting them outdoors once warm weather has arrived.
Leave your turmeric in the ground until after the first frost or freeze burns the leaves back to the ground. Then it’s harvest time!
To harvest your rhizomes, start by brushing back the soil/mulch around the base of the plant. Then, using a spade or shovel, dig under the plant and lift.
Unless your soil is really light and loose, you’ll likely have to go all the way around the plant with your shovel in order to dislodge the entire rhizome — especially if you’re harvesting older, larger plants.
Next, use a sharpened set of quality pruning shears to cut the dead leaves and stems off the plant. (Put the leaves in compost, in your walking paths, or back into the bed to decompose if you’re not immediately planting the next crop.)
Clean the rhizomes
Turmeric rhizomes can be hard work to clean, given their tight, dense structure.
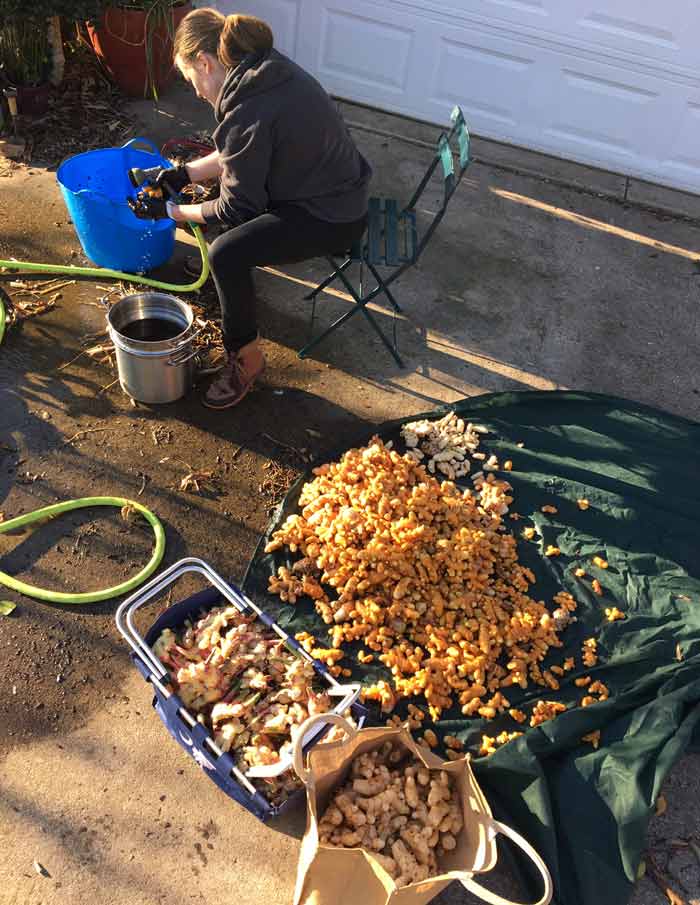
We start by dumping the rhizomes in a large tub/bucket of water to loosen up the soil clinging to them. If you’re cleaning a large amount of rhizomes, the next thing you’re going to want to do is lay them on a firm, slatted surface outdoors so you can blast them off with a hose sprayer.
If you’re cleaning a small batch under a few pounds, you can just spray off each rhizome by hand. You’ll then want to clip off all the small roots attached to the underside of the nodes, and give the rhizomes one final hose down.

Dry and store turmeric
Once your turmeric rhizomes are cleaned, it’s time to dry and store them.
If weather permits, let the rhizomes dry outside during a sunny day to evaporate any water left over from the cleaning process. Then bring them indoors to dry for another 2-3 weeks. Be sure to lay them out no more than one layer deep, not stacked, so air can circulate around them (and ideally under them as well).

After a few weeks, your turmeric rhizomes are ready for long-term storage. We put ours into large, open cardboard boxes (so they can breathe) stored indoors at room temperature.

Once dried, our baby turmeric easily stores for up to 6 months until it’s ready to plant again in the spring. Mature rhizomes can store even longer.
Overwintering turmeric in-ground?
What’s the in-ground cold hardiness of turmeric? Conventional wisdom says turmeric won’t survive winter in the ground beyond Zone 8.
Over multiple winters, we’ve experimented with overwintering ‘White Mango’ and ‘Indira Yellow’ turmeric and ‘Bubba Baba’ ginger (turmeric and ginger are in the same plant family). Beds were covered with a 2-3″ layer of insulating wood chip mulch.
Here’s what we’ve found:
- Indira Yellow turmeric has survived in-ground in Zone 7b for over five consecutive winters, including down to 6°F (-14°C).
- Neither White Mango turmeric or Bubba Baba ginger survived our winter in-ground.
So, if you want to grow turmeric as an in-ground, overwintering herbaceous perennial in moderate climate zones, we’d recommend growing ‘Indira Yellow’.
In fact, in our our garden we no longer bother to harvest our Indira Yellow turmeric at the end of the growing season. Instead, we just dig rhizomes whenever we need them throughout the year.
Key takeaways: How to grow organic turmeric anywhere:

How to grow organic turmeric anywhere
Instructions
- Source "seed" rhizomes of the varieties of turmeric you want to plant. (See variety notes in article.)
- Tender, immature "baby" turmeric takes 6-8 months to develop. Mature rhizomes take 9-12 months to develop. In colder climate zones (7 or lower), you can get a multi-month jump on the season by starting seed rhizomes indoors in flats or pots. Then either transfer plants in-ground after last frost or move pots outdoors after last frost. Alternatively, starting under low tunnels can provide a jump on the season but is a bit riskier if a severe, late cold snap comes through.
- Warmer climates (8+): plant individual fingers of turmeric in-ground or in pots after last frost date. Turmeric needs rich, consistently moist soil and temperatures between 70-90°F for optimal development. Amending or top-dressing the planting spot with quality compost or worm castings prior to planting is recommended. Or use organic/OMRI fertilizer in each hole. Once planted, apply 2-3" of mulch (wood chips, chopped leaves, etc) to soil surface to help prevent weeds and maintain optimal soil health. Note: Turmeric plants grow to 6'+ tall and thrive in full sun, so select planting spots accordingly.
- Spacing: Plant each turmeric finger at least 12″ apart, rows 24″ apart. If edible landscaping, cluster them together more densely.Depth: Bury each node about 2-3″ deep.
- Shoots will emerge from rhizomes in 2-4 weeks. Maintain even soil moisture or about 1" of water per week, irrigating if no rain.
- After about 3 months, you'll see developing rhizomes popping through the soil surface. We recommend covering these rhizomes with an additional 2″ of compost + 2″ wood chips, aka “hill them up” to maximize development.
- At first hard frost, turmeric leaves will wilt and die back to the ground. Cut the stalks just above the soil line and use a shovel to dig entire rhizomes from ground. Use garden pruners to remove roots growing off of rhizomes. Use a garden sprayer to blast off soil. Allow rhizomes to dry indoors under a ceiling fan for 2-3 weeks (don't pile them). Then place in cardboard box or breathable containers for long-term storage. Turmeric rhizomes (baby or mature) can be stored for at least 6 months.
Now you know how to grow your own organic turmeric anywhere! We hope this information helps spice up your life.
KIGI,


Thank you! Nicely explained. Can the round structure in the center of the rhizome from where the roots emerge can be trimmed and replanted? And also what can we do with the pale little round nodules that emerge from the rhizome? They don’t have any flavor , is it worth to replant or just put them in the compost?
Thanks Rani! Yes, the round structure in the center of the rhizome (perhaps best referred to as the central node) can be replanted. The small round nodules are edible, but not very flavorful as you point out. Perhaps best for compost! Enjoy your turmeric.
Hello! Great info, thanks! i am not able to find any of the varieties that you recommend. I’m in East bay CA, 94542, zone 9. do you sell both turmeric and ginger to grow?
Best,
Jenn
Hi Jennifer! Sorry, we don’t sell ginger or turmeric seed rhizomes. One place you might look is Etsy. There are usually sellers of all sorts of unusual plants and you can see their ratings to know you’re getting them from someone you can trust. Best of luck!
Hello Aaron,
I just ordered some Peruvian Ginger from Hawaii Clean Seeds. Unfortunately it doesn’t look like they have Bubba baba this year. I’m also interested in purchasing turmeric as well. Would it be possible to purchase both from your farm? Many thanks.
Hi Michele! I’ll send you an email now.
Very interesting article! My family is in SW Ontario, Canada; we guess we’re in zone 4b. Do you know of anyone who’s succeeded with turmeric or ginger this far north and, if so, how? We’re interested in household-scale production.
We don’t personally know of anyone who has grown turmeric or ginger as far north as Canada, but that doesn’t mean it’s not possible (it probably just means we don’t know enough Canadian gardeners!). You’d want to grow it in pots you could bring in and out as the seasons change. Obviously, in the cool/cold months, young ginger and turmeric pots would need to live indoors. That far north, even the sunniest south-facing window in your house likely wouldn’t provide adequate light to get them through until spring, so you might have to use tripod growlights or some other type of growlight system to keep them happy enough to develop large baby or mature rhizomes for harvest.
hello do you have fertile eggs how much shipping 24 eggs to dublin
Sorry, we don’t have fertilized eggs. Shipping fertilized eggs internationally is also likely prohibited.
Hello,
Great reading. I’m in Ga. and considering growing blue and black turermic. Where can I sell them when I have more than I need.
Hi! Selling turmeric in relatively small quantities is going to be best done either at a local level (local coop, small grocer, farmers market, etc) or online via sites like Etsy or facebook marketplace.
I am considering growing Turmeric as a small commercial crop here in Louisiana, mainly in large containers (25 gallon). I am in zone 8B between Shreveport and Alexandria and was wondering what you thought would be the best time to plant. I could start indoors and transplant in early Spring? We have a good long growing season here.
For turmeric commercial production, the more time in ground, the larger the rhizomes and the more you’ll get paid. So any way you can get a jump on the growing season is a good way to increase pounds harvested after first frost. However, something you need to factor in is the ROI on whatever materials, labor costs, etc are involved with starting your turmeric early/indoors. For instance, if you have to buy a ton of grow bags, heat a greenhouse, pay for labor (including your own time), etc all of that will diminish the returns of a larger harvest, and you might be better off just planting them in-ground after last frost in spring or trying to get a jump on the season by getting them started under low tunnels. That second scenario might yield a smaller harvest but a higher profit. So long answer short: when and how you start your turmeric should be determined by your unique setup, resources, and cost/benefit ROI analysis.
Hello Aaron,
Really nice to learn of Tyrant Farms. I have a farm in TR at Rutledge Lake. I am a Master Craftsman Beekeeper, have about 500 Blueberry bushes and a small garden and green house. Getting some age on me (87) and not doing much in the beekeeping industry these days. I have grown some Turmeric and just harvested (small amount). I would very much like to speak with you on the preparation of your Turmeric for planting. I would also like to purchase some Ginger for planting, if you have any available. Enjoyed your presentation very much. Look forward to your response.
Hi Ralph! Thanks for reaching out regarding your interest in growing turmeric and ginger. I’ll send you a private email momentarily.
I have a ? I planted and grew tumeric last year. I just harvested it. I have tumeric tubers that have that orange color but I also harvested some oval shaped black tubers that are WHITE inside. What are they?
Hi Melissa! It’s very hard to say for certain what you’ve got there without seeing it, cutting it, and smelling it. There are varieties of black turmeric, but all the ones we know of are blue-colored inside. There is also white turmeric, but it’s got a more tan-colored outer skin. Do the tubers in question have a distinctly turmeric smell? If not, it’s likely that some of kind of unknown tuberous plant somehow grew adjacent to your turmeric. Obviously, you don’t want to eat any unidentified tubers since there are plenty of plant tubers that can make you very sick or worse.
My baby ginger still has intact seed (dark) rhizome attached which falls off when harvested. It looks like store ginger. Can it be used that way?
Yes, sure can! It’s just going to be tougher and more fibrous than baby ginger.
What do you do with the fibrous ginger at the end of the baby ginger. Can you use it?
Those are ginger’s adventitious roots, unless I’m misunderstanding your question. They’ll eventually form new plants if you live in an area with a long enough warm season. The roots are technically edible, but we typically just compost them or put them in the worm bin. If you’re able to adequately clean them and want to invest the time, they’d probably be perfectly fine ground up and used for tea or flavoring, just as with the ginger rhizomes.
Excellent review of how to grow tumeric…I would like to try using grow bags…What size grow bag is adequate for tumeric?
Minimum grow bag size per turmeric plant would probably be about 10 gallons. Last summer, we used large 25 gallon grow bags and put 3-4 turmeric plants into each one. The plants do get quite large by the end of the growing season.