How to make acorn flour the best way – with video!

Tyrant Farms' articles are created by real people with real experience. Our articles are free and supported by readers like you, which is why there are ads on our site. Please consider buying (or gifting) our books about raising ducks and raising geese. Also, when you buy through links on our site, we may earn an affiliate commission. Learn more
We’ve been making and eating acorn flour for over a decade. In this article, we’ll share all of our tips and tricks to help you make your own high quality homemade acorn flour!

Video: How to make acorn flour – a quick overview
Can you make flour from acorns?
Yes, acorns (the nuts of oak trees) can be turned into acorn flour which can be eaten by humans. However, due to the high levels of tannins, you can not eat raw acorns OR acorn flour until the tannins have been removed through various processes.
Tannins are very bitter-flavored compounds that can cause nausea and GI distress. Thus, it’s essential that you remove the tannins from acorns and acorn flour before using them for food.
Is it easy to make acorn flour?
No, there is no fast or easy way to make acorn flour. Rather, acorn flour is a “slow food” with a rich history.
Why do we bother making acorn flour since it takes a long time and a lot of work to make? We’re food explorers with a profound interest in history and our natural environment, Also, we like trying new and unusual flavors from “wild foods” that can’t be found on a grocery store shelf. Plus, acorn flour is delicious and nutritious.
If any of these reasons resonate with you, then you might also want to try making your own acorn flour. If you enjoy it as much as we do, you might then continue to make it every year when fresh acorns can be foraged.
How do you “leach” acorns to remove the bitter tannins?
Broadly speaking, there are two different methods for removing acorn tannins:
Method 1: Hot leaching method
Acorns are repeatedly boiled in a pot of water and the water is dumped every ~30 minutes or so until the acorns no longer have a bitter taste. Completion time ranges from 3-6 hours of cooking depending on tannin content of acorns. Finished acorns are then dried and pulverized into flour.
Method 2: Cold leaching method
Acorns are ground and soaked in cold water, with water carefully dumped and replenished multiple times per day over 7-10 days. Finished acorn mash is dried and pulverized into flour.
Which method is best for making acorn flour?
We’ve used both methods and experimented with lots of different techniques under each method. Which method is best?
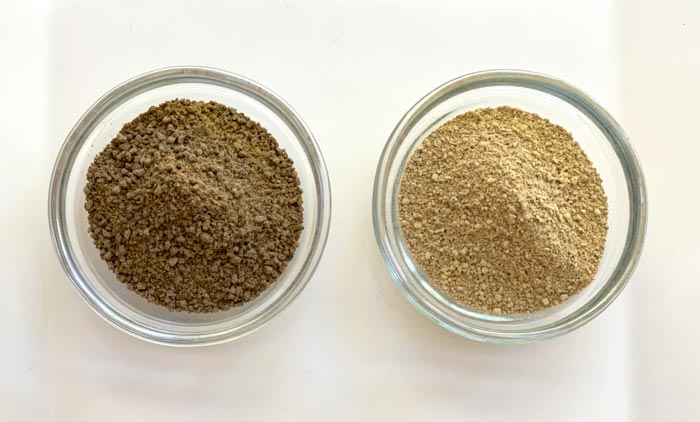
Cold leached acorn flour is the best method because:
- Even though hot leaching is faster (you can have flour in a day), the hot leaching process removes many of the good fats, water-soluble vitamins, and “sticky” properties of the final acorn flour.
- Cold leaching spreads the work out over 7-14 days (depending on the tannin content of your acorns) but it produces a lighter-colored, more nutritive, better tasting acorn flour that also has a better consistency in baked goods.
Thus, in this article, we’ll show you how to make cold-leached acorn flour.
What does acorn flour taste like?
Properly made cold-leached acorn flour tastes like acorns smell: mildly sweet, nutty, and earthy. It’s similar to chestnut flour, but more complex.
(Related: How to make chestnut flour)
How is acorn flour different than wheat flour?
Both acorn flour and wheat flour are predominantly complex carbohydrates. However, a few differences between the two:
- Acorn flour is higher in fat (healthy fats) than wheat flour.
- Wheat flour is far less flavorful (more neutral) than acorn flour.
- Acorn flour bakes/cooks heavier than wheat flour.
- Acorn flour doesn’t stick together as well as wheat flour when baked.
Is acorn flour gluten-free?
One very important feature of acorn flour is that it’s gluten-free. Gluten is the protein in wheat and some other grains that allows bread to hold together and stretch at the same time during baking.
However, properly made cold-leached acorn flour (which is what we recommend making) does have some binding qualities to it, just not nearly to the degree that wheat flour does. That means you can’t use acorn flour 1:1 as a wheat flour substitute in recipes and expect good results.
How do you use acorn flour?
Acorn flour is a very versatile ingredient that can be used in countless applications; just remember it should not be used exactly like wheat flour for reasons mentioned above.
To make acorn bread or bread-adjacent recipes with acorn flour, you’ll need to use other binding agents like eggs to help the final product hold together. Even then, your acorn bread will be more proximate to cornbread than a fluffy loaf of wheat bread. You can also just use a little bit of acorn flour alongside wheat flour to add interesting flavor nuances to your favorite wheat bread recipes.
Here are a few of our favorite recipes that are made with 100% acorn flour (no wheat):
- Fluffy acorn flour pancakes
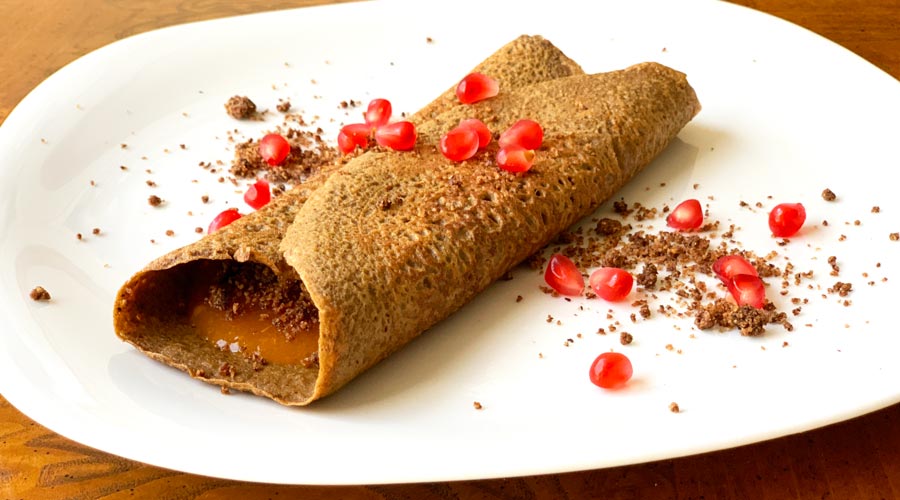
- Acorn flour crepes
- Acorn flour & American persimmon cookies
- Hot-brewed acorn & yaupon holly (a delicious caffeinated drink made with native plants)
Many Native American societies used acorn flour to make a mash, similar in consistency to grits. Acorn “grits” are another fantastic use for acorn flour that could be made a thousand different ways depending on what ingredients you have on hand and whether you want to go in a sweet or savory direction.
How to make acorn flour, step by step
Ready to make acorn flour? Let’s get started!
Equipment you need to make acorn flour.
You can make acorn flour with tools and equipment you probably already have on hand. Here are the supplies you’ll need to make acorn flour:
- A tool to open the nuts. A hammer or mallet work ok, but we prefer a technique we created called “the back porch chop” using a large kitchen knife, which we detail below and in the instructional video at the top of this article.
- Cookie sheets to flash-roast and dry the nuts and nut flour. A dehydrator works best for drying, but you can use other drying methods.
- Large glass jars or bowls to soak the nuts and leach out the tannins. (Don’t use plastic or you’ll likely infuse your acorns with chemical compounds you don’t want to consume.)
- A good food processor or blender to pulverize the acorns for leaching and to grind them into a flour-like consistency at the end.
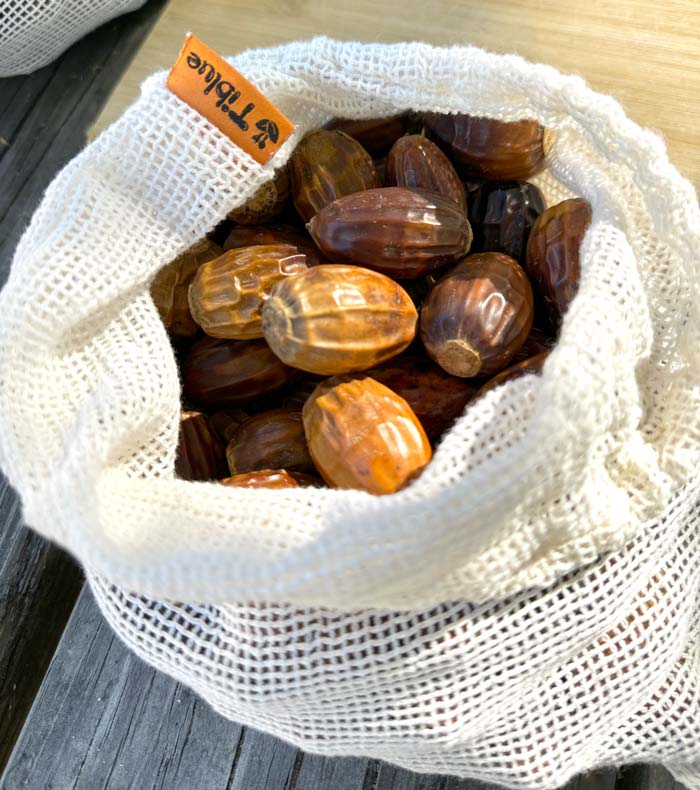
Step 1: Select and gather the largest acorns you can find.
Obviously, the first step to making acorn flour is gathering acorns. But what are the best varieties of oak for producing acorn flour? Nuts from white oaks, red oaks, live oaks, something else?
Simple answer: the largest acorn nuts you can get hold of.
Smaller acorns just aren’t worth the effort. In our area (Upstate South Carolina, United States) our personal favorite oak species for making acorn flour is chestnut oaks (Quercus montana), a member of the white oak group, which grow atop ridge lines and mountaintops, producing massive chestnut-sized acorns.
Note that there are hundreds of oak species worldwide, at least 90 distinct species in North America, and countless hybrids. If you want to identify a particular oak species, use a plant ID app on your phone and/or look for regional oak tree guides. For instance, the USDA has an excellent eastern US oak tree guide.
Do certain types of acorns have more or less tannins?
Yes, there is a lot of variability between oak species when it comes to the tannin content of their acorns.
In Sam Thayer’s wonderful book Nature’s Garden: A Guide to Identifying, Harvesting, and Preparing Edible Wild Plants, he notes the high and low end tannin ranges found in acorns.
- Highest: red oak species Q. agrifolia at 20.3% tannin content.
- Lowest: white oak species Q. ilex at 0.4% tannin content.
This variability in tannin content makes providing precise instructions for how long to leach acorns very difficult. Leaching duration will depend on the type of acorn you use.
Saving whole acorns for future use?
If you’re gathering acorns to process months later, we suggest immediately roasting them whole in your oven on 350°F (177°C) for 45 minutes, then letting them dry for 7-10 days prior to long-term dry storage. Otherwise, you’ll end up with moldy, insect-eaten acorns later on.
Float test before cracking?
Some people start by putting their acorns into a bucket of water. Acorns that have air pockets inside carved out by hungry weevils will float to the top of the water and can then be discarded… hypothetically.
We don’t bother with this step. Why?
First, it isn’t full-proof (plenty of acorns where weevils have just gotten started won’t float). Second, it makes your acorn shells wet, difficult to handle (assuming you’re ready to start processing them), and potentially encourages mold growth (a problem if you’re not going to process them immediately).
Also, bad acorns can easily be screened out in the next step, as detailed below.
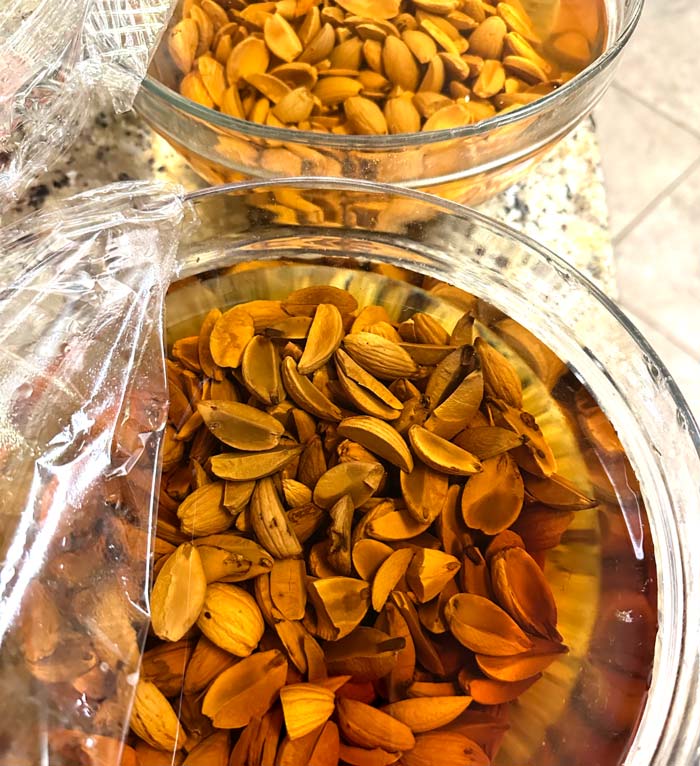
Step 2: Crack or cut open your acorns.
Acorns can be a difficult nut to crack, especially when they’re fresh from the forest and still have a high moisture content.
We’ve trialed every method imaginable to get the shells off of acorns including hammers, mallets, and our hand-cranked Dave-bilt nut cracker… All of these methods are relatively slow and difficult.
Today, our preferred method is an innovation born of necessity, which we call the “back porch chop.” This method is 3-5x faster than any other method we’ve tried for cracking acorns, allowing us to quickly process large quantities of acorns.
Here’s how to do it:

- Place 1-3 acorns in the slot between two boards on a wooden porch or on top of a picnic table.
- Position a wood cutting board higher up above the acorn(s).
- Place the tip of a large kitchen knife on the cutting board and slice down into the acorn (which is held firm in the slot). Once the knife has cut a quarter to half way into the acorn, quickly lift it up to the cutting board, then slice completely through the acorn.
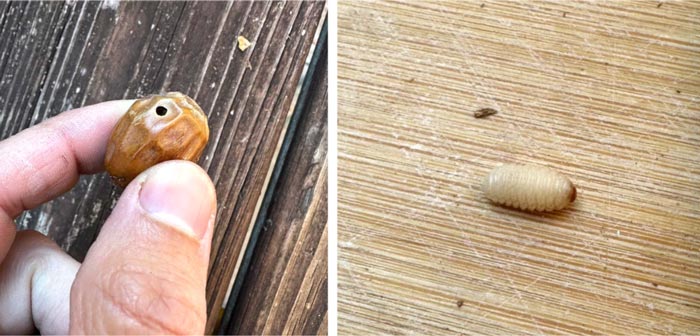
- Repeat until done, discarding any gross acorns you come across. Some acorns will be moldy and some will have acorn weevil grubs (Curculio glandium) in them. Only save the good acorns to make into flour.
- *In the instructional video at the top of this article, you can see the back porch chop method in action.
Note: Depending on the type of acorn you’re cutting and how dry or wet they are, some of the acorn nuts will fall right out of the shell and testa (the papery skins on top of the nut) after cutting. If so, have a bowl of water ready to put those acorns into, which will stop them from oxidizing and turning brown. These acorns may be soft enough to pulverize in your blender with water right away, without soaking (next step), so test them to see!
However, most of the time most of your acorns will still be firmly entrenched in their shells and testa. Set these onto a cookie sheet for the next step.

Step 3: Dehydrate or oven-roast cut acorns to remove them from their shells and testa.
The acorns that didn’t immediately dislodge from their shells and testa will need to have some of their moisture content removed. Then they’ll pop right out of their shells and testa. (The occasional bit of testa that’s stuck on can easily be scraped off with a fingernail or paring knife.)
There are two ways to do this:
- Option 1: Roast in a pre-heated oven on 350°F (177°C) for 30 minutes, then let cool to room temperature before removing nuts.
- Option 2: Dehydrate at 115°F (46°C) for about 12 hours or until nuts easily remove from shells and testa.
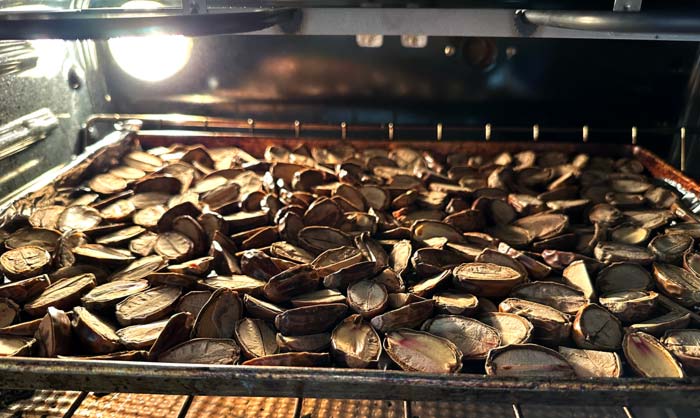
Somewhat counterintuitively, between these two options, the oven-roasting process seems to cause the least amount of oxidation, resulting in the lightest-colored finished acorn flour. We’ve also baked with acorn flour made from both methods and found little difference. If anything, the oven-roasted acorn flour is a little better to cook with.
Step 4: Soak nuts to soften and start tannin removal
Your acorns need to be pulverized in order to have their tannins fully removed. However, if you put them into a blender or food processor at this point (even with water), you’re likely to damage your devices. Yes, we’re speaking from experience here!
If you happen to have your own grain mill, now is the time to use it. Since most people don’t, we instead recommend soaking your acorns for 2-3 days in water to start softening them up and removing some of the tannins.
Here’s how:
- Put them in glass jars or glass bowls.
- Completely cover your acorns with water. If you keep them at room temp, they could get a bit funky, so place them in your fridge instead.
- Dump and refill the water at least twice per day.
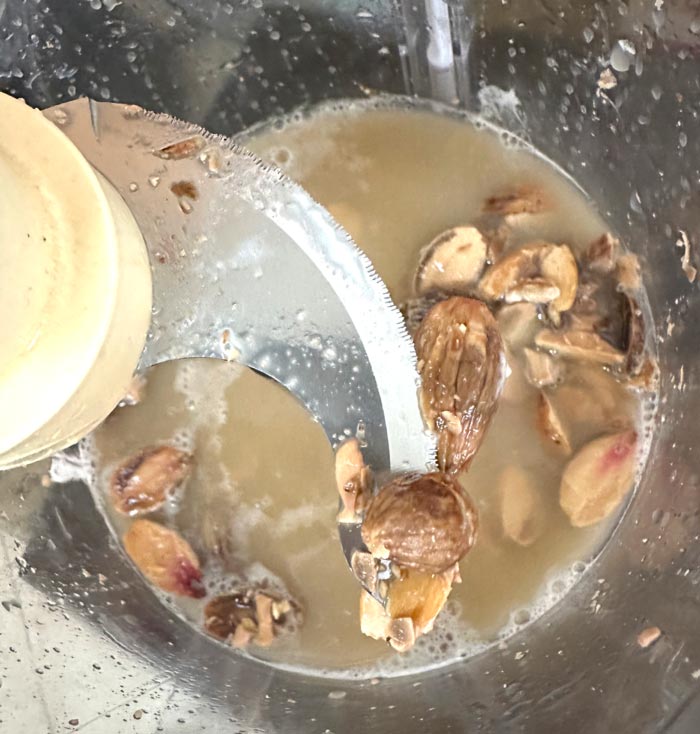
Step 5: Pulverize acorns and cold leach the ground acorn meal to remove tannins.
After a few days, your acorns should be soft enough for a good blender to pulverize in small batches, with some caveats:
- Don’t put more than ~1 cup of acorns into the blender at a time.
- Add water to the blender at a roughly 1:1 ratio. Example: 1 cup nuts, 1 cup water. If you’re still having trouble, add more water and less acorns.
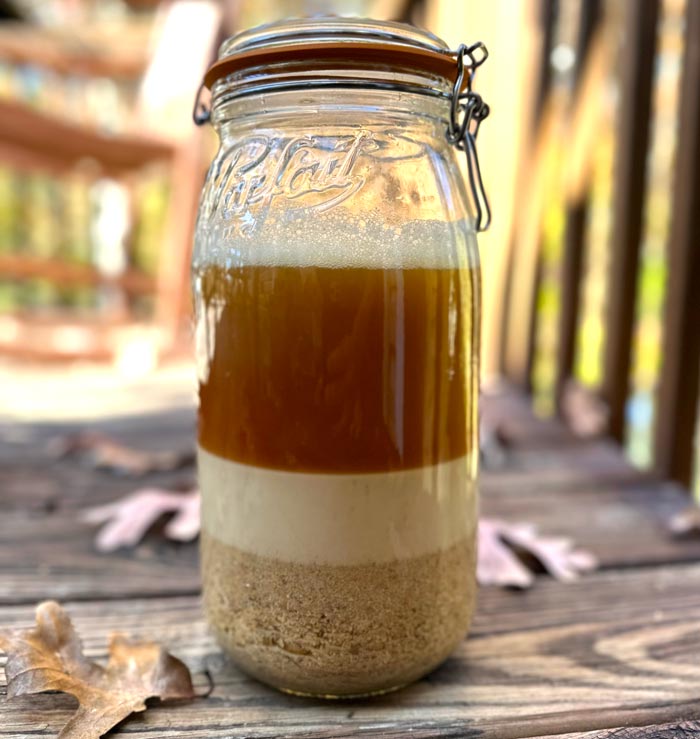
Once the acorns are pulverized, put them into glass jars with water and into your fridge. You’ll vigorously shake these jars and change out the water at least twice per day until all the tannins are removed.
Three tips here:
i. Ratios
Don’t fill the jars too full or you won’t be able to add enough water or shake them well. The more water, the better for leaching tannins.
A good ratio for the fastest cold leaching possible is no more than:
- 40% acorn meal,
- 40% water,
- 20% air/gap at the top.
ii. Water changes
Carefully pour off the top layer of tannin-rich water at least twice per day. Be careful NOT to pour off the fine layer of white-colored sediment that forms in the middle; this is rich in good fats and starches and is what makes cold-leached acorn flour better than hot-leached.
If necessary, pour the water through a fine-mesh strainer or layers of cheesecloth when doing water changes so you don’t loose any of this nutrient-rich substrate.
iii. Shake your booty
Vigorously shake the jar each time new water is added to make sure all the acorn meal at the bottom gets throughly stirred up. We also prefer to use large Le Parfait glass jars with rubber seals rather than standard jars whose lids are coated with BPA.
How do you know when all the tannins are removed from your acorn meal?
Remember: Different acorns have different tannin levels. Expect 7-14 days of cold-leaching to complete tannin removal, depending on the tannin levels of your specific acorns.
After ~5 days, start tasting a small amount of the wet acorn meal during water change outs. Make sure you give it a good chew to detect any bitter tannins still inside the small bits.
Even after you no longer detect bitter tannins, we’d still recommend going 1-2 more days of leaching just to be sure.
Thoroughly removing the tannins is the most important step in the process. We’ve moved forward too hastily and ended up with acorn flour that still has bitter flavor. If this happens to you, you can always cold-leach the flour again, but it’s better to get it right the first time.
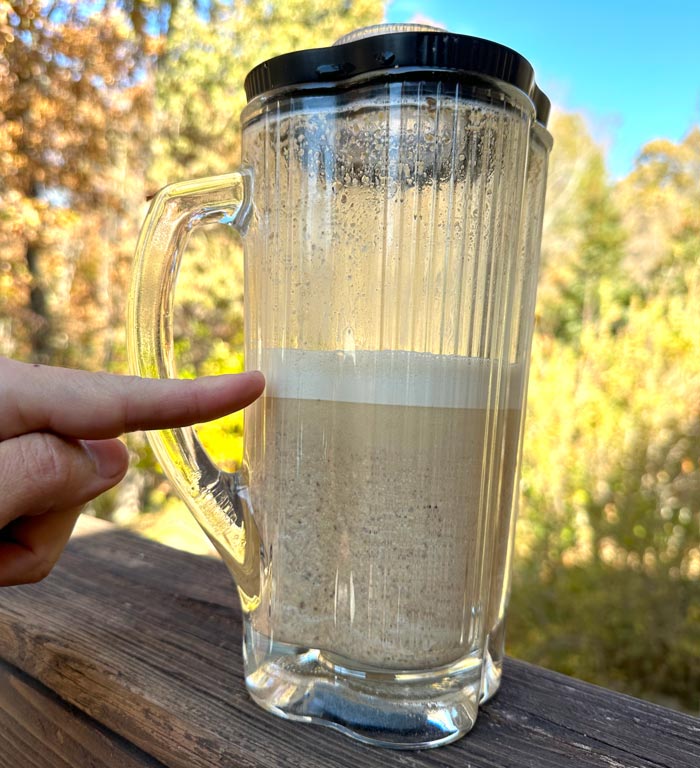
Step 6: Dry the acorn meal.
Pour off the final bit of water in your jar, then pour the finished acorn meal into a bowl. Stir it together so there aren’t blobs of separated fat and starch.
From here, you can either air dry it or use a dehydrator if you have one.
- If air-drying, thinly spread the meal on to a baking sheet covered with foil, with the foil folded up to form a lip on all sides. Dry under a fan until completely, powder-dry, stirring 1-2 times per day to provide air exposure.
- If dehydrating, spread the meal about 1/3″ – 1/2″ thick on to drying racks that are covered with foil that is folded to form a lip on all sides. This thickness helps keep the inside from oxidizing while it dries. Dry on lowest setting or no more than 115°F (46°C). Make sure it’s bone dry before finishing.
Warning: Any moisture left in dried acorn meal can cause the final flour to go rancid or moldy during storage, so don’t rush this step!
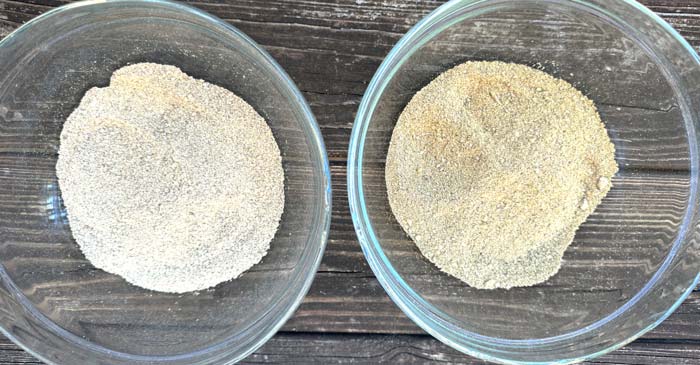
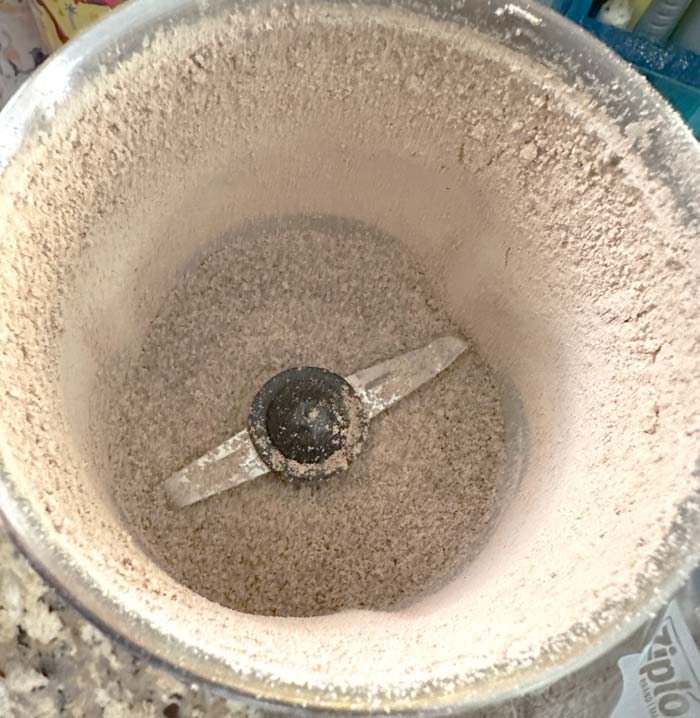
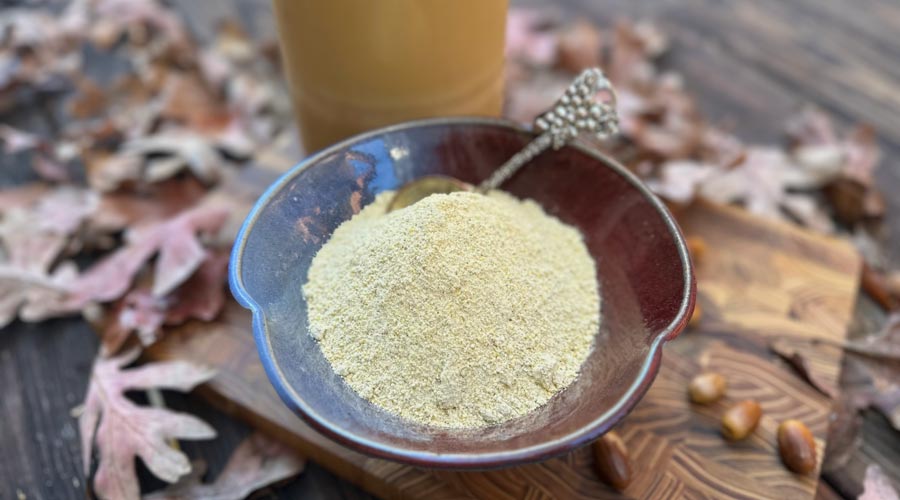
Step 7: Pulverize, sift, and store acorn flour.
Put the powder-dry acorn meal into a food processor or multi-bladed blender and pulverize it into a flour-like consistency. Depending on your device, the acorn flour still may be a bit gritty.
For a finer-textured acorn flour, you can either:
a. Sift the flour through a mesh strainer over a large bowl, then re-grind the larger bits that stick in the strainer; or
b. If you have a spice grinder, another option is to just store your relatively gritty acorn flour, then use your spice grinder to finely grind the acorn flour as you need it before making a recipe. (No, a coffee grinder isn’t a good substitute for a spice grinder.) A possible alternative to a spice grinder is a mortar and pestle.
Storage and shelf life
Store your acorn flour in airtight bags or jars. At room temperature, it can last for over a year. In a freezer, acorn flour can store for multiple years (use freezer bags or jars here).
Also, if you have as many odd homemade ingredients laying around as we do, be sure to label your finished acorn flour (“acorn flour / date made”) so future you can identify it!
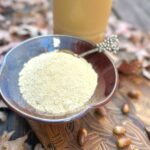
And now you have your own homemade acorn flour!
Check out our quick summary instructions and acorn FAQs below!
How to make cold-leached acorn flour - best method!
Equipment
- food processor and/or blender
Ingredients
- large kitchen knife
- baking sheets
- large glass jar
Instructions
- Gather the largest acorns possible. The type of acorns is irrelevant, even though tannin levels vary by oak species.
- Cut open acorns with a large kitchen knife using the "back porch chop" method detailed in article (also includes photos).
- Discard any bad acorns (moldy, worm-eaten, etc). Place any acorn nuts that immediately come out of the shell and testa (the papery membrane over the nut) into a bowl of water to prevent oxidation. Depending on acorn species and moisture levels, you may be able to pulverize these with water in a blender immediately to start cold leaching, skipping a couple steps. Any good acorn nuts that stick to the shells and testas should be placed on baking sheet for flash-roasting.
- Preheat oven to 350°F (177°C) and place "stuck acorns" in oven for 30 minutes on middle oven rack. Then let acorns cool to room temperature before removing nuts. (They should now be easy to remove.)Place de-shelled flash-roasted acorns in glass bowl or jar, then cover with cold water. Put in fridge for 2-3 days, dumping and replacing water at least twice per day. Once you think they've adequately softened, do a small test batch in your blender or food processor using ~1 cup of acorns and 1 cup of water. Add more water if necessary to keep the blades turning. Our blender works better than our food processor for this step! The goal is to end up with a ground acorn meal wherein the tannins can be completely removed.
- Put acorn meal into glass jar(s) and back into fridge. Ideal ratios: 40% acorn meal, 40% water, 20% air/gap at the top of jar. Carefully drain out the top layer of dark, tannin-rich water at least twice per day, being careful not to let any of the white-colored sediment pour out (that's good fats and starches!) Use a fine mesh strainer or cheese cloth if necessary. After refilling with water, shake jar vigorously to make sure acorn meal at bottom of jar also gets shaken up. Expect 7-14 days of cold-leaching to complete tannin removal process. After 5 days, start tasting a small amount of the acorn meal during water change-outs. Give it a good chew to detect any bitter tannins still inside the small bits. Even after you no longer detect bitter tannins, we’d still recommend going 1-2 more days of leaching just to be sure.
- Pour off the final bit of tannin water in jar, then pour the finished acorn meal into a bowl. Stir. If you have a food dehydrator: spread the acorn meal 1/3" - 1/2" thick on to drying racks that are covered with foil that is folded to form a lip on all sides. Dry on low heat, no more than 115°F (46°C). Make sure it’s bone dry before finishing. If you do not have a dehydrator, air dry acorn meal as follows: thinly spread the meal on to a baking sheet covered with foil, with the foil folded up to form a lip on all sides. Dry under a fan until completely, powder-dry, stirring 1-2 times per day to provide air exposure. Any moisture left in can cause the finished flour to go rancid or moldy during storage, so make sure it's completely dry before going to next step!
- Put dried acorn meal into a food processor or multi-bladed blender and pulverize it into a flour-like consistency. For a finer-textured acorn flour, you can either:a. Sift the flour through a mesh strainer over a large bowl, then re-grind the larger bits that stick in the strainer; orb. (If you have a spice grinder) Store gritty acorn flour, then use your spice grinder to finely grind the acorn flour as-needed before making a recipe.
- Store acorn flour in airtight jars or bags. Label containers, including adding date processed. Stored at room temp, acorn flour can last at least 1 year. In your freezer, it can last for many years.
Acorn flour FAQs
Answers to common questions about acorns and acorn flour:
How did Native Americans make and use acorn flour?
Acorns were a staple crop for many Native American societies, especially on the west coast. Exactly how the acorns were processed varied by time and place.
For example, we’ve read reports of some tribes using hardwood ash as lye to help remove the tannins during processing. According to Heidi Lucero, the tribal chair of the Juaneńo Band of Mission Indians of the Acjachemen Nation (in modern day California), her tribe’s preparation methods are to first roast acorns whole to kill weevils before drying, cracking, and grinding them. Traditionally, they’d then be leached in specialized baskets in rivers and creeks to remove tannins, which is probably not a good idea today given modern water pollution.
Once prepared, acorn meal/flour was typically made into mash-like dishes, comparable to corn grits.
It’s also interesting to note that other indigenous peoples around the world have long made use of acorns as food, from Japan to England to Greece.
How long can oak trees live and how many pounds of acorns can they produce each year?
The average oak tree initiates acorn production around its 25th year. It will continue to increase acorn production for the next 75 years of its life before plateauing around year 100 at an average of about 2,500 acorns per year.
Incredibly, the average natural lifespan of a white oak is 550 years old. Some trees live to be thousands of years old, like this magnificent 2,000 year old giant Coast Live Oak tree in California or this 1,500 year old “Angel Oak” tree that we used to live near in Charleston, SC.
Do oak trees produce acorns every year?
Oak trees may substantially vary their acorn output each year as a natural defense against animals such as squirrels and insects such as weevils that eat their acorns.
Some years, they may produce almost no acorns. However, every 3-5 years (when weather conditions cooperate) oaks will have a “mast year” in which they produce the maximum amount of acorns possible.
This production variability is why Native American tribes who relied on acorns as a staple crop stored up to two years of acorn nuts and/or acorn flour as insurance against low acorn production years.
Are acorns nutritious?
Yes, acorns are a highly nutritious food once the tannins have been leached to render them edible for humans. Acorns’ nutritional profile varies by species, but the following ranges apply (sources: USDA, 2008 and Mason, 1992):
- 50-90 percent complex carbohydrate
- 5-30 percent fat (healthy monounsatured and polyunsatured fats)
- 5-8 percent protein
- contain all the essential amino acids
- very high in vitamin B6, potassium, manganese, and copper
- good source of a laundry list of other vitamins and micronutrients
We hope this article was helpful and that you enjoy your homemade acorn flour! Use the comment section below to let us know what you do with you acorn flour, and be sure to drop us a rating on our acorn flour instructional guide.
KIGI,

Other nutty articles you’ll love:
- Acorn flour DIY web story
- Hot-brewed acorn & yaupon holly – better than coffee?
- Why and how to grow chestnuts
- How to make chestnut flour
- Recipe: cast iron pan-roasted chestnuts on a stovetop
- Recipe: chestnut flour breakfast porridge w/ pan-roasted persimmons
- Recipe: Acorn flour & American persimmon cookies
- Recipe: Fluffy acorn flour pancakes
- Recipe: Acorn flour crepes (sweet or savory)
- Recipe: Hickory nut ambrosia


Hi! Thanks for a great recipie. I do have a question…
At the bottom of my jars is a white substance that doesn’t dissipate when I change the water and shake the jar… it’s been four days. Is this normal or is it something icky like mold or fungus or something? I’m not sealing the jars so it’s not fermenting…
Strongly doubt it’s anything concerning like fungus. Perhaps it’s fats from the acorns? Try scraping and mixing with a hard spoon or other kitchen implement.
Your method of processing the Acorns on the porch gave me an idea; you will have to use your minds eye for the imaging process.
Take a piece of square tubing a trial length of, 12 inches in length and about twice the size of a large Acorn, Approximately 4 inches from one end, cut a slot that will provide a tight fit to a heavy duty kitchen knife to be inserted and held firmly in place. No wiggle room. Mount the tubing to a 1 x 12 about 18 inches long, with clearance at both ends. These are all first run dimensions, and improvements during fabrication are likely. On a hard surface, place the knife end down with the blade facing up inserted into the tube. Fill the tubing with Acorns, and using a piece of lumber that fits inside the tubing hammer the Acorns into the blade. Reprocess any small Acorns that did not get cut sufficiently.
Feeding the Acorns through the process multiple times will result in diced product. A high quality steel knife will be worth the investment after the prototype proves itself.
Someone may already have thought of this idea.
What the Fox said.
Great Post about acorn flour. You’ve broken down the process into easy to hollow steps. Thank you for sharing. I always wanted to try making it but wasn’t confident enough. Too late now, but I’m motivated to try next year. A propos nothing to fo with acorns but my brother lived in Greenville for a long time.He still has property there and goes back regularly.
Thanks Kameela! Hope you get a chance to make your own acorn flour next year. Neat that your brother has a place here in Greenville. If you happen to be here in the fall, we can point you to some acorn foraging spots where you can fill buckets with giant acorns in no time.
Re leaching. I am lucky enough to have a stone mill. Would it be easier/more effective to leach after grinding?
Yes, it would be easier to leach the tannins from acorns after grinding them versus leaching tannins from larger nut pieces. However, you’ll then have a different challenge: you’ll need to strain the water without losing the finely ground acorns. Perhaps straining through cheesecloth would be the way to go here. Best of luck!
Help! Just started this process, and was wondering for there are slightly darker brown or gray portions in the acorn meat, is that something one can’t use? And same for acorns that have black sections – do you throw out all the meat from that acorn, or just cut off the black part?
Some spotting and discoloration is to be expected on the exterior surfaces of the raw acorn meat. Oxidation happens. If there are holes where acorn weevil larvae have been at work, we generally discard those acorns. If the nut meat is black, we’d discard those as well. It’s hard to say for certain what your dark brown or gray spots are without seeing them. Feel free to send some pictures to aaron at tyrantfarms dot com (not putting the actual email in to avoid bots/spam emails).
Could you provide a bit more detail on the possible contamination you mentioned when doing the cold method and changing the water a minimum of twice a day? I’d like to try this out but want to make sure I don’t do something wrong. Thank you!
Hi Krissy! Sorry for delayed response, we’ve been without power or internet since last Thurs due to hurricane damage. The idea is to avoid pathogenic microbes gaining a foothold in your acorns and proliferating. Anaerobic conditions plus a food source for microbes creates the potential to do just that, so changing the water regularly not only provides oxygen but helps flush out potential pathogens. If you’re anxious about cold-leaching your acorns, you may want to go with the hot-leach method instead.
I’ve been using the cold water method decant to drain the water, then triple rinse once per day with giving it a stir a couple of times a day.
I’ve heard that acorns dried and left in their shells have a longer shelf life. Any idea how much longer than when you dry them out of the shells like you did? With how hard they become once dried I’m inclined to believe they are quite stable even without their shells, especially if kept in an airtight container. Also, by cracking them fresh do you not have a hard time since the shells are still soft and not brittle like they are once dried? Thanks-
Hi Ryan! Great questions. We’re in South Carolina, where it’s quite hot and humid. If we’ve had a good bit of rain prior to our acorn foraging, we’ve found that the acorns can and will mold quite easily if left in their shells. As far as storage of in-shell vs out-of-shell acorns goes, we’ve never really experimented either way since we usually process them into flour soon after gathering. If you can dry your acorns for a bit in their shells prior to cracking, that would likely speed up processing by making the shells easier to crack and the nutmeat easier to separate from the testa. We’re inadvertently testing that approach this year since time constraints made it impossible for us to crack all the acorns we gathered. We have the nuts laid out in a single layer underneath a ceiling fan turned on high so hopefully they won’t mold before we’re able to get to them.
The Chumash indians would grind the acorns first and then leach the tannins using natural materials to keep it from washing away…you could easily substitute cheese cloth or white cotton sheets/shirt material. I would be inclined to use my sink and just change the water for each flush.
The extra surface area and more exposed parts of the ground nut makes for much faster tannin leaching. Not sure if all of the tribes did something similar or not just learned that when I was a kid growing up.
Interesting, thanks! Problem with that approach for us would be that the raw acorns we use are quite hard. Even our Ninja blender has trouble chopping them. We’d still have to soak them from probably 1-2 weeks before we could grind them into smaller chunks. Perhaps the acorns used by the Chumash were a softer variety that could be more easily ground.
Well there are a lot of live oaks and they were not too hard. I think it does depend on the tree. There are morteros all over in California if you know where to look…usually old growth oak forests. I am in the south now and there are more of the white and red oaks not the year round live oaks with the real spiky leaves.
Really interesting! I’d never heard of morteros before. I grew up finding Native American artifacts in the southeast and remember finding specialized grinding stones at some of the sites where we’d look – but have never seen grinding spots built right into boulders.
We’re in Upstate South Carolina on the outskirts of Greenville. The acorns we like best for making acorn flour are on a friend’s property on Paris Mountain. They’re giant nuts – almost as big as Chinese chestnuts, and they come from a grove of white oak, subspecies unknown. The nut meat is quite hard, however. Frankly, even though the final product isn’t quite as good as cold leaching, hot leaching is the best option since it takes a fraction of the time and uses far less water. With hot leaching you can have a final acorn flour product dried and bagged within 48 hours whereas it takes at least several weeks to cold leach them. (Unless there’s an easy way to grind them down right off the bat, as you say.)
I am definitely going to try the hot leaching technique. I tried to do some acorns a few years back but there were a load of grubs in the bucket and I found it discouraging. If I can fight the squirrels and deer here and get a decent amount that aren’t too grub infested we will see. Thank you for all the great tips!
I take the dried nuts that I’ve shelled and pass them through a meat grinder. It works like a charm and I wind up with a course grained flour with some pieces that are couscous sized.
Hey there,
What temp. do you set your dehydrator for?
Sorry for the non-specificity in the article on that point. Whether drying the cracked acorn nuts or dehydrating the acorn mush in the final stages of making acorn flour, we put the dehydrator on ~135F.
P.S. my parents would grind the acorns in an old electric coffee grinder.
My parents used to hot leach their acorns with boiling water. The only cold leaching I had known about was the natives in the Eastern Sierra Nevada Mountains who used to put acorns in a bag and stick them in swift flowing streams. My parents taught me how, but I never had enough acorns til this year. I’m still in the process of taking the nuts out of the shells, but have quite a lot. I will be getting more, before the winter.
Thanks for sharing! We mention cold leaching acorns in streams in the article – the problem with doing that today is virtually all US waterways are fairly heavily polluted with contaminants that you don’t want your acorns soaking in. If you happen to have a clean, spring-fed creek that’s upstream from any source of contamination, this is a great way to go about cold leaching your acorns. Otherwise, you’ll have to make other plans to cold leach or hot leach indoors.
Yeah. It’s sad that streams are so polluted. I’ll do it the way you describe in your article. I’d rather that than boiling out the vitamins.
Wish a person could buy acorn flour! I’d definitely try to make them in bread if I had some!
Us too! As of now, the only way to get high quality acorn flour made in the US is to make it yourself.
Hi Lindsey! This is Susan @ Tyrant Farms. There shouldn’t be nearly that high a percentage of bad acorns, so we’re wondering if either: a) the ones you picked were just really old, or b) you stumbled on an oak/acorn variety that has an air pocket between the shell and nut meat that would cause them to float. It’s probably worth cracking a couple of your “floaters” open to see just in case? The good ones won’t have any weevil damage inside and will look like whole, solid nuts.
Interesting but it did not tell how to make acorn flour or have recipes for it as the title says.
GB: there are three tabs at the top of the article: The Acorn Story | How to Prepare Acorns | Acorn Recipes. You have to click the How to Prepare Acorns tab to see how to make them into flour, and the Acorn Recipes tab to see recipes.
Thank you.
Thank you for this insightful knowledge on the white oak tree! We have two in our back yard, and enjoy collecting their acorns each fall. I am so fascinated with these beauties, like an instinctive ancestral memory is sparked forth at the sight of them 🙂 I will be trying for acorn flour next season.
Glad to hear you’ll be giving acorn flour a try, Lissa! Best of luck and let us know how it turns out.
thanks for this great overview! i collected a bunch of acorns (before the snow falls) but don’t have a free weekend yet to process them. can i dry them in a dehydrator before processing them in the winter? how long (and at what temp) should i dehydrate them?
Sorry we missed your question, Lauren! Yes, you can dehydrate them. Apparently, many Native American people would dry store acorns to make sure there would be plenty in the event of an off year. This response is probably too late to do you much good, but you can dehydrate your acorns. If you leave the shells on, dehydrate them at a higher temp setting on your dehydrator and keep them going for 2-3 days. If the shells are off, you could probably get away with 24-36 hours in the dehydrator.
Sorry we missed your question, Lauren. Our comment system has been a little nutty (pun intended). Yes, you can dehydrate acorns. Apparently, Native Americans would often dry store acorns to make sure there would be plenty in the event of an off year. This response is probably too late to do you much good, but you can dehydrate your acorns. If you leave the shells on, dehydrate them at a higher temp setting on your dehydrator and keep them going for 2-3 days. If the shells are off, you could probably get away with 24-36 hours in the dehydrator.
Have already made about a Kilo of acorn flour, wonderful! Made delicious cookies for Thanksgiving, everyone was a fan. It is even tasty sprinkled in granola with milk, just like you would use flax meal. Excited to try more ways of cooking and using this amazing resource. Thank you for this guide. I will be trying cold leaching to see how much of a difference with taste and consistency it gives. Great site here! I live in BC near the coast, and am enjoying reading about your farm.
Happy Foraging!