How to easily make an affordable mini-greenhouse
Tyrant Farms' articles are created by real people with real experience. Our articles are free and supported by readers like you, which is why there are ads on our site. Please consider buying (or gifting) our books about raising ducks and raising geese. Also, when you buy through links on our site, we may earn an affiliate commission. Learn more
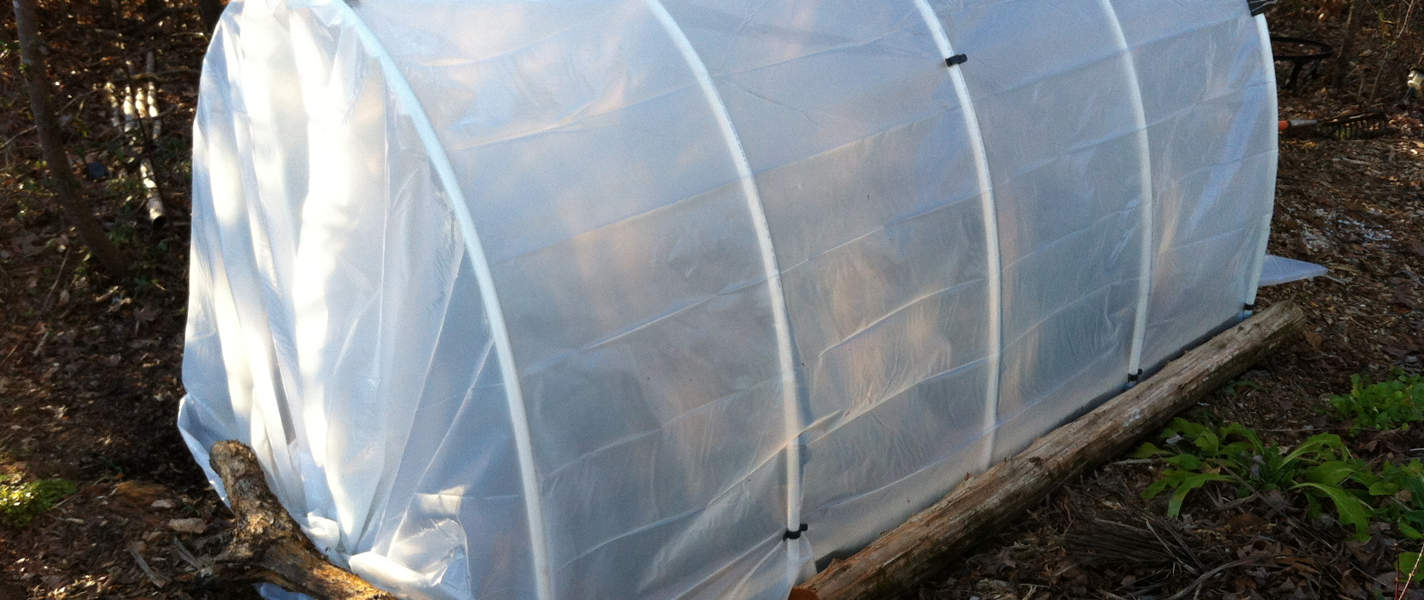
If you need to make an inexpensive tall hoop house or a small greenhouse, the setup we outline in this article might just do the trick for you.
Possible uses for this mini-greenhouse?
Here are a few possible uses for this mini-greenhouse:
- help protect or start flats of cold-sensitive seedlings;
- house cold-sensitive potted plants;
- as a cover for a garden bed that you want to keep going into fall/winter.
We used it for seedling protection. We also used it back when we only had a couple of small potted citrus to overwinter. Now with a citrus collection of over a dozen plants, it no longer works for that purpose.
How much temperature protection will the mini-greenhouse provide?
Like low tunnels, this mini-greenhouse will keep internal temperatures at least 5 degrees warmer inside at night and potentially up to 20 degrees on sunny days. You could boost the temperature with heated soil cables or some other form of heating system.
Materials needed to construct the mini-greenhouse:
- (3) 8′ treated 4x4s
- (6) 10′ long pieces of 1/2″ PVC pipe
- (1) roll of 25′ clear greenh0use film (at least 6 mil thickness)
- (10) metal 1/2″ clasps to attach pipes to frame
- (Optional) (1) bag cedar mulch- temp & bug control
- (12) clamps to hold plastic sheet to PVC
- (5) cable ties
- Large screws for wood frame
- Small screws for PVC braces
The total price of this system should only be a couple hundred dollars, depending on the price of materials at your local home improvement store.

Step-by-step: how to build a mini-greenhouse
Step 1: Get your materials.
Get your materials from a home supply store (see materials list above).

A pickup truck is helpful, but we managed to get all of these supplies into our car with the back seat down.
Step 2: Build the frame & attach PVC braces.
Cut one 8′ 2×4 into two 4′ 2x4s. Assemble wood pieces into 8×4′ floor base using screws and drill.
Attach 5 metal PVC braces evenly on outside of 8′ sides; 2 braces on edges, with the other 3 at 32″ increments. The PVC pieces will be held in place by these braces.

Step 3: Slide PVC frame into place.
Slide one side of PVC pipe inside the metal bracket, then bend and insert the PVC into the brackets on the opposite side of the frame.

Go down the line sliding all 5 PVC pipes into place in their respective brackets.
Step 4: Cut and install top-mounted PVC piece.
Use a plastic cutter or saw to cut the top-mounted PVC to its proper length (8′).

Then attach the top-mounted PVC piece to center of hoops using plastic cable ties/zip ties. (Add duct tape if desired; we just used ties.)
Step 5: Assemble the plastic cover.
Unroll the first fold of plastic. Lay plastic from end-to-end over top of hoop house, dropping it to the ground on both ends.

Extend the cover 18″ out from ground on both sides, then cut plastic with scissors. Next, clip sheet to PVC pipe.
Step 6: Put mini-greenhouse into final position and start using!
Put the mini-greenhouse into desired position in your yard or garden. The sunnier the spot, the warmer it will be inside.
Inside temperatures will be boosted above outside temps the most on sunny days and least at night or on cloudy days.

We hope this DIY greenhouse helps you grow better!
KIGI,