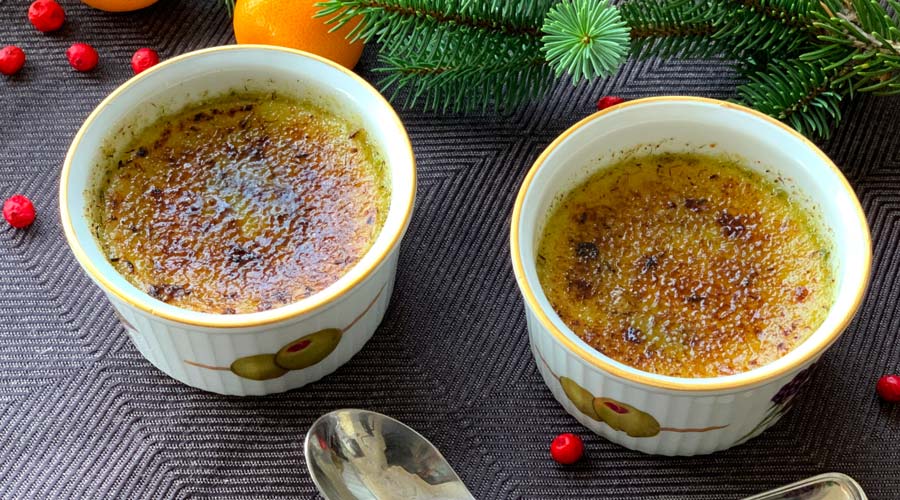
Recipe: Christmas tree crème brûlée (made w/ conifer needles)
Tyrant Farms' articles are created by real people with real experience. Our articles are free and supported by readers like you, which is why there are ads on our site. Please consider buying (or gifting) our books about raising ducks and raising geese. Also, when you buy through links on our site, we may earn an affiliate commission. Learn more
Find out how to turn the needles from your Christmas tree (or any edible conifer tree) into a unique and delicious holiday treat: Christmas tree crème brûlée.
If you’ve ever wanted to eat Christmas in a spoon, this Christmas tree crème brûlée recipe will help you unwrap that desire. We’ve been playing with edible conifers in the kitchen for quite a while, and this recipe is about as good as it gets for capturing the delicious flavors hiding away in your Christmas tree needles.

Safety warnings
We detail three warnings in our How to Eat Your Christmas Tree Guide that we’ll briefly outline again here (read the guide for more info):
- You should know what type of tree you’re planning to eat (especially when foraging) because there are poisonous evergreen species. For instance, yews are deadly poisonous, although yews are not used for Christmas trees or ornamentation in the US.
- Commercial Christmas trees may have synthetic pesticide residues on them. In some locations, organic Christmas trees are available. Synthetic pesticides are not permitted on organic farms.
- Like any food, some people may have sensitivities/allergies to edible conifer needles. Especially if you’re prone to food allergies, try a small amount to make sure you have no averse reactions before eating larger quantities.
What type of Christmas tree is best for making Christmas tree crème brûlée?
We used the mature needles from blue spruce (Picea pungens) for this recipe. Don’t have a blue spruce? No worries…
In addition to various spruce species (Picea spp.), here are other types of edible conifers that will make an excellent Christmas tree crème brûlée:
- firs (Abies spp.)
- Douglass-fir, which is not a true fir (Pseudotsuga menziesii)
- hemlocks (Tsuga spp.)
- pines (Pinus spp.)
Each genus/species of edible conifer tree listed above has different, unique flavor characteristics. Regardless of which edible conifer species you use for this recipe, we’d recommend using fresh, mature green needles for best results (no more than a few days off the branches).
From here on, when we say “Christmas tree needles,” we’re simply using shorthand for whichever of these edible conifer species you plan to use to make this Christmas tree crème brûlée recipe.
Getting the Christmas tree flavor to “show up”
This recipe combines two basic Christmas tree ingredients that we discuss in our edible Christmas tree guide:
One thing that’s tricky when using Christmas tree needles in the kitchen is getting their flavor to come through after cooking – or to show up the way you want them to. Despite their pleasing yet strong smell, Christmas tree needles present unique culinary challenges:
- Whole needles aren’t pleasant to chew on from a texture standpoint – plus they pack some bitter flavors.
- Using the needles to infuse other ingredients (example: cream) via COOKING can either lead to not enough flavor or too much bitter flavor coming out of the needles.
We’ve even heard some chefs and foragers say you shouldn’t bother cooking with Christmas tree needles for this reason. Hmm. An interesting challenge…
Cold-infused vs hot-infused cream: how to unlock the best flavor notes of Christmas tree needles
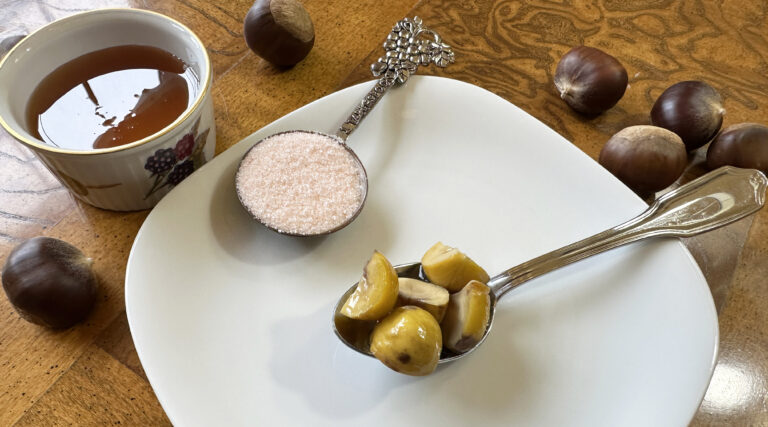
The foundation of this Christmas tree crème brûlée recipe is our Christmas tree needle cream: heavy cream infused with the flavor of conifer needles. You’ll need to read (and make) our Christmas tree cream recipe AND our Christmas tree sugar recipe before making this crème brûlée!
Yes, we do blind taste tests with our recipe trials (and errors) when trying to decide between different versions. When doing final taste tests for this recipe, one version used cold-infused cream, the other used hot-infused cream (both methods are outlined in our Christmas tree cream recipe article). Otherwise, the two versions were identical.
Results from the three tasters?
Two out of three liked the more intense flavor of the cold-infused cream version. One liked the milder/less intense flavor of the hot-infused version.
Make of this info (from a three-person blind taste testing) what you will. If you want more intense Christmas tree flavor but don’t have time to make a cold-infused cream, perhaps you could go for a longer heat-infusion (45-60 minutes) on your cream to extract more flavor without also extracting unpleasant notes.
Step-by-step recipe tips to make Christmas tree crème brûlée
Here are some essential details to help you make a perfect Christmas tree crème brûlée on your first attempt:
Step 1. Make Christmas tree cream & Christmas tree sugar.
Again, this recipe is built upon two other foundational Christmas tree recipes:
- Christmas tree cream recipe used when making the custard, and
- Christmas tree sugar recipe used to make the caramelized sugar (brûlée) on top of the custard.
You’ll need to make both of these ingredients before you can make this recipe.
Why don’t we use Christmas tree sugar in the custard? Even when using a spice grinder, there are still enough bits of needle left over that some people might find the texture objectionable in a silky custard.
Also, using both the Christmas tree sugar and cream in the same recipe would make the flavor too strong.
Step 2. Determine quantity you want to make and ideal baking ramekins.
This recipe makes six *nearly half-cup servings of Christmas tree crème brûlée. The ramekins we used are family heirlooms that have a 3″ diameter, 1 5/8″ depth, and have a 1/2 cup capacity when full to the brim. (*You don’t want to fill your ramekins to the brim with custard hence “nearly half-cup servings.”)
The dimensions of the ramekins you use will affect the cook time of the custard AND the surface area of the caramelized sugar. We like more custard and less sugar crust, but you may like the opposite. We can still be friends.
If using smaller ramekins or ramekins with less depth, just be sure to adjust your cook time down accordingly – or at least start checking it sooner as it cooks. Your custard may be ready in as little as 30 minutes, versus ours which took 45 minutes.
Regardless of the ramekin size you use, you’ll know your crème brûlée custard is done when it’s firm on the sides but still jello-jiggly in the center.
Step 3. Make the custard (with some important tricks and tips).
a. Separate your egg yolks, preheat oven.
Start by separating the egg yolks from the whites. There are fancy kitchen gadgets that do this for you, but all you need to do is crack an egg in half while holding it over a bowl, then pass the yolk back and forth between each half of the shell as all the whites fall into the bowl below. Easy peasy.
Whisk your egg yolks, sugar, and vanilla extract together in a bowl, then set the bowl aside.
Now is a good time to go ahead and preheat your oven to 325°F (163°C) as well.
b. Heat the cream and salt. Boil water.
You’re NOT making custard on a stovetop. You’re ultimately going to be making your custard in a water bath in your oven.
Put the cream and salt in a saucepan over medium heat, stirring occasionally. Once the cream starts to simmer, immediately remove it from the heat (don’t let it reach boiling).
Now is also a good time to go ahead and get water heated for your water bath (you want it near boiling when you pour it in to the baking dish).
c. Temper the egg mixture.
Now comes a delicate part of the operation: tempering your egg yolk mixture with the hot cream so the yolks don’t cook and clump.
If you have two people in the kitchen, let one SLOWLY pour the hot cream into the egg yolk mixture while the other person whisks vigorously. If you’re cooking solo, be sure to use a relatively heavy bowl since you won’t have a free hand to hold it steady. (We like to use a large 8 cup glass measuring cup for this part, which also makes it easy for pouring the custard into ramekins in the next step.)
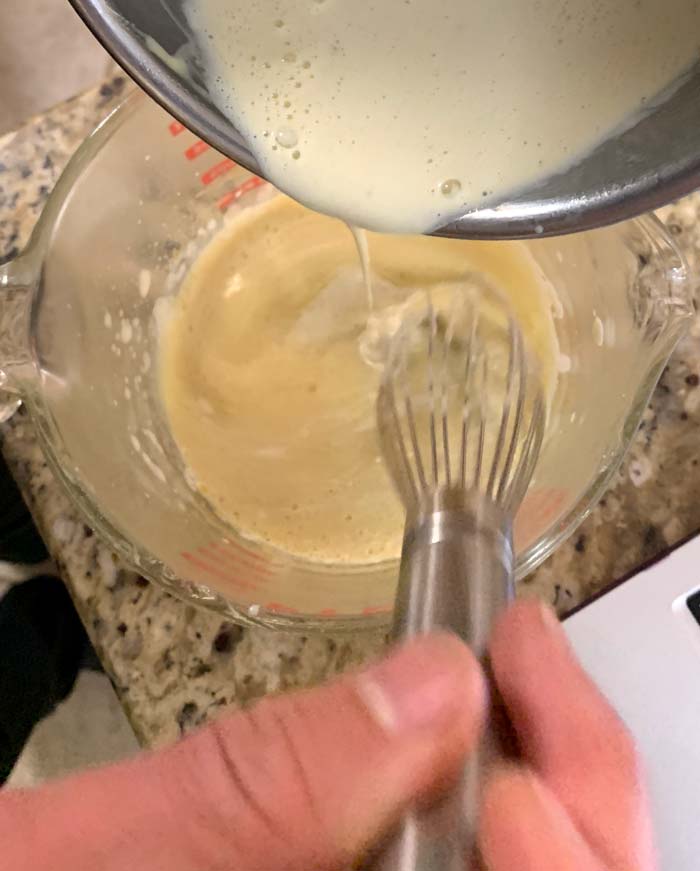
Again, slowly pour in the hot cream as you whisk away on the egg yolk mixture. If you end up with a few lumps, you can always strain your uncooked custard before proceeding.
d. Water bath.
Arrange your empty ceramic ramekins in a large, deep baking dish. Pour the uncooked custard evenly into each ramekin.

Next, carefully pour the hot water into the baking dish until it’s about half way up the side of each ramekin. Just be careful not to pour the water into the custard-filled ramekins or to burn yourself while pouring or carrying the now-hot baking dish to the oven.
Why a hot water bath? The hot water evenly distributes heat around each ramekin of custard. This means the eggs don’t curdle and the top of the custard doesn’t dry out and split before it’s fully cooked inside.
With our ramekin size, our custard took 45 minutes to cook. If you have shallower or smaller ramekins, your custard may cook in as little as 30 minutes.
Another wild card: each oven cooks a bit differently. As mentioned above, you’ll know your crème brûlée custard is done when it’s firm on the sides but still jello-jiggly in the center.
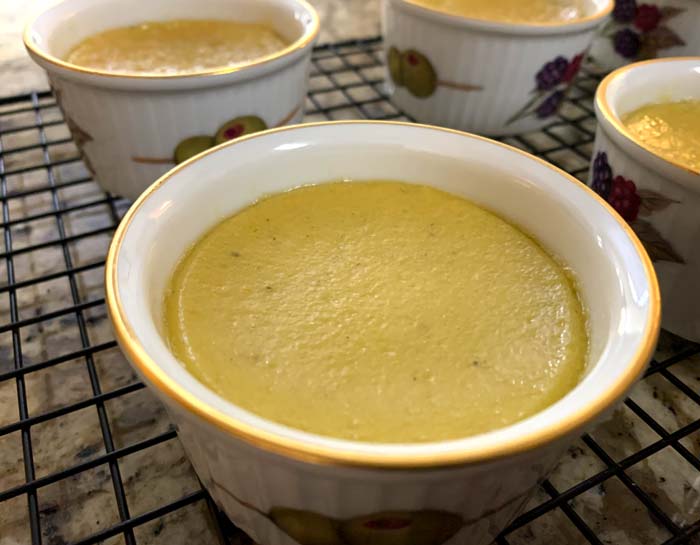
Step 3. Chill the custard.
Once out of the stove, chill your custard ramekins on a baking rack until they’re cool enough to put in the fridge.
Yes, you have to put crème brûlée in the fridge to chill otherwise you’ll be serving warm custard with watery sugar on top. It might taste ok, but that’s not crème brûlée.
How long do you have to chill crème brûlée custard? At least 4 hours. Our personal preference is to make our custard the day before, then caramelize the sugar and serve it the next day.
You can store the ramekins in the same baking dish you cooked them in, just be sure to cover the dish so they don’t dry out or absorb any funky flavors from your fridge.
Step 4. Make the perfect brûlée crust with Christmas tree sugar (with or without a torch).
Brûlée means burnt in French. “Caramelizing” sugar is more accurate for what you’re aiming for, but any word you say in French sounds more enticing. Oui, brûlée it is.
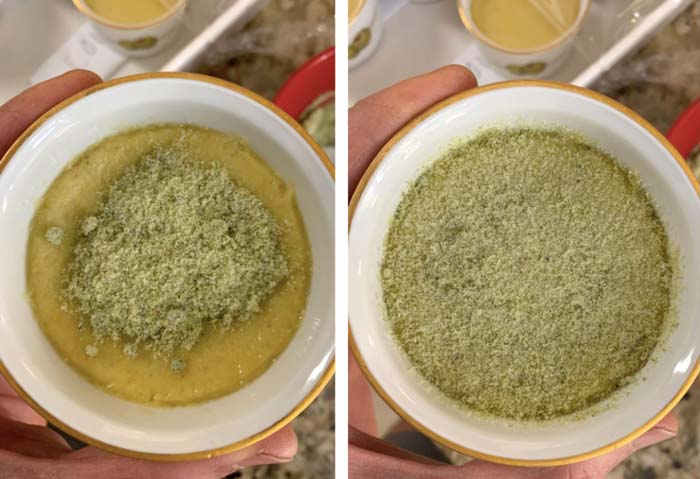
Once you’ve got your custard ramekins and your Christmas tree sugar out of the fridge, it’s time to coat the surface of each custard with sugar. Scoop a generous spoonful of Christmas tree sugar on to the top of each custard. Then, gently swirl and tap the ramekin until the surface is evenly coated in sugar. Pour any extra sugar back into your sugar bowl.
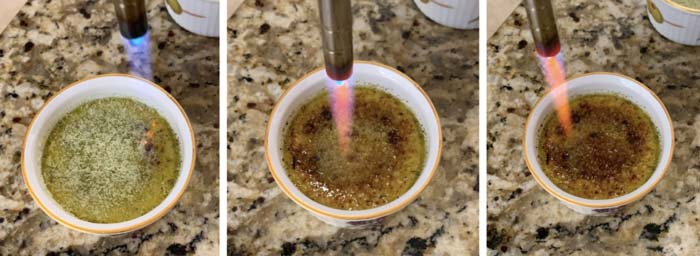
Now you’ve got two options: 1) use a kitchen/cooking torch to caramelize the sugar, or b) use your oven broiler plus a cold water bath to caramelize your sugar.
A kitchen torch is simpler and our preferred method.
Option 1: If using a kitchen torch, hold the torch about 6″ above the surface of the sugar. Aim your flame at one point on the side of ramekin. As the sugar begins to boil and darken, move to the next spot in a slow, steady swirling motion around the ramekin, from the outside in. Within a minute or so, you’ll have a beautifully browning, boiling crust. It cools and hardens rapidly.
Option 2: If using your oven broiler, turn the broiler on and move an oven rack to either the first or second shelf/position. Put your ramekins into the same baking dish you cooked them in, but this time fill the baking dish with cold water. (This will help prevent the custard from heating while the sugar caramelizes.)
Turn your oven light on and keep a close eye on the sugar as it caramelizes. It shouldn’t take more than a couple minutes under your broiler before you’ve got a nice brûlée surface.
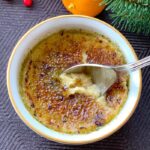
Now it’s ready to serve. And you’ve just made Christmas tree crème brûlée!
Recipe: Christmas tree crème brûlée
Christmas tree crème brûlée
Ingredients
- 2 cups Christmas tree needle-infused cream (See recipe notes in article.)
- 3 large egg yolks
- 1/2 cup organic cane sugar
- 6 tbsp Christmas tree sugar (See recipe notes in article.)
- 1 tsp vanilla extract
- pinch of salt (No more than ~1/4 tsp)
Instructions
Making the custard
- Preheat oven to 325°F (163°C).
- Separate your egg yolks. In a large measuring bowl, whisk your egg yolks, sugar, and vanilla extract together, then set aside.
- Put the cream and salt in a saucepan over medium heat, stirring occasionally. Once the cream starts to simmer, immediately remove it from the heat (don’t let it reach boiling). At the same time as you're heating the cream, boil water (to be used in water bath).
- While the cream is still hot, SLOWLY begin pouring the hot cream into the egg yolk mixture while whisking vigorously. You don't want the egg yolks to scramble or form chunks.
- Arrange empty ramekins in a large, deep baking dish. Pour the uncooked custard evenly into each ramekin. Pour hot water into baking dish until it’s about half way up the side of ramekins. Using oven mitts, carefully transfer baking dish into oven. Cook time may vary from 30-45 minutes, depending on size of ramekins. Custard is done when it’s firm on the sides but still jello-jiggly in the center.
- Remove from oven and cool ramekins on baking rack. Cover and put in fridge to chill for 4-24 hours. (We put our ramekins back into baking dish and cover the baking dish.)
Making the brûlée (caramelized sugar crust)
- Option 1: Kitchen torch - Hold the torch about 6″ above the surface of the sugar. Aim your flame at one point on the side of ramekin. As the sugar begins to boil and darken, move to the next spot in a slow, steady swirling motion around the ramekin, from the outside in until the entire surface is adequately caramelized.
- Option 2: Oven broiler - Turn the broiler on and move an oven rack to either the first or second shelf/position. Place ramekins into same baking dish you cooked them in, but this time fill the baking dish with cold water to help prevent the custard from heating while the sugar caramelizes. With oven light on, carefully watch the sugar surface since it will go from uncooked to caramelized very quickly.
- Serve immediately!
We think this recipe should be a holiday classic, but you can make unique recipes from conifer trees year round. We’d love to help show you how…
KIGI,

Want to dig your fork deeper into edible conifers?
Start here: Tyrant Farms’ Edible Christmas Tree Guide
Base recipes:
- Christmas tree sugar
- Christmas tree salt
- Christmas tree cream or milk
- Christmas tree oil
- Christmas tree butter
Additional Christmas tree/edible conifer recipes:
We’d also like to recommend two books for other Christmas tree eaters and food explorers; each contains delicious recipes you can make with your Christmas tree:
- How to eat your Christmas tree by Julia Geogallis, and
- Forage, Harvest, Feast by Marie Viljoen.