The ultimate hoshigaki persimmon guide, with variety comparison
Tyrant Farms' articles are created by real people with real experience. Our articles are free and supported by readers like you, which is why there are ads on our site. Please consider buying (or gifting) our books about raising ducks and raising geese. Also, when you buy through links on our site, we may earn an affiliate commission. Learn more
Hoshigaki persimmons are a traditional East Asian delicacy made by slowly drying and massaging persimmons over many weeks. In this hoshigaki guide, you’ll find out how to make your own!
We grow loads of Asian persimmons each year — far more than we can possibly eat before they go bad. That abundance means we need preservation methods that allow us to enjoy our persimmons throughout the year.
When we have firm but ripe Asian persimmons, our favorite preservation method is to make hoshigaki, a traditional Asian delicacy made by slow-drying and massaging the fruit over many weeks. Whether you have home-grown or store bought Asian persimmons, you’ll find out everything you need to know to make your own hoshigaki in this helpful guide!
Table of contents:
Jump right to the section you’re interested in or read the whole article!
1. What is hoshigaki?
2. Hoshigaki vs conventional dehydrated persimmons
3. Can you make hoshigaki with American persimmons?
4. Asian persimmon hoshigaki, with variety comparison
5. Step-by-step: How to make hoshigaki
6. How to store hoshigaki (and how long it lasts)
7. How to eat hoshigaki
What is hoshigaki?
In Japanese, “hoshi” means dried and “kaki” means persimmon, so the word “hoshigaki” translates into dried persimmon. However, simply dehydrating a persimmon will not yield true hoshigaki.
Instead, making true hoshigaki requires each persimmon be peeled, hung to dry in a well-ventilated and sunny spot, and massaged daily for anywhere from a few weeks to a couple months, depending on:
- type/variety of persimmon used,
- specific environmental conditions,
- preferences of the hoshigaki maker (some people prefer softer jelly-like interiors, others prefer firmer dryer interiors).
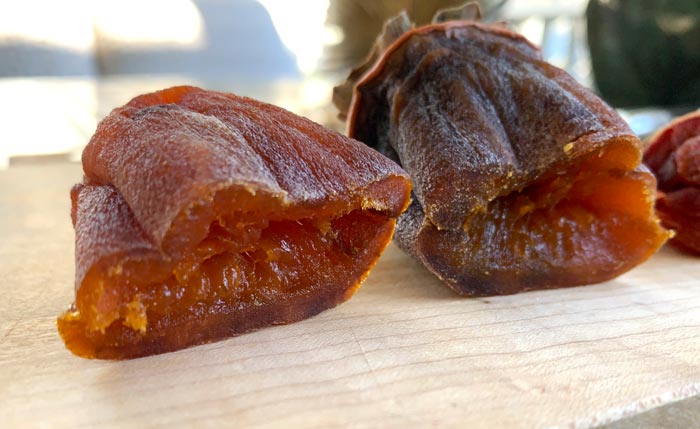
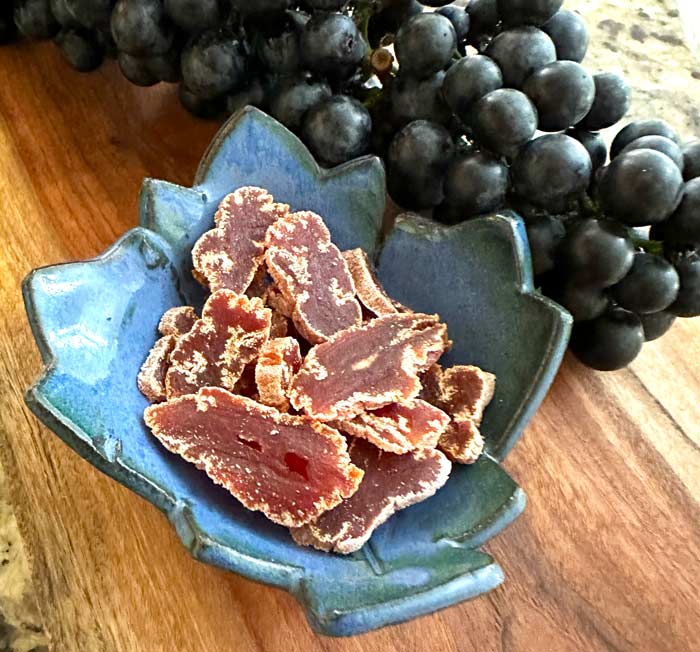
Finished hoshigaki is a delicacy. It features a naturally formed sugary “bloom” on the exterior, a chewy texture, and a unique sweet and rich flavor.
How is hoshigaki different from a dehydrated persimmon?
We also make standard dehydrated persimmons when we have an abundance of Asian persimmons that are too squishy-ripe to make into hoshigaki.
Dehydrated Asian persimmons are unpeeled and can be made in an electric dehydrator in 2-3 days. Hoshigaki persimmons are peeled and require weeks of dehydrating and massaging.
Even though making hoshigaki is far more time- and labor-intensive than making dehydrated persimmons, the difference in flavor and texture is worth it. Although both are delicious, hoshigaki has a superior texture and taste than standard dehydrated persimmons.
Can you make hoshigaki with American persimmons?
We’re also huge fans of native American persimmons (Diospyros virginiana), which are a different species than Asian persimmons (Diospyros kaki). While they have many virtues, American persimmons are not ideal candidates for hoshigaki for two reasons:
- They’re small, mushy when ripe, and have very thin skins. Peeling them is a chore and the fruit isn’t likely to hold together when hung to dry.
- They tend to have lots of large, rock-hard seeds inside that are impossible to remove without turning the fruit into mush.
That said, there are bred varieties of seedless American persimmons that might lend themselves to hoshigaki. However, we have an abundance of wild American persimmons in our area that we forage, so we don’t bother growing bred varieties.
Can you make hoshigaki from any type of Asian persimmon?
Yes, you can technically make hoshigaki from any type of Asian persimmon, although you’ll want to use seedless varieties. There are dozens of varieties of Asian persimmons, and they’re all generally lumped under one of two categories:
- Astringent, meaning they leave an unpleasant bitter film and flavor in your mouth when they’re firm to the touch and not fully ripe. Once they’re squishy ripe, they become delicious with no astringency. (This characteristic also applies to American persimmons.)
- Non-astringent, meaning they’re sweet with no bitterness as soon as they start to blush orange even if the fruit is still very firm to the touch.
What’s the most popular Asian persimmon variety for making hoshigaki?
Hachiya, a large, oblong astringent Asian persimmon variety, is the most popular choice for making hoshigaki. The astringent tannins in the firm fruits are broken down and rendered undetectable during the hoshigaki-making process.
For instance, I tasted the peeled skins of the hachiyas used to make hoshigaki for this article. They were horribly bitter and left my mouth puckered. However, after the fruit was transformed into hoshigaki, there was zero astringency remaining, only sweet delicious flavors.
What is the best variety of persimmon for making hoshigaki?
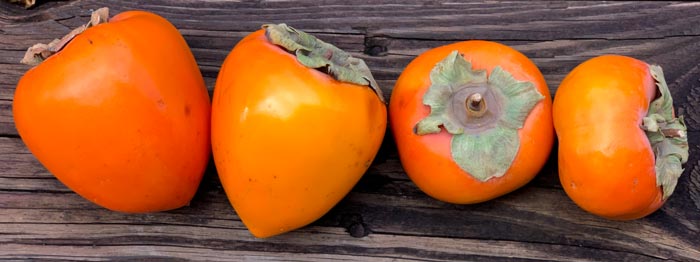
Popular is not necessarily best. We don’t grow hachiya persimmons, so we were curious how the Asian persimmons we do grow would compare to hachiyas once made into hoshigaki…
Thus, we conducted a small blind taste test using hoshigaki made from three different types of Asian persimmons:
- Hachiya, the astringent variety most commonly used to make hoshigaki;
- Fuyu, a popular non-astringent variety; and
- Ichi Ki Kei Jiro, an excellent non-astringent variety we grow that’s very similar to Fuyu, but larger.
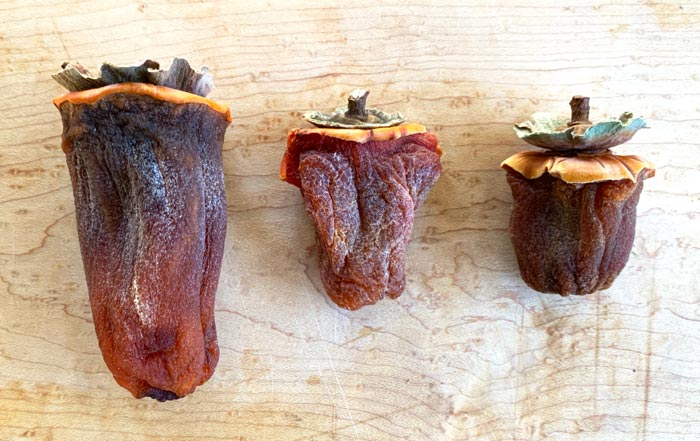
The results?
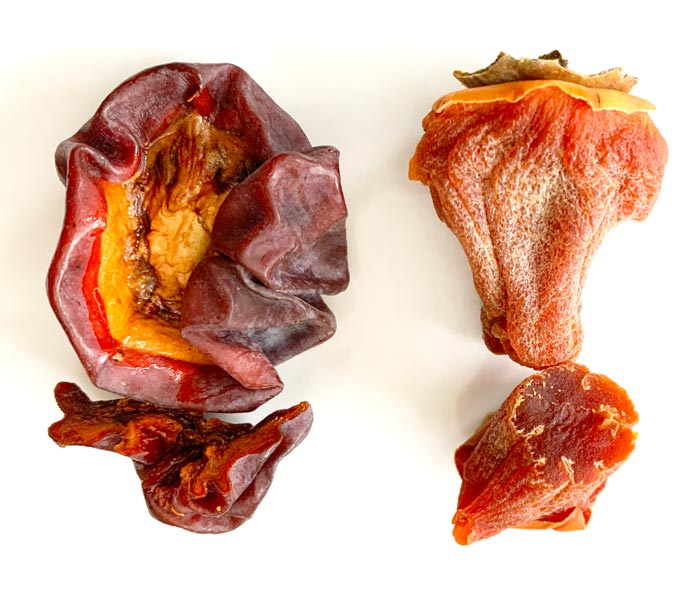
- Ichi Ki Kei Jiro won the taste test by 3 to 1 over Hachiya, with one other taste tester being undecided between the three varieties.
- All taste testers acknowledged that the differences between the three varieties were fairly subtle, e.g. all were quite good.
- Hachiya has a slightly different, almost granular texture compared to the other two varieties, and one taste tester detected notes of honeydew melon in Hachiya. Ichi Ki Kei Jiro offered the most candy-like flavor and best texture.
- Ichi Ki Kei Jiro persimmons maintained a brighter, more orange coloration when made into hoshigaki than either Hachiyas or Fuyus, which had more brown coloration.
- Due to their unique size and shape, Hachiya produced the largest finished hoshigaki.
Key takeaways:
There are dozens of varieties of Asian persimmons that can be used to make good hoshigaki, so long as the fruit is seedless. Even though Ichi Ki Kei Jiro persimmons won our small hoshigaki taste test, use whatever seedless Asian persimmon variety you have access to!
How to make hoshigaki
Now comes the fun part – making your own hoshigaki! Below is a step-by-step guide with lots of tips and process photos to help you get it right.
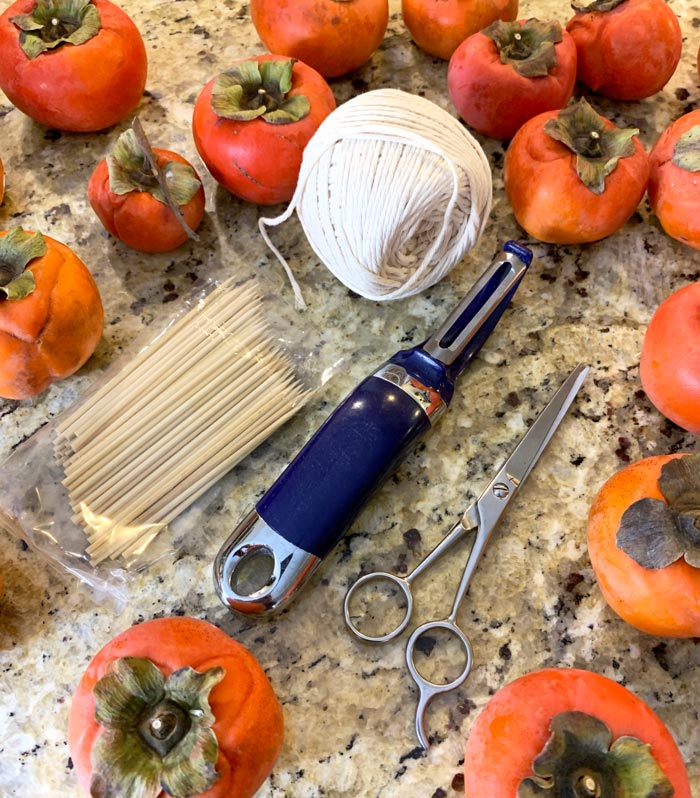
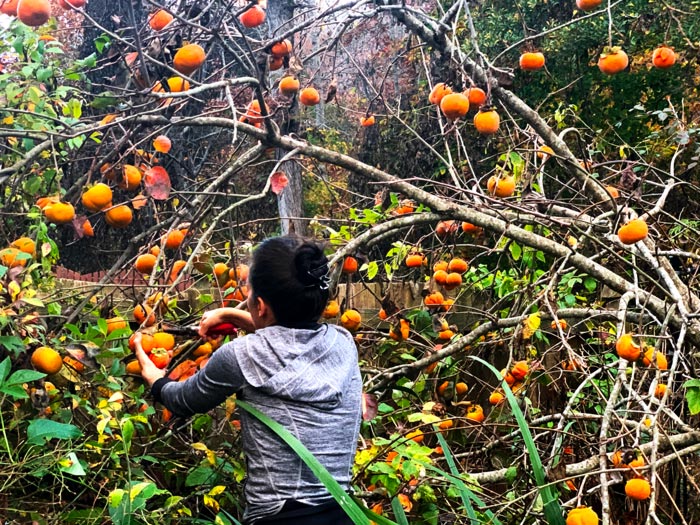
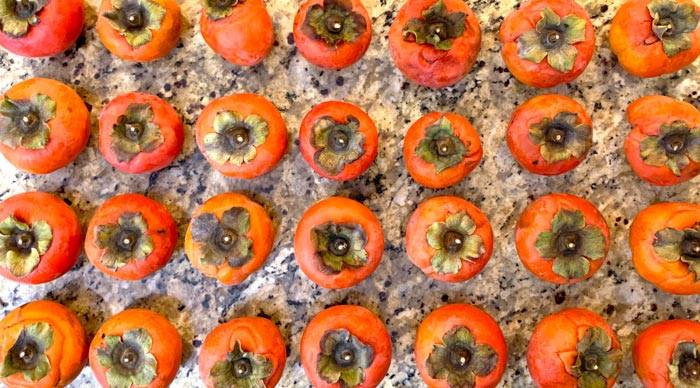
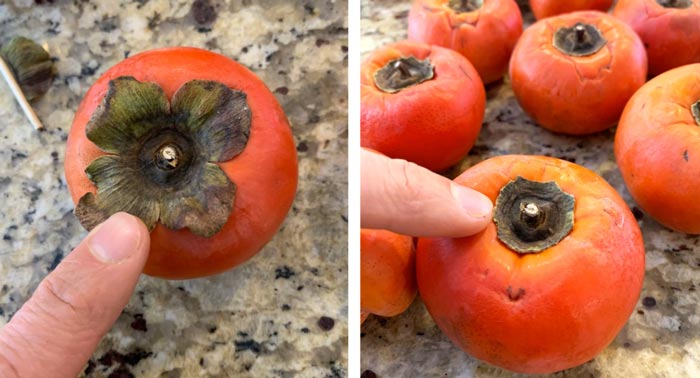
Step 1: Select the right fruit.
Here are three tips for selecting the perfect fruit for making hoshigaki:
- Select seedless Asian persimmon varieties. American persimmons are not ideal for making hoshigaki.
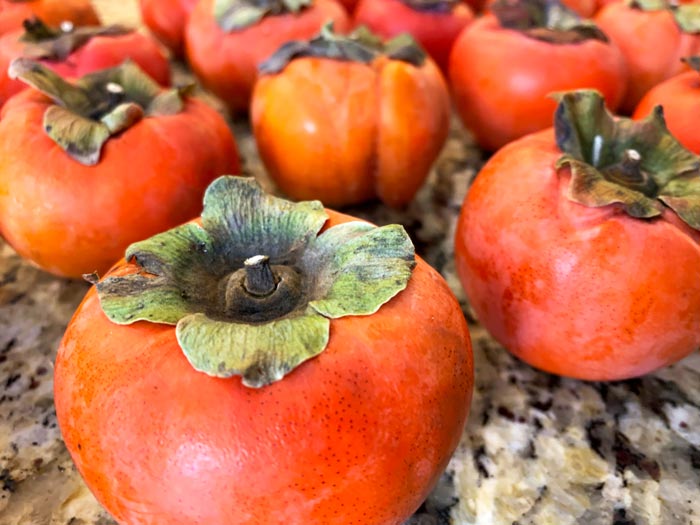
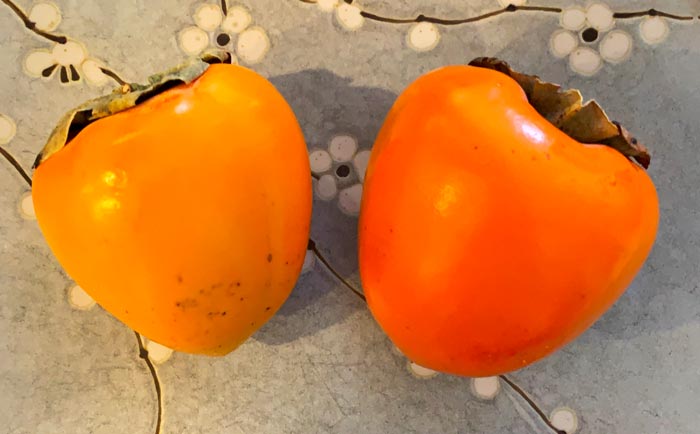
- Select FIRM fruit with orange skin. You want the fruit ripe, but not too ripe. If a persimmon is soft/squishy, it’s good for other recipes but NOT for making hoshigaki.
- Ideally, select fruit with the largest stems on it as possible to make it easy to tie and string up. Or see our tip in Step 3 for making hoshigaki from persimmons with small/no stems using the skewer method.
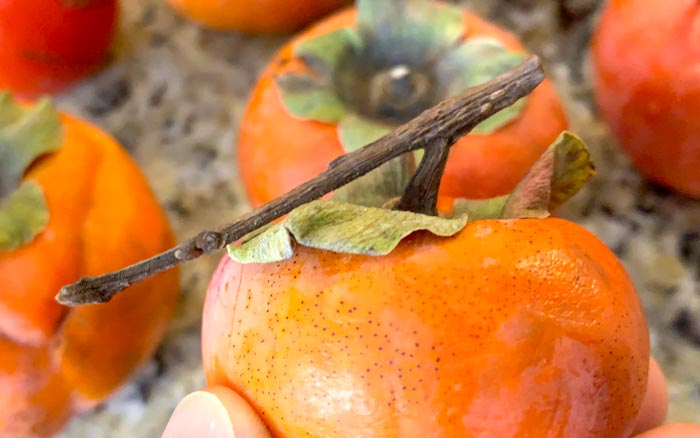
If you’re harvesting your own persimmons to make hoshigaki, try to leave larger pieces of stems on. However, this is not always easy to do without removing branch pieces that may yield fruit next year.
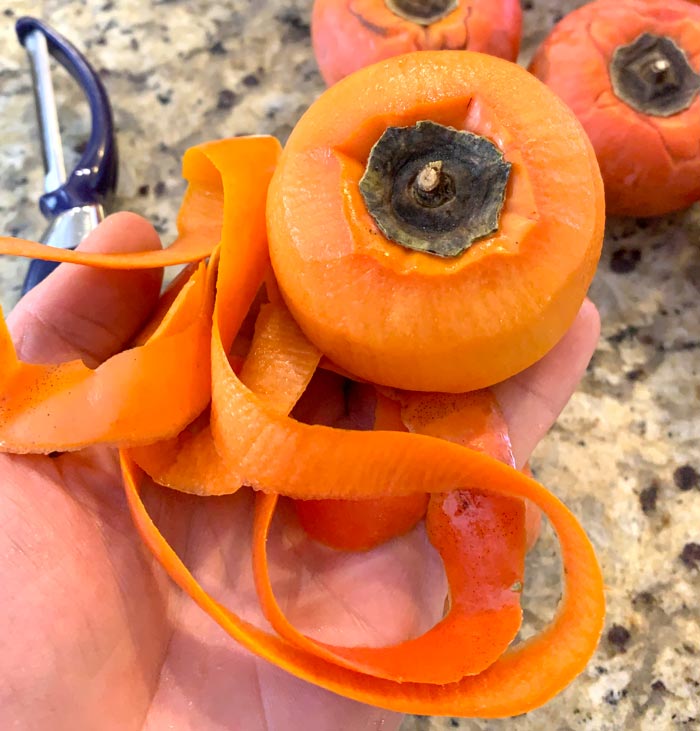
Step 2: Peel the persimmons.
Two things to do before peeling your hoshigaki persimmons:
- Optional, but recommended: remove as much of the brittle calyx on top of the fruit as you can by snapping it off with your fingers or cutting it with kitchen scissors, which makes for a tidier finished hoshigaki.
- Thoroughly wash the fruit AND your hands.
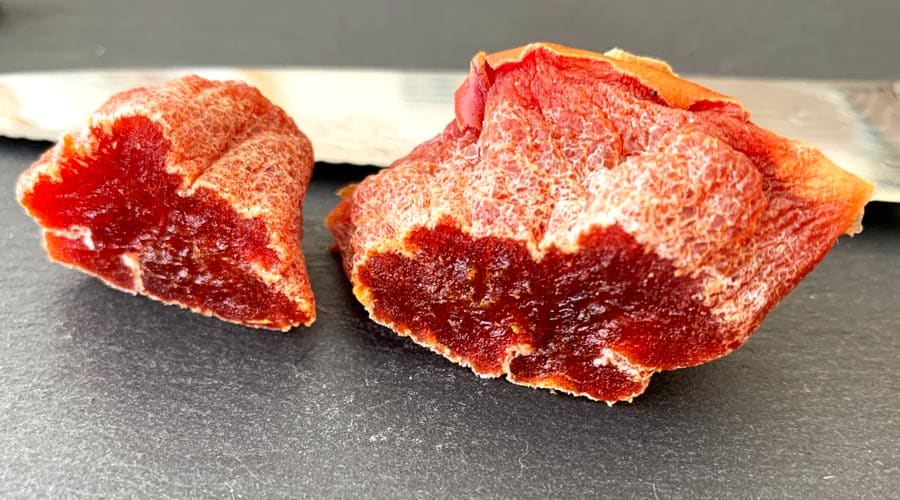
Next, use a quality carrot peeler to remove the skin from each persimmon with minimal fruit loss. You can compost the persimmon skins or dry them into edible “chips” to reduce waste.
Step 3: Sanitize fruit – and maybe skewers, too.
The first time we made hoshigaki, a few of the fruits started to develop moldy spots on the surface within a week. What to do? We immediately dipped the fruit into vodka and wiped off any visible mold.
The hoshigaki turned out fine, but it taught us the importance of sanitizing the fruit up front. Traditionally, persimmons were sometimes dipped/blanched into boiling water before drying for this purpose.
However, we simply dip our peeled persimmons into vodka before hanging them. You could also spray them with a spray bottle of vodka after attaching the strings if that’s easier for you.
Vodka instantly kills any pathogens or molds. Then it soon vaporizes, leaving zero taste, alcohol, or effect on the fruit texture. In fact, we’ve done side-by-side comparisons of hoshigaki made either dipped or un-dipped in vodka and could tell no difference.
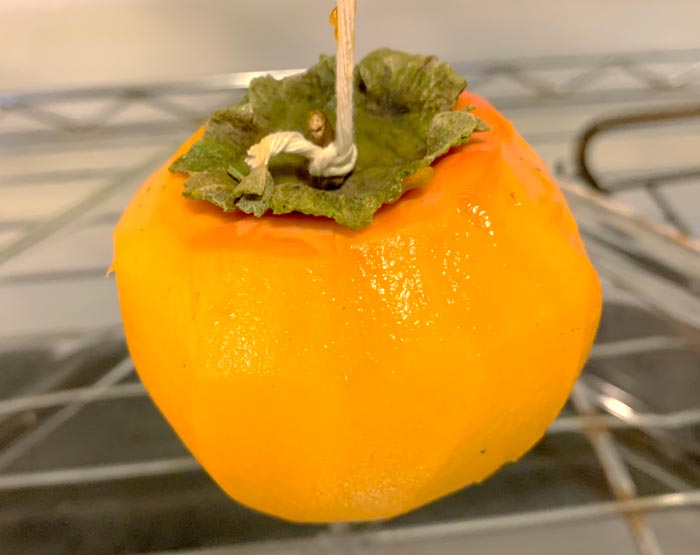
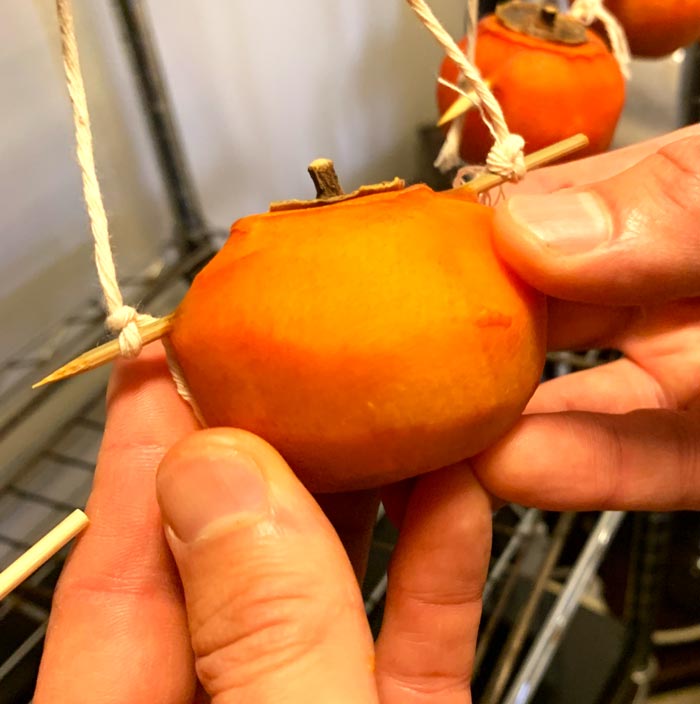
What if your persimmons don’t have stems?
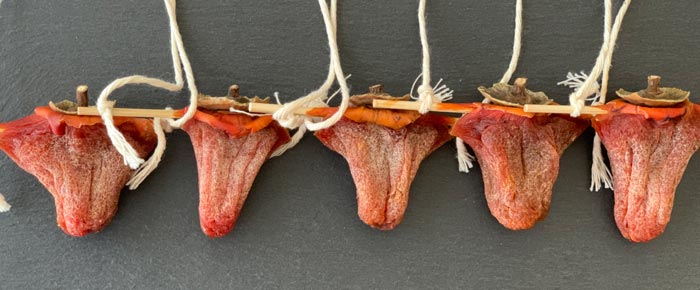
If your persimmons do NOT have large stem pieces to tie a string to, you can use the “skewer method” to hang your hoshigaki. Here’s how:
a. Sanitize 4″ skewers, aka large toothpicks, in vodka. (These 4″ skewers are perfect.)
b. Punch a skewer through the top of each persimmon just under the calyx. (The calyx is the leaf-like stem attachment on the top of the fruit.)
c. Instead of tying the string to the persimmon’s stem, you’ll tie it to either side of the skewer.
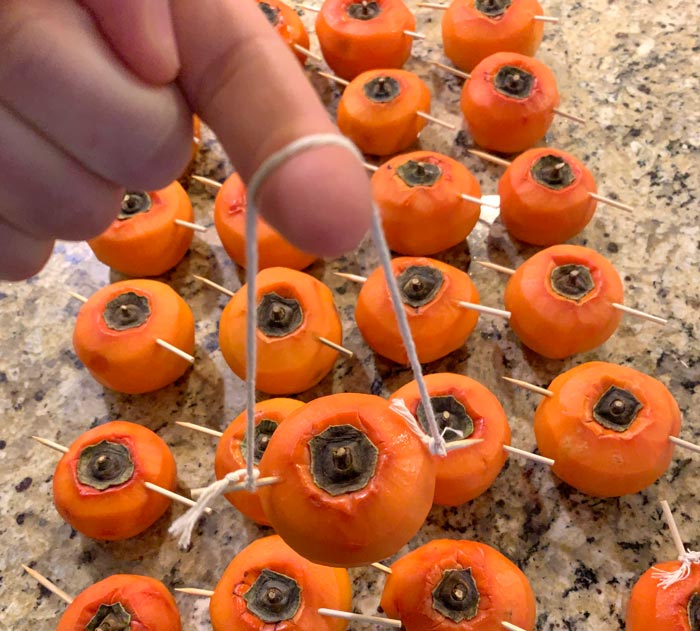
Step 4: String the fruit.
Depending on how many persimmons you’re using and how much space you have to hang them, you’ll want to carefully consider how you tie and string your persimmons. Should you do multiple persimmons hanging vertically on a single string? Or just one persimmon per string?
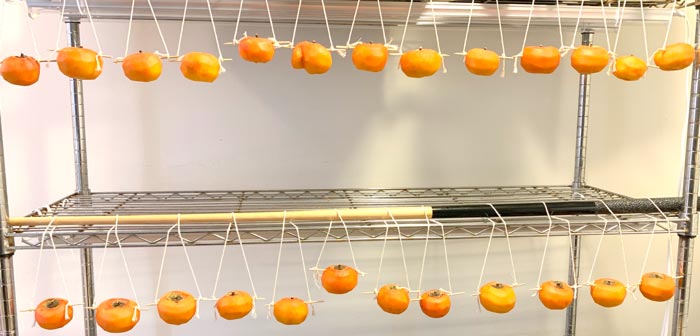
As mentioned previously, it’s also much easier to attach a string to persimmons with large stem pieces left on top than ones with almost no stem remaining.
We use kitchen twine to hang our hoshigaki, but any type of string will do so long as it can support the weight of the fruit.
Step 5: Select an ideal hoshigaki hanging location.
The ideal location to hang your hoshigaki will have the following features:
- Light – Plenty of sunlight. (We hung ours next to our LED grow lights since we don’t have a great sunny spot in our home.)
- Air circulation – Good air flow from either natural breeze or a fan. (Our ceiling fan suffices.)
- Protection – Out of the elements and away from pests. You don’t want your hoshigaki to be rained on, blown to the ground, or eaten by animals.
There can be some temperature variability in the location so long as the three criteria above are met, but the ideal temperature range is somewhere between ~50°F – 70°F (10°C – 21°C).
Step 6: Massage the fruit.
Once the exterior surface of your persimmons feels dry to the touch (which takes about 36-48 hours in our setup), it’s time to start massaging your hoshigaki.
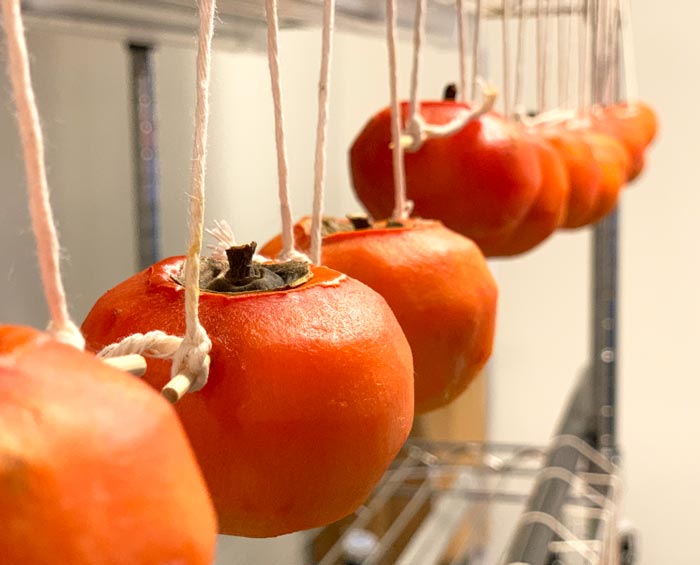
First and very important note here: make sure your hands are washed and dried before each massage session to reduce the likelihood of contamination!
Initially, the hoshigaki massaging process is quite gentle and delicate. Here, you’re just gently rubbing the surface of the skin while being careful to avoid tearing it.
As the persimmons continue to lose moisture, shrink, and develop a tougher exterior, your massages should get a bit stronger. Towards the end of the process, your hoshigaki will start to feel like a leathery dried apricot and look like it’s coated in powdered sugar due to the development of the bloom. Then, you’ll be doing much more vigorous massages.
Throughout the process, you’ll massage each persimmon once per day for about 15-30 seconds.
Step 7: Test and finish.
How do you know when your hoshigaki is finished? There’s some subjectivity based on your personal preferences, but hoshigaki should have a sugary bloom and be very low in moisture when done.
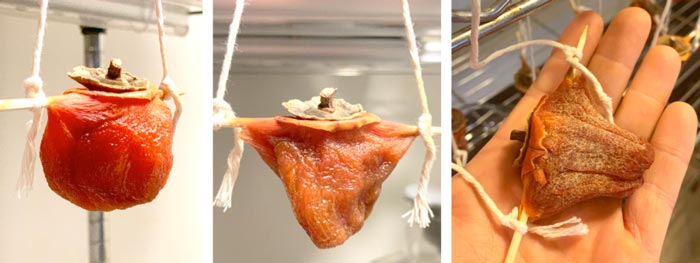
One good way to dial things in for your specific setup is to start sampling your hoshigaki when you think it might be done and take notes of how many days old it is. You might find that you like a younger or older hoshigaki, and that’s perfectly fine.
How long does it take to make hoshigaki?
When making hoshigaki, smaller varieties of Asian persimmons like Fuyus can be finished in a few weeks under certain conditions, such as a drier and warmer environment. Larger varieties like Hachiyas may take up to a couple months to finish.
Note that faster is not better. Hoshigaki is truly a slow food, and the process should not be intentionally rushed or expedited.
How to store hoshigaki
We recommend storing your finished hoshigaki in non-breathable containers to preserve the best texture and flavor. We store our hoshigaki in glass jars or silicone Stasher bags. Add a desiccant package or some rice to each storage container to help control moisture and extend shelf life.
How long does hoshigaki last? Properly made hoshigaki is very shelf stable and can last for about a year if properly stored — even at room temperature.
Alternately, for long term storage of 1+ years, you can store hoshigaki in jars/silicone bags in your fridge. When you’re planning to use it, remove it and let it come to room temperature before eating it for the best flavor and texture.
How to eat hoshigaki
Here are a few ways we recommend eating hoshigaki:
- Sliced and served as-is for dessert or as a topping on dessert;
- Served as slices with cheese and crackers or as an addition on a charcuterie plate;
- Cut into chunks and added to homemade granola;
- Cut into bits and used as an alternative to raisins or dates in recipes;
- As hiking fuel.
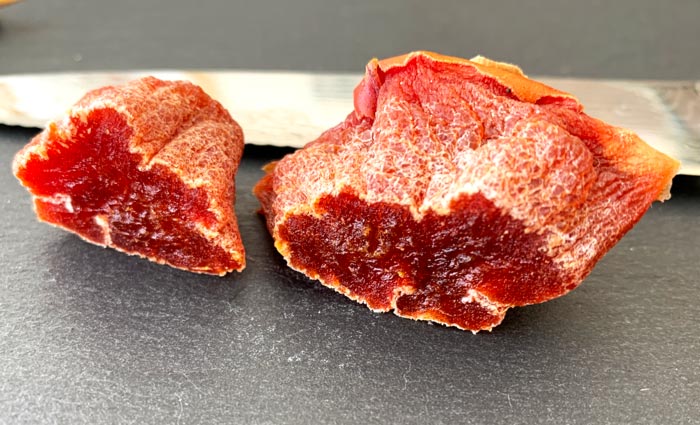
Important note: We’ve found that even “seedless” Asian persimmons may sometimes contain seeds. Since persimmon seeds are rock hard, you don’t want to go all-in and chomp a whole hoshigaki persimmon. Instead, it’s better to slice them before eating to make sure there are no seeds. Otherwise, you may be making a trip to your dentist’s office!
Making hoshigaki: Summary and key takeaways
How to make hoshigaki
Equipment
- kitchen twine
- scissors
- hanging rack
Ingredients
- FIRM ripe Asian persimmons, any seedless variety
Instructions
- Select firm but ripe Asian persimmons. Remove as much of the calyx as possible (leaf-like structure on top of fruit).
- Wash fruit and wash hands. Use carrot peeler to peel persimmons, then quickly dip each persimmon in vodka to sanitize the surface. If using the "skewer method" (detailed in article and below), also dip skewers in vodka to sanitize them. Also sanitize work surface and/or dishes where you'll be prepping persimmons.
- If your persimmons have large stem pieces left on, tie twine directly on to stems. Depending on your drying setup, you can either hang each persimmon on individual string or string multiple persimmons together vertically onto a single string. If your persimmons have no or minimal stems, you'll need to use 4" skewers/toothpicks to hang them. Insert sanitized toothpicks through the top of the fruit under the calyxes. Cut one small 1-2' length of twine for each persimmon you plan to hang. Tie each end of twine to either side of skewer that's been inserted through persimmons. (See pictures in article.)
- Hang persimmons in sunny indoor spot with good air circulation. Begin doing light massages to the fruit once the sufaces have dried, usually 1-2 days after hanging. Massage each fruit once per day for 15-30 seconds each. As the fruit develops a leathery surface, do stronger massages.
- Hoshigaki completion time will vary based on environmental conditions, variety/size of fruit, and personal preferences. Expect a minimum of 3 weeks and a maximum of 8 weeks.
We hope this hoshigaki guide has been helpful and answered all your questions about how to make this Asian delicacy. Let us know how yours turns out!
KIGI,

More persimmon articles you’ll want to sink your teeth into:
- Japanese vs American persimmons: how to grow, forage and eat
- Tips & tricks for storing and using Asian persimmons
- Recipe: Persimmon bread with oats, walnuts, and honey
- Recipe: Persimmon oat crumble (gluten-free)
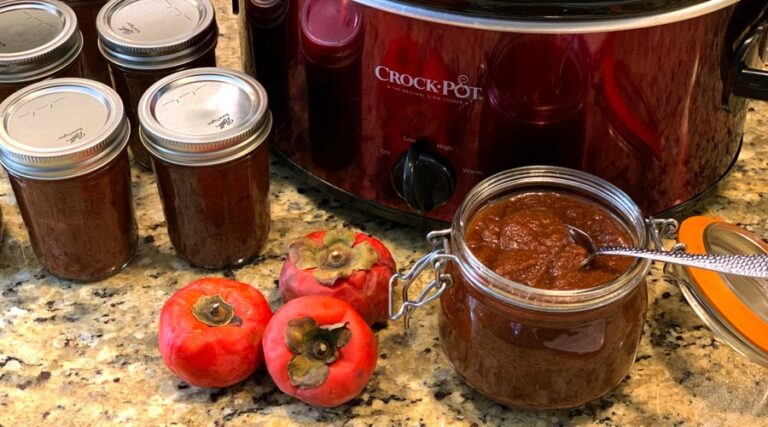
- Recipe: Persimmon butter with blood oranges and maple syrup
- Recipe: Spiced persimmon breakfast bread
- Recipe: Cranberry relish with persimmons & citrus
- Recipe: Maple-sweetened persimmon balls with blood oranges and pecans