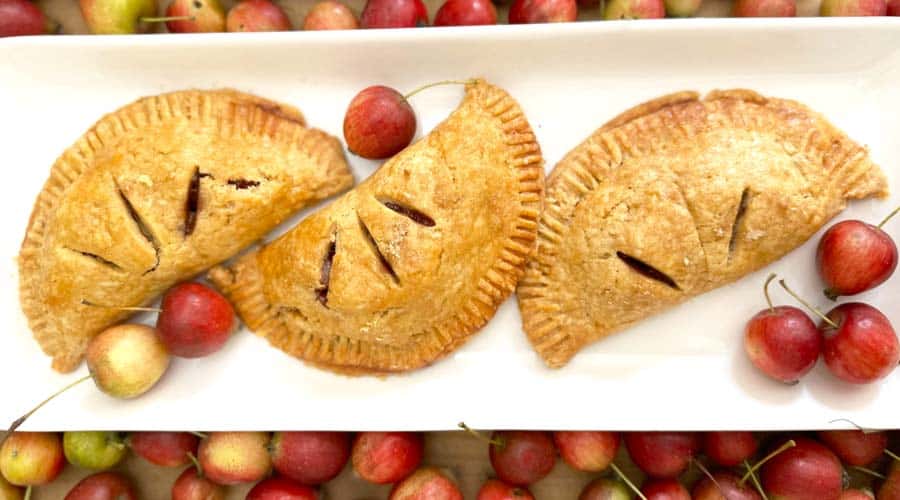
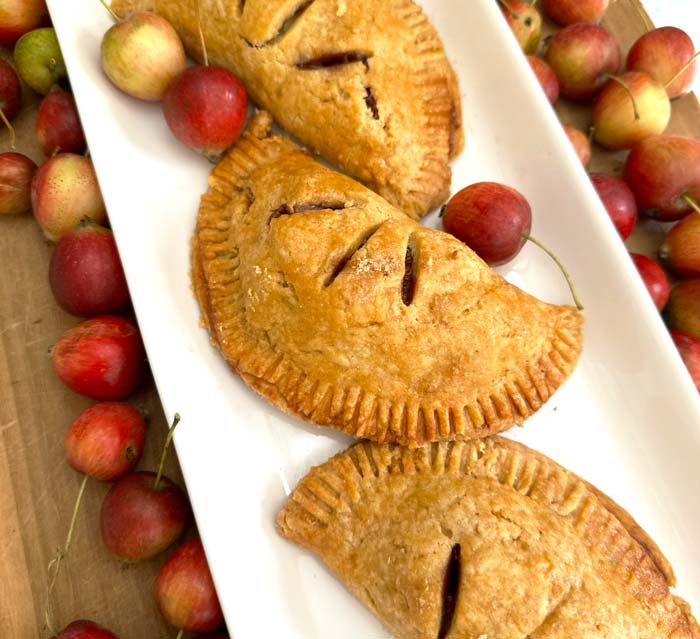
Crabapple hand pies – maple sweetened & whole wheat!
Tyrant Farms' articles are created by real people with real experience. Our articles are free and supported by readers like you, which is why there are ads on our site. Please consider buying (or gifting) our books about raising ducks and raising geese. Also, when you buy through links on our site, we may earn an affiliate commission. Learn more
In this article, you’ll find out how to turn crabapples into a gourmet dessert: crabapple hand pies made with organic whole wheat pastry flour and maple sugar! (Recommended ingredient substitutions provided.)
Crabapples: a secret seasonal treat
Ever since finding the most prolific and largest-fruited crabapple tree we’ve ever seen at the base of the mountain where our aunts live in Asheville, NC, we look forward to crabapple season each year. Yes, crabapples are packed with flavor and nutrition and can make amazingly delicious meals and beverages.
Case in point, our previous crabapple recipes include:
- Fermented crabapple cider with beautyberries
- Maple syrup candied crabapples with oat-pecan crumble cakes
- One-pot roasted chicken with chestnuts and crabapples
Our aunts recently came down to Greenville to see us and they brought with them a bounty of crabapples as an offering to The Tyrant:

Crabapple hand pies
Our aunts’ generosity translates into us coming up with more delicious crabapple recipes to share with you!
Next up and hot out of our kitchen: crabapple hand pies. Not just any old hand pie either… These are made with organic 100% whole wheat pastry flour and sweetened with maple sugar.
Substitution notes:
- Don’t have crabapples? Use a tart apple like ‘Granny Smith’ instead.
- If you don’t have maple sugar, regular cane sugar will work fine.
- No organic whole wheat pastry flour? Use a 50/50 mix of all-purpose and standard whole wheat, preferably organic.
Ready to make your own crabapple hand pies? Let’s get started!
Step-by-step and process photos
Step 1: Process crabapples.
This is the worst part: you’ve got to remove the seeds from each crabapple. Actually, you’ve got to remove the seeds, stems, and calyxes. How?
Our process:
- First, use a small knife to remove the calyx from the bottom of each crabapple. (The calyx is the little brown hole.)
- Next, quarter the crabapple.
- Then, remove the stem and use a knife to scrape or cut out each seed section, leaving as much of the fruit as possible. Put processed crabapples in a bowl and keep going.
You should only lose a small amount of the fruit when done right. Here’s what a finished crabapple looks like:
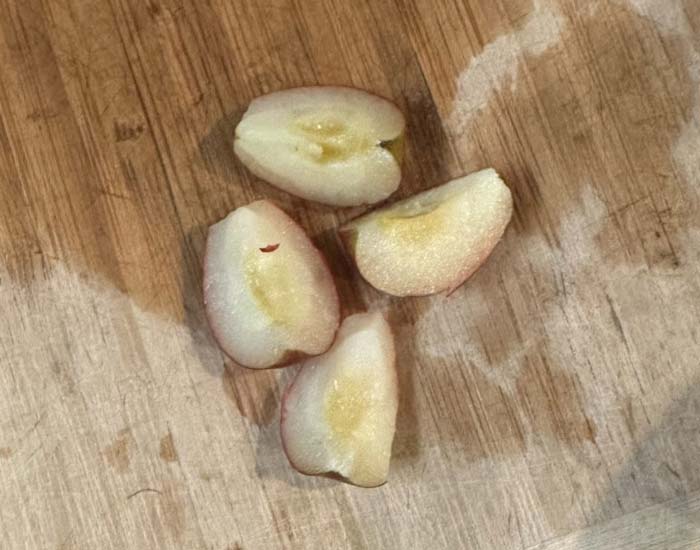
Note: The crabapples will oxidize/turn brown as you go but that doesn’t matter because they’re going to turn brown anyway when you cook them, like when you make apple butter. If the browning crabapples are upsetting to you, add lemon juice to the bowl and stir occasionally as you go.
Step 2: Make crabapple filling.
Next, melt butter in a saucepan over medium heat then add your other crabapple filling ingredients (see recipe card at bottom of article).
Cook, stirring regularly, for about 15-20 minutes or until the remaining sauce is quite thick. Here’s what the crabapple filling should look like when it’s done:
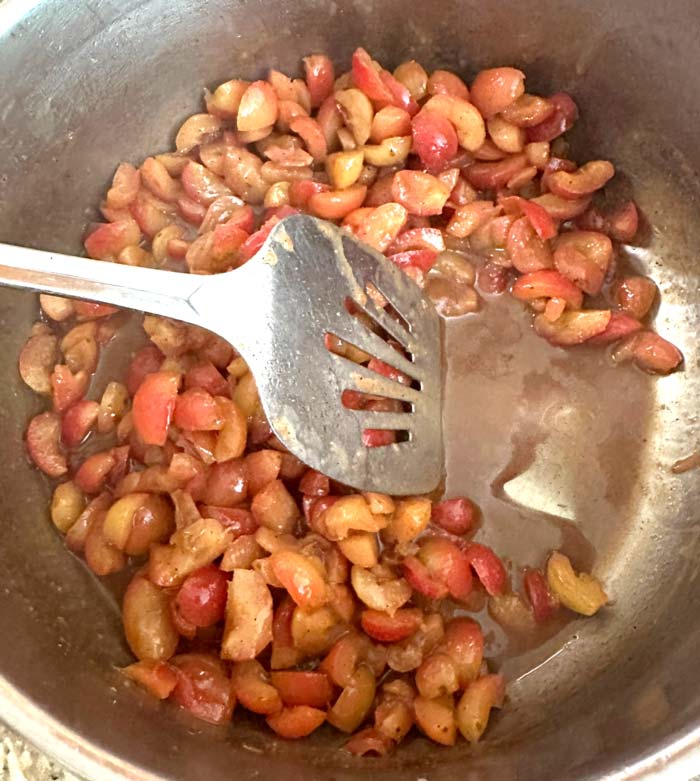
Put the crabapple filling in an ice bath for rapid chilling or in your fridge if you’re not in a rush. It’s much easier to fill and fold the pie dough when the filling is cold vs warm and runny.
Step 3: Make hand pie dough
Put ice in 1/2 cup water, then set aside to allow water to chill.
Now mix your dry ingredients (flour, maple sugar, salt) in bowl, then transfer them to a food processor. Cut COLD butter into ~8 equal sized chunks or 1″ cubes. Add butter to food processor and use pulse setting to work butter into flour mixture. Do NOT over-blend; you want butter chunks of varying sizes for ideal crust. (Alternate: you can work butter into flour by hand using a fork or pastry cutter/knife.)
Next measure out 1/2 cup of ice water. Remove 2 tablespoons of the water, then add 2 tablespoons of vinegar back to the water. Why vinegar? Adding a bit of vinegar to pie dough makes it easier to work with and creates a better finished crust.
Next you’re going to slowly add your ice water/vinegar combination to the dough, working it in as you go. There are two options here:
- Option 1 (easier and maybe better for beginning bakers who don’t have a good sense of what finished pie dough should feel like): Slowly pour in water/vinegar to food processor and pulse after each addition. You don’t want to over-process/over-mix the dough or your crust won’t have ideal texture.
- Option 2 (more work but maybe better for seasoned bakers): Pour butter/flour combination into large bowl. Slowly add ice water/vinegar bit by bit and work in by hand until the dough feels just right. You may not need to use the full 1/2 cup of ice water/vinegar.
Transfer dough to bowl, then cover and chill in your fridge for at least one hour.
Step 3: Preheat oven and prep.
- Pre-heat oven to 400°F (204°C).
- Cover two cookie sheets with parchment paper.
- In small bowl, whisk 1 egg and set aside along with a kitchen baster for egg wash.
- Dust countertop with flour.
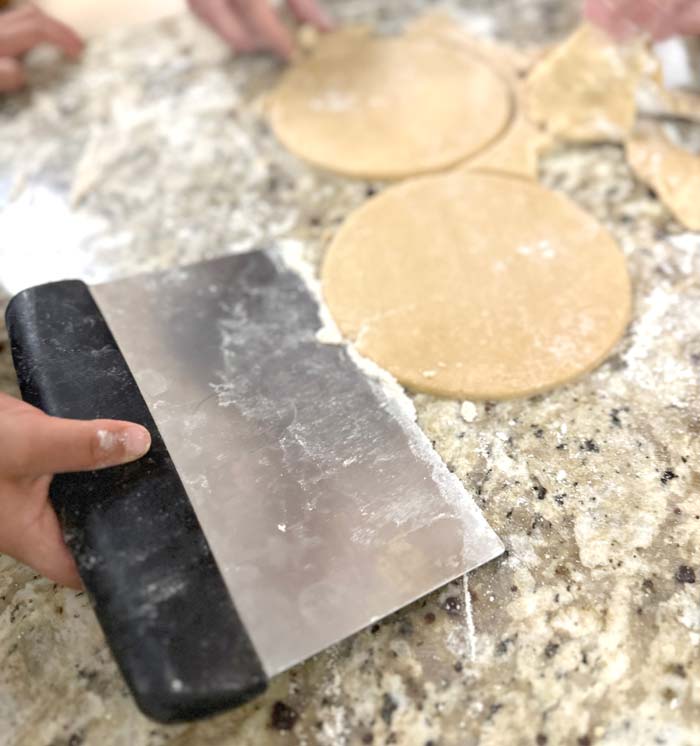
Step 4: Roll and cut dough.
Roll out dough to about about 1/8″ thick — or slightly more but not less, or it’s more likely to tear/break when you fold and bake it. Dust dough surface and rolling pin surface in flour as you go.
Cutting time! We use a 5″ bowl to cut out our dough circles, which made a perfectly sized hand pie for our liking. Depending on what size mold you’re using, you may want to roll out your dough to a shape and width that allows for maximum efficiency when cutting.

Step 5: Transfer cut dough to covered baking sheets.
Transfer finished dough circles to covered baking sheets. If you’re making 5-6″ diameter circles, you should finish with 8-9 hand pies, so you’ll need two baking sheets.
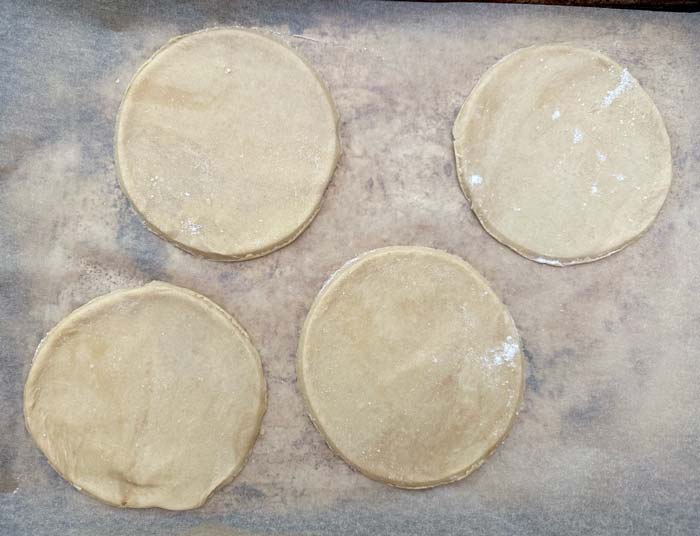
If your dough circles are difficult to remove from the countertop, a dough scraper can help!
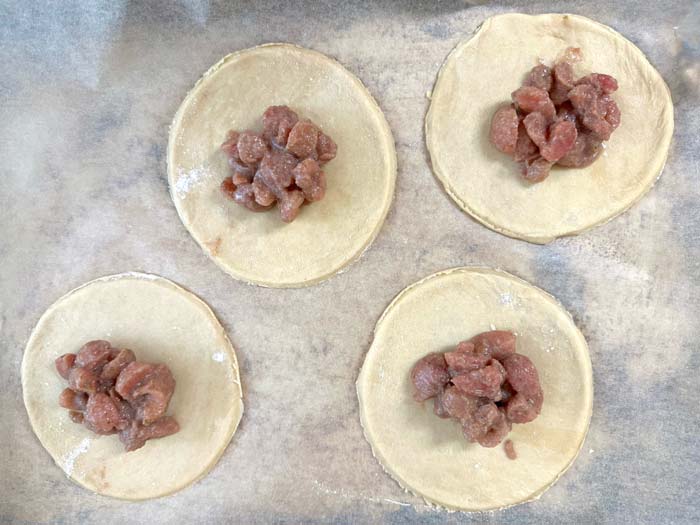
Step 6: Fill and fold hand pies.
Next, put a scoop of crabapple filling in each hand pie. A little less than 1/4 cup of filling seemed to be ideal for our 5″ diameter pies.
Next, use your baster to make an egg smily face on half of the outer edge of each dough circle. The egg will help the dough stick together when you fold and press it.
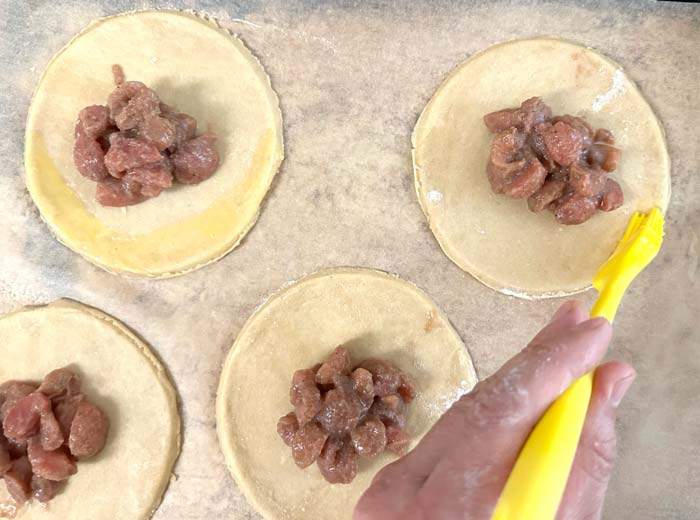
Fold the dough over the filling, then press together with thumb on edge to make a seal.
Next, use a fork to push down on the outside edge of each hand pie, helping the dough stick together and providing a decorative touch:
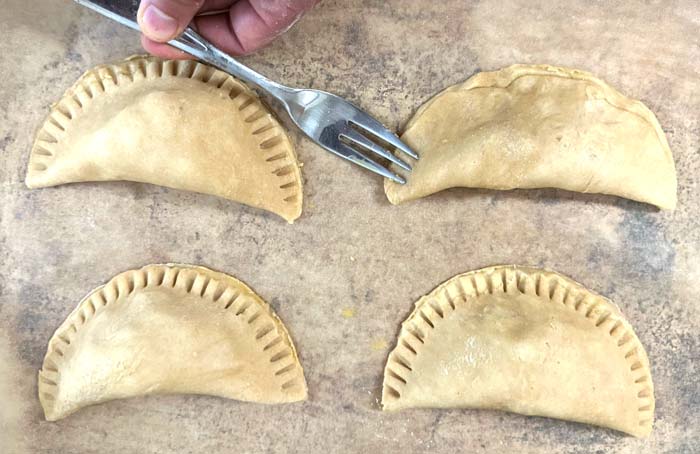
Step 7: Score and egg wash hand pies.
In the photos below, we actually reversed the proper order. You should first score your hand pies with a knife, then give them an egg wash. It’s not the end of the world if you get this order inverted though!
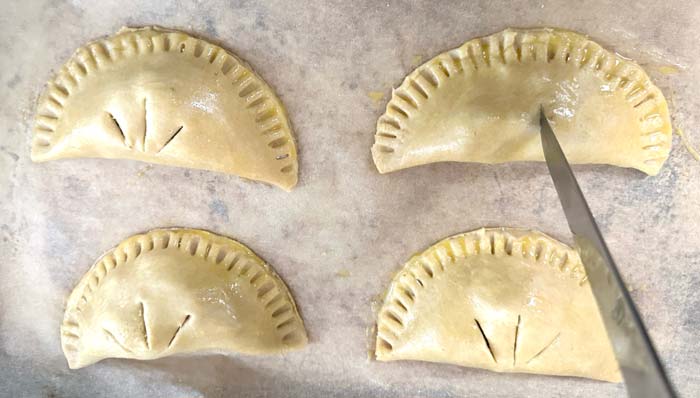
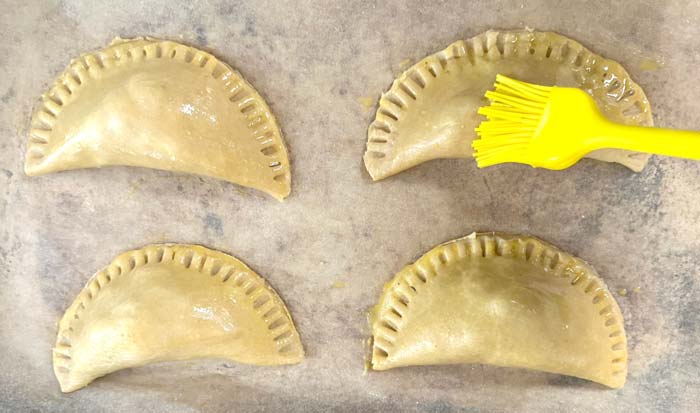
Once done, you can either transfer all of your hand pies to a single baking sheet or keep them on two separate sheets.
Optional: Before sticking them in the oven, you can sprinkle your hand pies with large flake salt and sugar for a bit of extra taste and visual flair.
Step 8: Bake hotter then cooler.
Place pies in center racks of your pre-heated 400°F oven for 10 minutes. After 10 minutes, turn heat down to 350°F (177°C) and bake for another 30 minutes until hand pies are golden brown.
Remove from oven and put sheet on cooling rack until ready to eat.
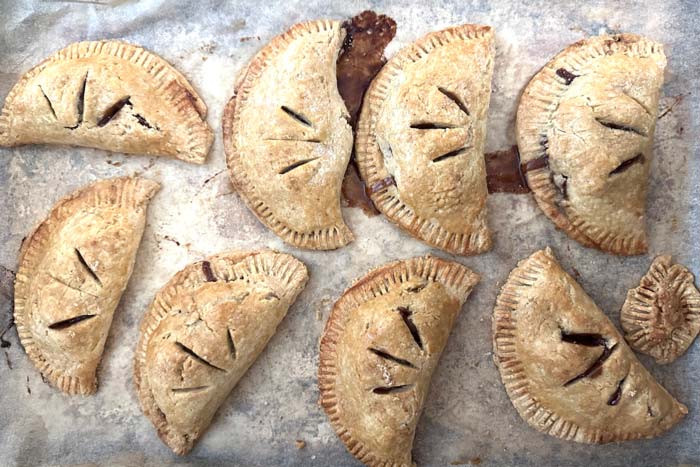
Crabapple hand pies are great served warm immediately or served at room temperature days later. They’re also perfectly suitable as a breakfast addition or a dessert.
Once cooled, store them covered at room temperature for 3-5 days. For longer storage, refrigerate or freeze them.
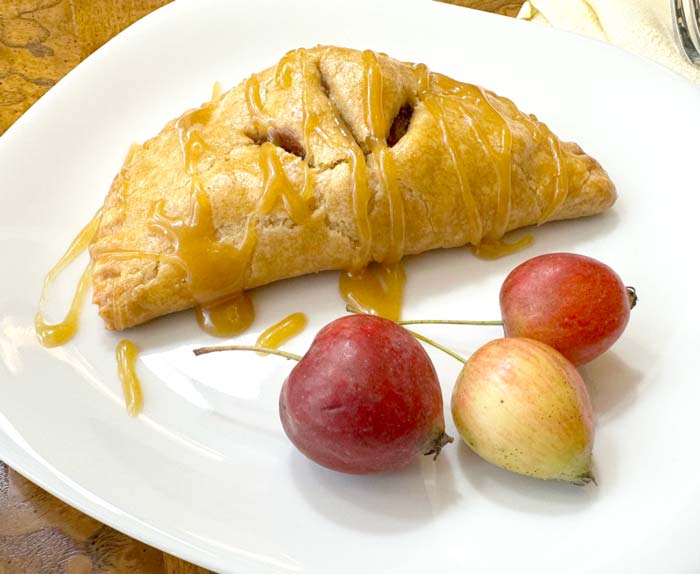
Want more sweet? Make a 5-minute maple sugar glaze!
If you want to bump up the sweetness and go full dessert on your crabapple hand pies, make a 5-minute maple glaze. Here’s how:
- Melt 3 tablespoons of butter over medium heat in a small saucepan.
- Add 3 tablespoons of maple sugar, 1 tablespoon of whole milk, and a pinch of salt.
- Stir constantly as mixture bubbles and cook for about 4-5 minutes, then remove from heat.
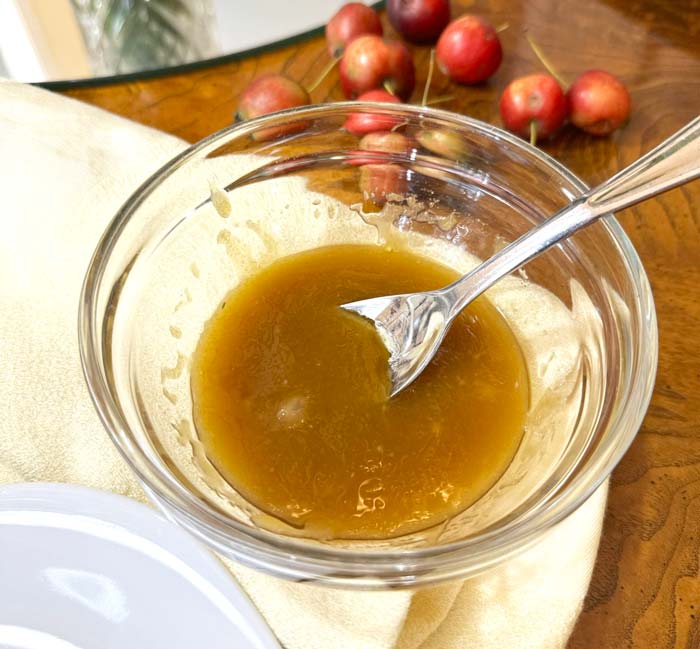
Use a spoon to drizzle the maple glaze over your hand pies. Note that the maple glaze will thicken as it cools, but you can cover and re-heat it in the microwave for 5-10 seconds to return it to a more liquid state.

Whole wheat crabapple maple hand pies
Equipment
- Rolling Pin
- food processor optional
Ingredients
Crabapple filling
- 1 lb crabapples weighed whole
- 1 1/2 tbsp lemon juice, ideally fresh
- 1 tsp dried orange zest, ideally blood orange (alt lemon zest)
- 1/2 cup maple sugar / alternatives: option 1: organic brown sugar or turbinado sugar, option 2: 1/2 cup maple syrup, just cook longer to lower water content (Note: There is flavor variability in crabapples and you might also like a sweeter filling. Start with 1/2 cup sugar and if the filling isn't sweet enough for your tastes, add more maple sugar at the end before filling hand pies.)
- 1 tsp cinnamon
- 1 tsp ginger powder
- 1/2 tsp nutmeg
- 1/2 tsp cardamom
- 6 tbsp organic grass-fed butter
- 1/2 tsp salt
Pie dough
- 338 grams organic whole wheat PASTRY flour (slightly more than 2.5 cups, measured with spoon and sweep method) (Note: Standard whole what flour is not ground fine enough to make a good crust.)
- 1 tbsp maple sugar (or leave out for less sweet pastry)
- 1/2 lb chilled unsalted organic grass-fed butter, cut into 1" cubes (2 standard sticks)
- 1/2 cup ice cold water (you'll actually use a little less than 1/2 cup, as detailed in instructions)
- 2 tbsp organic apple cider vinegar
- 1 egg (NOT added to dough - you'll whisk the egg and use it as a wash on dough surface)
- 1 tsp salt
- (optional) large flake salt and sugar to sprinkle over surface of pies before baking
(Optional) Maple sugar glaze
- 3 tbsp maple sugar
- 3 tbsp unsalted organic grass-fed butter
- 1 tbsp whole organic grass-fed milk
- pinch of salt
Instructions
For crabapple filling
- Process crabapples to remove seeds, stems and calyxes. Our process: use knife to cut off calyx on bottom of crabapple (that's the little brown hole). Quarter crabapple. Remove stem. Use knife to scrape or cut out seed sections, leaving as much of the fruit as possible. It takes a while but it's worth it! If you start with a pound of whole crabapples, you should only lose a few ounces once you've processed them.
- Melt butter in saucepan over medium heat then immediately add all other crabapple filling ingredients. Cook, stirring regularly, for about 15-20 minutes or until the remaining sauce is quite thick. (See picture in article.) Remove from heat and chill in ice bath to chill quickly or put in your fridge for later use. You want the apple filling chilled when you're stuffing the hand pies or it's a lot harder to work with.
For hand pie dough
- Put ice in 1/2 cup water, then set aside to allow water to chill. Mix dry ingredients in bowl, then transfer them to a food processor. Cut cold butter into ~8 equal sized chunks or 1" cubes. Add butter to food processor and use pulse setting to work butter into flour mixture. Do NOT over-blend; you want butter chunks of varying sizes for ideal crust.Next measure out 1/2 cup of ice water. Remove 2 tablespoons of the water, then add 2 tablespoons of vinegar back to the water. (Adding a bit of vinegar to pie dough makes it easier to work and creates a better finished crust.) Next you're going to slowly add your ice water/vinegar combination to the dough, working it in as you go. Here's how:Option 1 (easier and maybe better for beginning bakers who don't have a good sense of what finished pie dough should feel like): Slowly pour in water/vinegar to food processor and pulse after each addition. You don't want to over-process/over-mix the dough or your crust won't have ideal texture. Option 2 (more work but maybe better for seasoned bakers): Pour butter/flour combination into large bowl. Slowly add ice water/vinegar bit by bit and work in by hand until the dough feels just right. You may not need to use the full 1/2 cup of ice water/vinegar. *If dough is to wet under either scenario, you can also add/fold in more flour as you're rolling it out in next step! Cover and chill dough in fridge for at least one hour.
- Once crust and crabapple filling have chilled, pre-heat oven to 400°F (204°C). Cover two cookie sheets with parchment paper. In small bowl, whisk 1 egg and set aside along with a kitchen baster for egg wash (before baking). Dust countertop with flour and roll out dough to about about 1/8" thick (or slightly more, but not less or it's more likely to tear). You'll want to occasionally dust rolling pin and dough surface as you go. Use a 5-6" form or bowl to cut out circular hand pies. Use a dough scraper to remove and transfer each circle of dough and transfer it to a covered baking sheet. (See pictures in article.) You should end up with 8-9 hand pies.
- Next, spoon crabapple filling into the middle of each hand pie. A little less than 1/4 cup of filling seemed to be ideal for our 5" diameter pies. Use baster to apply a rub of egg to half of the outer edge of the dough - this will help the two pieces better stick together. Fold dough over filling, then smush together with thumb. Next, use a fork to push down on the outside edge of each hand pie, helping the dough stick together and providing a decorative tough. Score each hand pie with a sharp knife, wiping clean between each cut. Apply final egg wash to each hand pie. Now, you can either consolidate each hand pie to a single baking sheet or keep them on two separate baking sheets. Optional: Sprinkle large flake salt and sugar over surface of pies before baking.
- Place pies in pre-heated 400°F oven for 10 minutes. After 10 minutes, turn heat down to 350°F (177°C) and bake for another 30 minutes until hand pies are golden brown. Remove from oven and put sheet on cooling rack until ready to eat. Once cooled, crabapple hand pies can be stored covered at room temperature for a few days. For longer storage, refrigerate or freeze.
(Optional) Maple sugar glaze
- Melt butter in small saucepan over medium heat, then immediately add maple sugar, milk, and salt. Stir constantly as the mixture heats and bubbles. Remove from heat after ~4-5 minutes. While still hot, drizzle glaze over hand pies with spoon.Glaze will thicken as it cools, but can easily be re-heated in microwave for 10 seconds or so as-needed for later use.
Enjoy! Combined with our other crabapple recipes, we hope you look forward to crabapple season as much as we do each year!
Shoutout to Gather Victoria, whose original recipe provided inspiration for our version.
KIGI,