The most delicious and decadent Asimina triloba / pawpaw dessert you’ll ever eat! This no-bake pawpaw cheesecake is surprisingly easy to make and features the sublime flavors of RAW pawpaw fruit. Since cooked pawpaw can develop off flavors and cause some people GI distress, no-bake cheesecake is a better alternative than baked cheesecake.

This delicious, picture perfect pawpaw cheesecake recipe had a far from perfect start. Trial and many errors for the win!
A funny pawpaw cheesecake failure
We feel compelled to tell you how this recipe started, so you can understand how and why it arrived at its final form…
We had 25 pounds of homegrown and foraged pawpaws to eat. It was also Semana de la Tyrana (aka Susan the Tyrant’s birth week).
Family was in town for the occasion, so I decided to make a pawpaw cheesecake for The Tyrant’s birthday cake/offering . I took inspiration from some online recipes and got to work. After a multi-day process of processing pawpaws and making cheesecake, the result was… a total failure.
The texture and appearance of the cheesecake was awful. The flavor was ok, but a bit strange owing to the fact that cooked pawpaw can take on a combination of bitter plus intensely sweet flavor notes. Nevertheless, some of us ate a piece – because wasting pawpaw fruit is a crime in our household.
Shortly thereafter, two of the pawpaw cheesecake consumers developed gastric upset that resulted in unpleasant bathroom experiences. (Happy birthday!) Thankfully, nothing too serious, but we all wanted to know what the cause was.
No, the cheesecake wasn’t under-cooked. Nope, the folks under duress do not have delicate constitutions – they have the intestinal fortitude of feral warthogs. So what was the cause of their gastric upset?
Pawpaw warnings
As it turns out, compounds in pawpaw fruit can make some people sick. This negative physiological response is fairly rare when people eat raw pawpaw fruit.
However, online reports we read indicate that GI distress resulting from pawpaw consumption is much more common when people eat cooked pawpaw fruit. Interestingly, one of the people who got mildly sick from eating cooked pawpaws in cheesecake had just eaten large quantities or raw pawpaw fruit the day before with no ill effects.
Something else we learned from our reading: when pawpaw fruit is dehydrated (which results in heavy oxidization), gastric distress is so common (and severe) after consumption that the Ohio chapter of the North American Pawpaw Growers Association warns people against dehydrating pawpaw fruit at all.
So whatever chemical/molecular changes happen in cooked or dried pawpaw fruit leading to off flavors also makes it much more likely for people to experience GI distress. (We take a deeper dive into this information in our guide to eating & processing pawpaw fruit.)
Since The Tyrant and I have been eating raw and cooked pawpaws for years with no averse effects, this information was news to us. What to do when desiring a pawpaw dessert intended to be shared with other people?
Answer: Create a pawpaw cheesecake recipe featuring raw pawpaw fruit instead of cooked fruit.
The results? Pawpaw perfection in the form of our no-bake pawpaw cheesecake.
I. Materials and ingredients to make no-bake pawpaw cheesecake
This recipe is fairly simple, but that doesn’t mean it’s easy to make. We highly recommend you take a careful read through the information below, which is accompanied by photos documenting each step.
A. Materials needed:
First, here’s what you’ll need to have on hand to make this pawpaw cheesecake:
- good food processor or blender (we used a 14 cup food processor – you’ll want to use one on the larger side as well, if possible)
- parchment paper
- 9″ x 3″ / 10 cup spring form pan (a spring form pan REALLY helps when making tidy cheesecakes, but you could use other bakeware in a pinch)
B. Ingredients needed:
As detailed below, this is three recipes (nut crust + cheesecake filling + gelatin topping) combined into one gorgeous cheesecake. While the nut crust and filling are essential, you can skip the orange-colored gelatin topping since it’s mostly for aesthetic purposes.
1. Toasted nut crust
The nut crust is the only part of this recipe that you’ll bake – the actual cheesecake and topping are entirely no-bake. Baking helps set the crust, thus preventing it from being too crumbly. Baking also makes the nutty flavors much richer and more complex (toasty!).

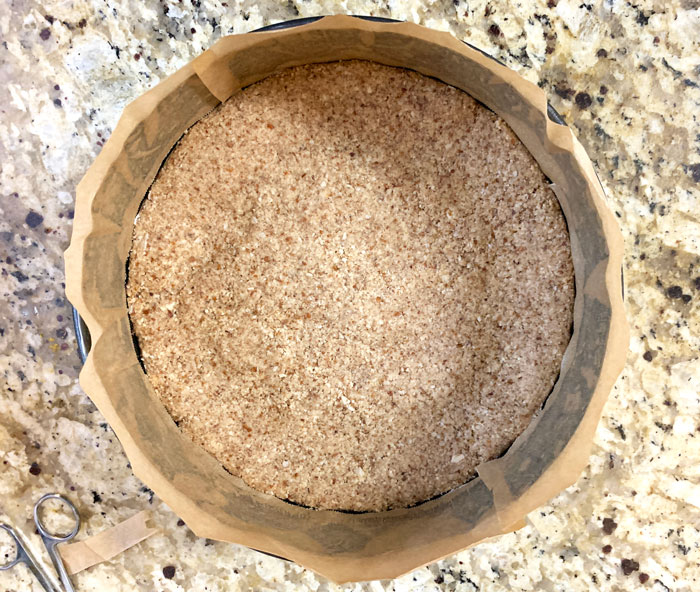
Here you can see the finished consistency of the nut crust ingredients before we put them into the springform pan to make the crust.
Nope, there’s no flour in the crust or other parts of this recipe, so it’s gluten-free if you’re trying to avoid gluten. Also note that we prefer a slightly thicker nut crust than might be customary. You could reduce ingredients by 25% to make a thinner crust if you prefer.
Toasted nut crust ingredients:
- pecans – 8 ounces / 226 grams
- almonds – 6 ounces / 170 grams
- 3 tablespoons light brown sugar
- 4 tablespoon unsalted butter, MELTED
- 1/2 tsp salt
- a pinch of nutmeg (or use microplane to scrape a bit from whole nutmeg, which is our preference)
2. No-bake pawpaw cheesecake filling
Once your crust is made and chilled, you’ll make the pawpaw cheesecake using these ingredients:
- 2 1/4 cups pawpaw puree (you’ll need an additional 3/4 cup of pawpaw puree for the gelatin topping, unless you plan to skip it)
- 1 lb organic cream cheese, softened/room temperature (500 grams or 2 blocks)
- 2/3 cup organic cane sugar
- 10 ounces organic heavy whipping cream (about 1 1/3 cups)
- 4 1/2 tsp gelatin powder (for simplicity, we use standard store bought gelatin, not sheets)
- 1/2 cup cold tap water
- *a bit of room temp butter to grease sides of pan in order to make parchment stick (more about this below)

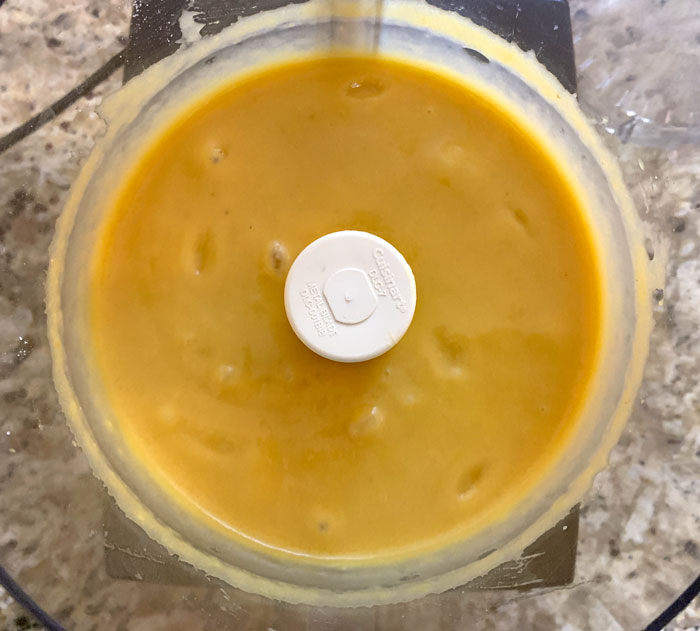
Here is what all the ingredients above will look like once blended into smooth, creamy pawpaw cheesecake filling in a food processor.
3. Pawpaw gelatin topping
The thin, top decorative layer of the cheesecake (which is optional) is made with the following ingredients:
- 1 tsp gelatin powder
- 1/4 cup cold tap water
- 3/4 cup pawpaw fruit puree

Finished pawpaw gelatin just poured atop the PRE-CHILLED cheesecake and ready to be evened and smoothed out over the surface. The gelatin topping starts off more yellow in color then turns more orange after refrigeration.
II. Step-by-step: how to make no-bake pawpaw cheesecake
Note the overall process and time requirements below before you get started or decide to make this recipe:
1. Make crust (10 minutes prep / 30 minutes bake / 1 hour cool in fridge) – First, you’ll make the nut crust and let it chill in the fridge for 1+ hours.
2. Make pawpaw puree (45-60 minutes prep) – The most time-consuming part of this recipe is processing your pawpaw fruit and making it into a puree. (See our article: How to process pawpaw fruit.)

You’ll need a total of 3 cups of pawpaw puree for this recipe.
Before you start making your cheesecake filling, you’ll need to make a total of 3 cups of pawpaw puree (weight: 740 grams / 1 lb 10 ounces).
- 2 1/4 cups of the pawpaw puree will remain in your food processor to go into the cheesecake.
- 3/4 cup will be refrigerated and used to make the gelatin topping, which is optional.
3. Make cheesecake (20 minutes prep / minimum 3 hours chill in fridge) – Once the nut crust is cooled, you’ll make the cheesecake filling, pour it on top of crust, then level it.
4. Make (optional) gelatin topping (15 minutes prep / 12 hours chill in fridge) – Once the cheesecake has chilled, you’ll make the decorative topping, pour it on top, and level it. From there, the whole cheesecake should chill in the fridge in a covered container for a minimum of 12 hours prior to serving.
As you can see from this overview, this is not a dessert recipe you can make quickly before dinner. You’ll start one day and finish the next. But it is sooo worth it!
Again, the gelatin topping is optional so if you want to speed things up and/or use less pawpaw fruit, skip it entirely.
Step-by-step with process photos
Now let’s get this no-bake pawpaw cheesecake started!
Step 1: Make the nut crust
1. First, preheat your oven to 350°F (176°C).
2. You’ll put all your nut crust ingredients in a food processor, and blend them until the nuts are ground and the ingredients stick together. Scrape the sides of your food processor with a spatula and blend again to make sure all ingredients are incorporated.
3. Transfer the nut mixture to a 9″ springform pan and gently press it down by hand or with a spatula to form a level crust on the bottom of the pan.

Flatten and even out the nut crumble by hand or with a spatula to form the cheesecake crust. Then into the oven for toasting!
4. Bake in a pre-heated oven for 25-30 minutes. Remove from oven and let cool to room temperature, then put the crust in your fridge to chill for at least 1 hour.
5. Once your crust is chilled, you’ll want to process 3 cups of pawpaw fruit and puree the pulp in a food processor or blender. Again: 2 1/4 cups goes into cheesecake filling, and 3/4 cup goes into gelatin topping, so if you’re skipping the topping, you won’t need to process as much pawpaw pulp.
Smooth and silky pawpaw puree.
Step 2: Make the pawpaw cheesecake
1. Remove your chilled spring form pan/nut crust from fridge. Cut strips of parchment paper wide enough to cover the sides of the pan. Butter the sides of the pan with your fingers.
Then push parchment paper strips into place lining the sides of the pan. This step will prevent the cheesecake from sticking and allow it to be removed from the pan after you unlock the spring.
Note the parchment paper strips stuck to the buttered sides of the springform pan. This is a VERY important step if you want to have an attractive cheesecake at the end!
2. Begin preparing your gelatin. Put cold tap water in a microwave-proof bowl.
SPRINKLE gelatin over water surface – do not dump it on in a pile or it will clump. Then stir it with a spoon to partly dissolve and let it set for 5 minutes (set a timer) at room temp.

Measure out your gelatin and put it into a small bowl before sprinkling it on the water. Again, don’t dump all the gelatin into a pile on the surface or it will form a giant glob. Once sprinkled, stir with a spoon and let it set for 5 minutes.
After 5 minutes, place gelatin-water mix in microwave for 15 seconds on high. Remove, stir with a spoon, and put back in microwave for another 15 seconds. Remove, stir, then leave on counter for 5 minutes until ready to be added to pawpaw mixture.
3. Now back to the pawpaw puree in your food processor… Add sugar, blend for 30 seconds, and let sit for 2-3 minutes so sugar has time to fully dissolve. Blend again for another 30 seconds, then let it sit for 3-5 minutes until sugar is completely dissolved. Then blend again.
Now, add heavy cream and ROOM TEMP cream cheese to food processor, and blend for 1 minute. When done, mixture should be silky smooth with no lumps of cream cheese present. Scrape sides and bottom of food processor with spatula and blend again to make sure no cream cheese lumps are present. Add gelatin mixture and blend for another minute until all ingredients combined and smooth.
4. Pour pawpaw mixture over cold nut crust in spring form pan lined with parchment paper. Use a spatula to even out the surface. Refrigerate 3+ hours until set.

Use a spatula to even out the pawpaw cheesecake/filling over the nut crust.
Step 3: Make the pawpaw gelatin topping (optional)
1. Pour water into microwave-proof bowl, sprinkle gelatin over the surface, and stir with a spoon. Let set for 5 minutes. Then microwave on high for 10 seconds, remove and stir with a spoon. Place back in microwave for 10 seconds, remove and stir again. Set aside for 5 minutes.
2. Place reserved pawpaw puree in a bowl or small blender. (We use and recommend a small blender like a Ninja for this step.) Pour in gelatin and whisk well (if doing by hand) or blend (if doing in blender).

Make pawpaw gelatin topping in a small food processor like this Ninja (ideal) or whisk in a bowl by hand.
3. Immediately pour liquid pawpaw gelatin topping over top of cheesecake, tilting the cake around to spread evenly over top. Use a spatula to even out the final coating.

Pawpaw gelatin evened out on surface (note the initial yellow color). This cheesecake is ready to go in the fridge to set!
4. Refrigerate cheesecake in a covered dish to reduce oxidation or absorption of odd flavors from your fridge (don’t let anything touch the surface though!) for 12 hours or more.

This is what the pawpaw cheesecake looks like after setting overnight in the fridge. The pawpaw in the gelatin turns from yellow to rich orange in color for reasons we’ll discuss below.
Step 4: Remove from pan, transfer to serving plate, cut, and serve
1. Release the spring on your spring form pan. Use a butter knife to carefully loosen between the pan and the parchment paper, then lift the side pan off the cake.

Use a butter knife to loosen the parchment paper from the sides of the spring form pan.
2. Now slowly pull the parchment paper off the sides of the cake for the full reveal!
3. Transfer your cheesecake (with pan base still on) to its final serving plate.
4. Put that knife down! Instead, use fishing line or thread held taught between both hands to mark and cut your cheesecake into perfect cuts. You may need to clean the fishing line between each cut.

Perfect cheesecake slices courtesy of fishing line.
5. Now, pick that sharp knife back up and carefully cut on the same lines you made with your fishing line, slicing all the way through to the bottom of the cake and through the nut crust.
6. Slide a pie spatula/server under the crust on your first piece, remove, and plate. Repeat.
Enjoy each and every bite of pawpaw flavored heaven!

We don’t think it’s possible to make a tastier pawpaw dessert than this no-bake pawpaw cheesecake! Decorative & edible top: native passionfruit flower (Passiflora incarnata) and mint from our garden.
Two additional important recipe notes:
1. Pawpaw oxidation / color
We were surprised by how the pawpaw gelatin layer turned from a yellow to a rich orange color after sitting overnight in our fridge. Since you’ve had fresh pawpaw before, you know how quickly the fruit perishes.
The perishability and coloration changes are likely due to the same factor: pawpaw fruit oxidizes quickly once exposed to oxygen. That means for the most beautiful no-bake pawpaw cheesecake, you’ll want to: a) make sure you’re using an airtight cake/pie container when storing it in your fridge, and b) eat it within 24-48 hours after it’s made.
The gelatin layer will oxidize to more of a brown color after that point. This coloration does not affect the taste, only the aesthetic appeal.
2. Add lemon juice to pawpaw puree to slow oxidation? Do NOT do it!
Knowing the information above, I initially added lemon juice to the pawpaw puree I set aside to make the gelatin topping. I stored it in an airtight container overnight in the fridge, then took it out in the morning to make the gelatin.
It looked fine – bright yellow with no browning on top. Thankfully, I tasted it first because it was awful.
Some sort of chemical/molecular reaction occurred overnight between the pawpaw puree and the acid in the lemon juice which concurrently brought out extreme bitter and sickeningly sweet flavors in the pawpaw fruit. That’s why we do NOT include an acid in this recipe. So be warned in case you’re tempted to add lemon juice!
III. Recipe: No-bake pawpaw cheesecake with toasted nut crust
Below is our no-bake pawpaw cheesecake recipe consolidated down into one recipe card:

The perfect pawpaw dessert: no-bake pawpaw cheesecake with toasted nut crust.

No-bake pawpaw cheesecake (Asimina triloba) w/ toasted pecan crust
A delicious and decadent no-bake cheesecake featuring the flavors of raw pawpaw fruit. Made with a nut crust, this recipe is also gluten-free.
Ingredients
For nut crust
- 8 ounces pecans (226 grams - equivalent to two standard bags in grocery store)
- 6 ounces almonds (170 grams - equivalent to one standard bag in grocery store)
- 3 tbsp organic light brown sugar (brown fine too)
- 4 tbsp unsalted butter, MELTED
- 1/2 tsp salt
- pinch of nutmeg (or use microplane to scrape a bit from whole nutmeg – our preference)
For pawpaw cheesecake/filling
- 2 1/4 cups pawpaw puree
- 1 lb organic cream cheese, softened/room temperature - NOT cold! (500 grams or 2 blocks)
- 2/3 cup organic cane sugar
- 10 ounces organic heavy whipping cream (about 1 1/3 cups)
- 4 1/2 tsp gelatin powder
- 1/2 cup cold tap water
- a bit of butter (ideally room temp) to grease sides of springform pan in order to make parchment stick
For pawpaw gelatin topping (this part of the recipe is optional)
- 1 tsp gelatin powder
- 1/4 cup cold tap water
- 3/4 cup pawpaw fruit puree
Instructions
Making the nut crust
-
Preheat oven to 350°F (176°C).
-
Put all ingredients in food processor. Blend until nuts are ground and ingredients stick together. Scrape sides of food processor with a spatula then blend again to make sure all ingredients are incorporated.
-
Transfer nut mixture to a 9″ springform pan. Gently press down by hand or with spatula to form level crust on the bottom of pan.
-
Bake in pre-heated oven for 25-30 minutes. Remove from oven and let cool to room temperature, then put crust in fridge to chill for at least 1 hour.
Making the pawpaw cheesecake filling
-
Once crust chilled, process pawpaw fruit and puree the pulp in a food processor or blender. Remove 3/4 cup and put in fridge in airtight jar/container (this will go in topping). Leave 2 1/4 cups of pawpaw puree in blender.
-
Remove chilled crust/spring form pan from fridge. Cut strips of parchment paper wide enough to cover the sides of the pan. Butter the sides of the pan with your fingers, then push parchment paper strips into place lining the sides of the pan. Set aside.
-
Begin preparing your gelatin by putting cold tap water in a microwave-proof bowl. SPRINKLE gelatin over water surface – do not dump it on water in a pile or it will clump. Immediately stir with a spoon to partly dissolve gelatin and let set for 5 minutes (set a timer) at room temp. After 5 minutes, place gelatin-water mix in microwave for 15 seconds on high. Remove, stir with a spoon, and put back in microwave for another 15 seconds. Remove, stir, then leave on counter for 5 minutes until ready to be added to pawpaw mixture.
-
To pawpaw in food processor: add sugar, blend for 30 seconds, and let sit for 2-3 minutes so sugar has time to fully dissolve. Blend again for another 30 seconds, then let it sit for 3-5 minutes until sugar is completely dissolved. Then blend again.
Add heavy cream and ROOM TEMP/slightly warm cream cheese to food processor, and blend for 1 minute (if cream cheese is cool/cold, it's likely to form lumps). Scrape sides and bottom of food processor with spatula and blend again to make sure no cream cheese lumps are present. Add gelatin mixture and blend for another minute until all ingredients combined and smooth.
-
Pour pawpaw mixture over cold nut crust in spring form pan lined with parchment paper. Use a spatula to even out the surface. Refrigerate in covered dish for 3+ hours until set.
Making the pawpaw gelatin topping (optional)
-
Once cheesecake chilled, pour water into microwave-proof bowl, sprinkle gelatin over the surface, and stir with a spoon. Let set for 5 minutes. Then microwave on high for 10 seconds, remove and stir with a spoon. Place back in microwave for 10 seconds, remove and stir again. Set aside for 5 minutes.
-
Place reserved pawpaw puree in a bowl or small blender. (Small blender is ideal if you have one.) Pour in gelatin and whisk well (if doing by hand) or blend (if doing in blender). Immediately pour liquid pawpaw gelatin topping over top of cheesecake, tilting the pan around to spread evenly over top. Use a spatula to even out the final coating.
-
Refrigerate cheesecake in a covered dish to reduce oxidation or absorption of odd flavors from your fridge (don’t let anything touch the surface though) for 12 hours+.
When ready to serve
-
Release the spring on your spring form pan. Use a butter knife to carefully loosen between the pan and the parchment paper, then lift the side pan off the cake. Slowly pull the parchment paper off the sides of the cake.
-
Transfer your cheesecake (with pan base still on) to its final serving plate. Use fishing line held taught between both hands to mark and cut your cheesecake into perfect cuts. (You may need to clean the fishing line between cuts.)
-
Using sharp knife, carefully cut on the same lines you made with your fishing line, slicing all the way through to the bottom of the cake and through the nut crust. Slide a pie spatula/server under the crust of each piece, remove, plate, and serve. Best eaten within 48 hours of making for most vibrant color!
Whether you make this recipe to celebrate a birthday or pawpaw season, we hope you love it as much as we do. From our family to yours, happy Semana de la Tyrana!
KIGI,

Other pawpaw articles you’ll love:
- How to process and eat pawpaws
- How to grow pawpaw trees organically
- Recipe: pawpaw-passionfruit sorbet

Like what you're seeing here? Please be sure to subscribe to Tyrant Farms so we can let you know about new articles you'll love.
2 Comments
Richard
October 26, 2022 at 9:01 pmI add fruit fresh (citric acid, ascorbic acid) to my pawpaw pulp so it keeps it color longer. I haven’t had any ill affects on the flavor.
Aaron von Frank
October 27, 2022 at 10:57 amThanks Richard! Perhaps there was some other chemical reaction beyond any interaction with citric acid in the lemon juice that caused the off flavors in our pawpaw pulp. There also seems to be pretty wide variability between fruit depending on location or even individual genetics, so it’s possible the reaction was specific to the pawpaws we were using, not something that could be generalized to all pawpaw fruit. All we know is that lemon juice was the only thing we added to the pawpaw pulp. The flavor was good/normal when we put it in the fridge at night, but awful by the next morning even though it looked fine and had no visual signs of oxidation.